
In this fourth game in the Darkness and Flame point-and-click series, Alice is once again on the trail of adventure. If you’re stuck anywhere in this puzzle RPG, read on for my complete walkthrough.
Darkness and Flame 4 walkthrough – All puzzle solutions
After being sucked through the mirror, you need to find out what is going on. Is it all a dream? This guide takes you from the beginning of the game until XXX. For later parts of the game, follow the links below.
Also, note that I won’t give directions throughout this guide (except the forest section, which isn’t available on the map). There’s a handy fast travel map in the bottom right corner of the screen, which can take you to any currently available location.
Awakening
Take the Morphing Object from the bed (a1) and the Collectible from the wall (a2). Take the Poster from the shelves (a3), open the drawer (a4) to find a Hairpin, move the cushions on the bed (a1) to take the Ribbon, and grab the Ladder (a5).
Place the poster on the floor under the door, use the hairpin on the doorlock (a6) to push the key through, and then pull the poster to take the Broken Key. Reassemble the three key pieces by choosing the broken key in your inventory, then add the ribbon to finish making the Key. Now you can use the key in the door and turn it, then the handle, to open it and go through to the Corridor.

The Morphing Object is a picture on the wall (b1), and the Collectible is the butterfly on the wall (b2). Select the end of the corridor (b3) to start a hidden objects mini-game. You can’t fail these as everything you need is in the image. Just note that if something is in red text, you can’t see it yet. Once complete, you’ll receive the Parts Kit.
Select the kit in your inventory to put it together. Hover over each part until your mouse highlights one, then click it to add that part to the kit (also notice the blue shape which gives you a hint to the next piece). Once complete, you’ll have a Bee.
Add the bee to the box on the sofa (b4) to start a movement puzzle. I’ve put the solution below. Once complete, take the Crystal.
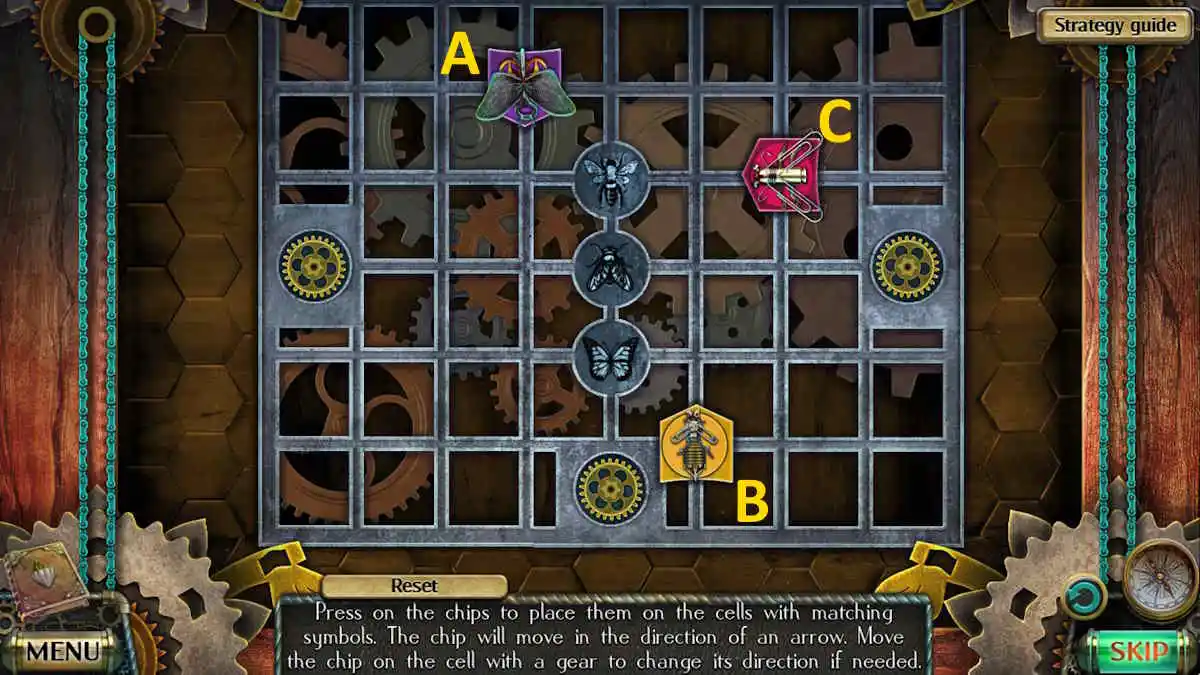
- Cx3
- A
- Cx5
- A
- C
- A
- Cx7
- Bx2
- C
- B
- C
Take the Tweezers and Matches from the pouches on the door (b5), which reveals the door handle. Open the door and note the lamps are broken, remove the broken crystal from the first one, and use your crystal to replace it. You can now head through the door and speak to your mom (click your mom to begin).
Mom
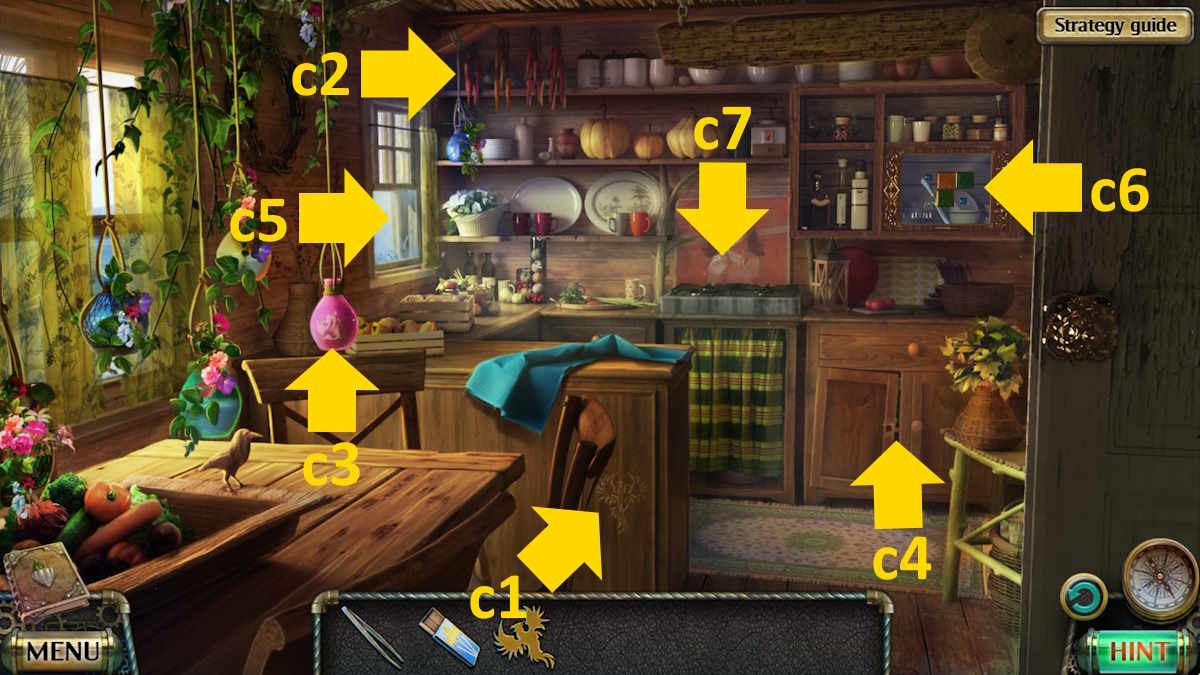
After the cutscene with your mom, you’ll receive a Key. Grab the Collectible from the wooden panel (c1) and the Morphing Object from the shelves (c2). Use the tweezers on the pink bulb (c3) to receive the musical Hint, and use the tweezers once more on the cupboard latch (c4) to open it and find a Spatula and a Ladle.
Look at the window (c5) and use the spatula to pry it open, taking the Spoon and Glass Sphere from the windowsill. Now move back to your bedroom and use the hint on the music box in the drawer (a4). Click the three notes that match the image on the hint and the box will open. Take the Puzzle Piece and the Hint from the box.
Move back into the corridor and place the ladder under the animal trophy (b6). Now you can click the trophy and use the spoon to gain a second Glass Sphere. Use the key on the door (b7) to find it broken. Click the four latches in the close-up to remove the front panel, add the hint, and then click the silver knobs until they match the pattern on the hint. The door will now open and you can go out to the Yard.
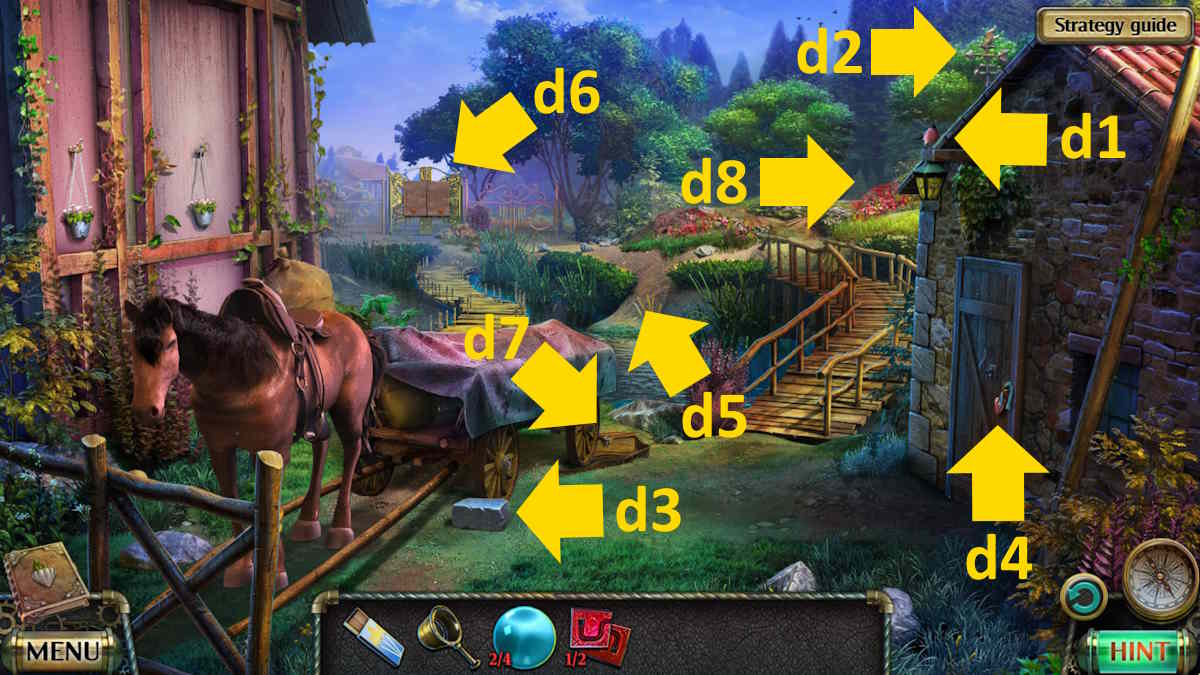
The Collectible is the bird on the lamp (d1), while the Morphing Object is on the shed roof (d2). Click the horse for a close-up and take the Brick (d3) blocking the cartwheel. Click the horse’s front legs to find it is missing its horseshoes, and then its mane to find you also need a horse collar and bridle.
Select the shed door (d4) to find a Horseshoe and use the brick to break the padlock. Click the open door to look inside and take Hammer, Rake, and Horse Collar. Back outside, select the area by the water (d5) for a close-up, and use the rake in the water to dredge up a chest. Click it until all the moss is removed, and take the second Puzzle Piece to trigger a cutscene.
Related: Lost Lands 9 Walkthrough – Full Guide
Memory Flashback
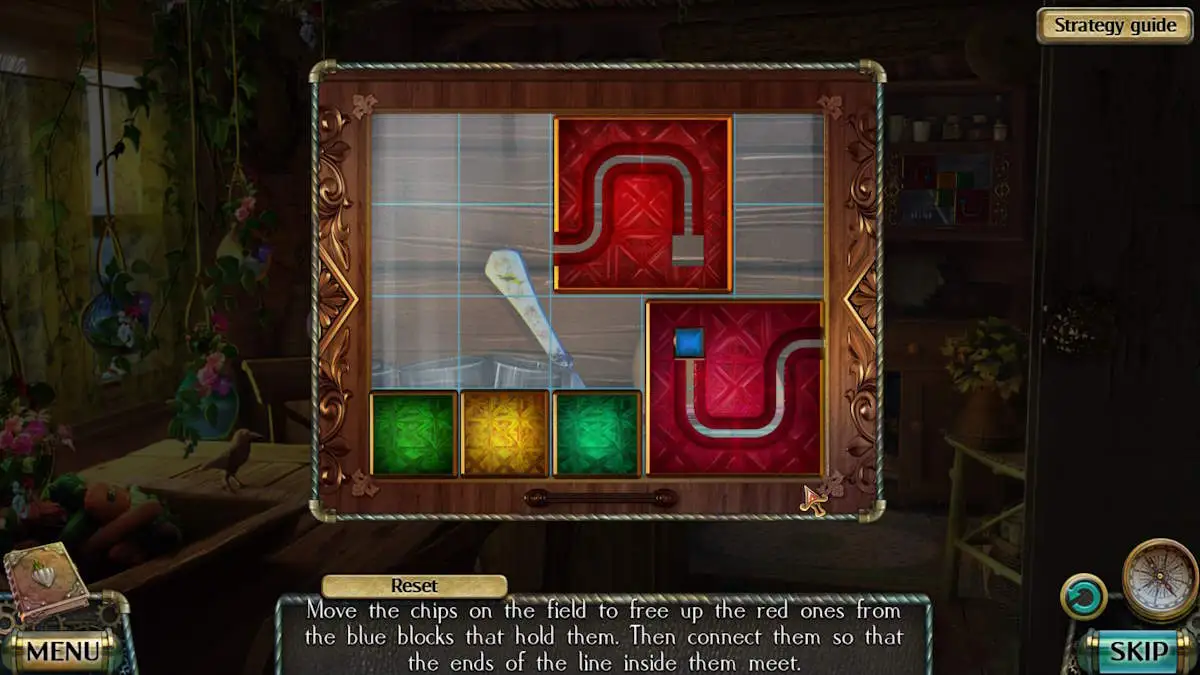
Click the gate (d6), move the rocks in the close-up to find the second Horseshoe, and then go back to the kitchen. Add the two puzzle pieces to the wall cupboard (c6) to start a movement puzzle. If you need a hint for this one, move the three small squares to the positions indicated above, then move the left red box to the position shown to free the first small blue square.
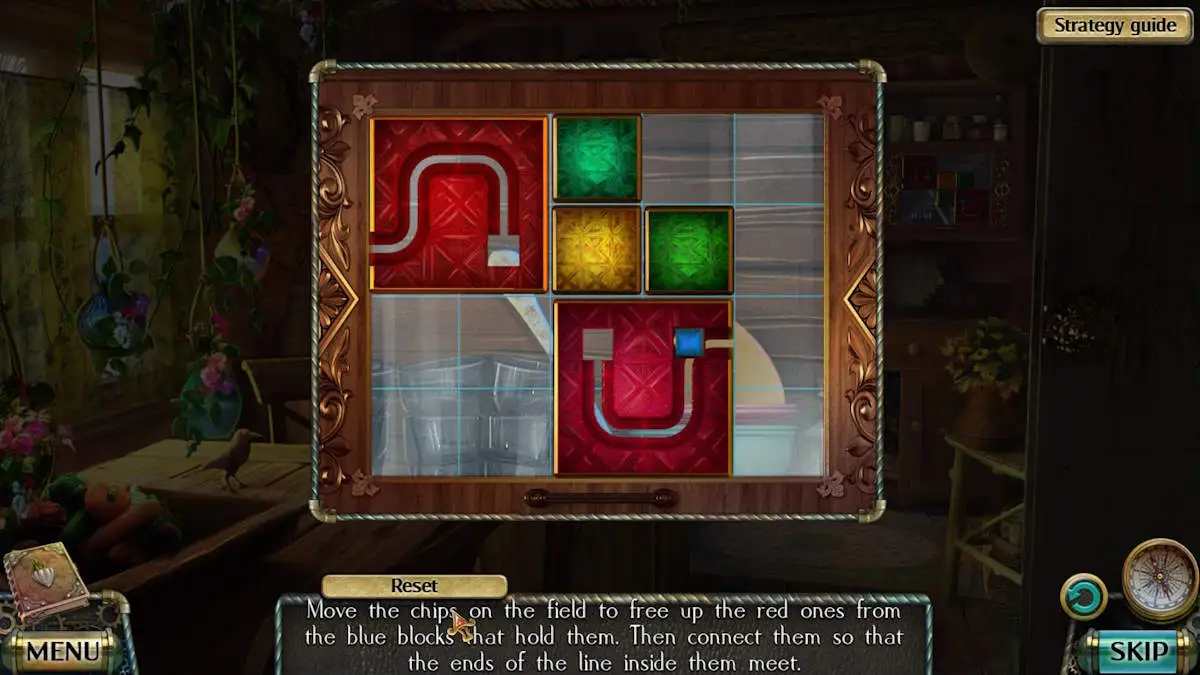
To free the second blue square, move the pieces to the positions above. Finally, slide the two red pieces so that the silver line in them joins up, and the cupboard will open. Take the Knife. Move into the corridor and use the knife to free the Bridle (b8).
Look in the shed in the yard (d4) and place the ladle under the red resin on the right side of the close-up. Now you can use the knife on the resin to free it from the wall, knocking it into the ladle to get a Ladle Full of Resin. Put the ladle on the stove in the kitchen (c7), click the right cooker button, use the matches to light the stove, and then take the Medallion from the ladle.
Select the horse, add the horseshoes, click the nails (on the floor in the close-up) to add them, and then use the hammer to secure them. Add the horse collar, then click the two poles on the floor in the same close-up to attach the cart. Add the bridle and the horse will move forward, giving you access to your bag (d7). Use your medallion to open it and take the Diary (it won’t appear in your inventory) and the Gate Handle.
Use the gate handle on the gate (d6) to start a movement puzzle. This one is tricky, as when you move a colored piece it also moves on the other side of the puzzle. The solution is below if you’re stuck.
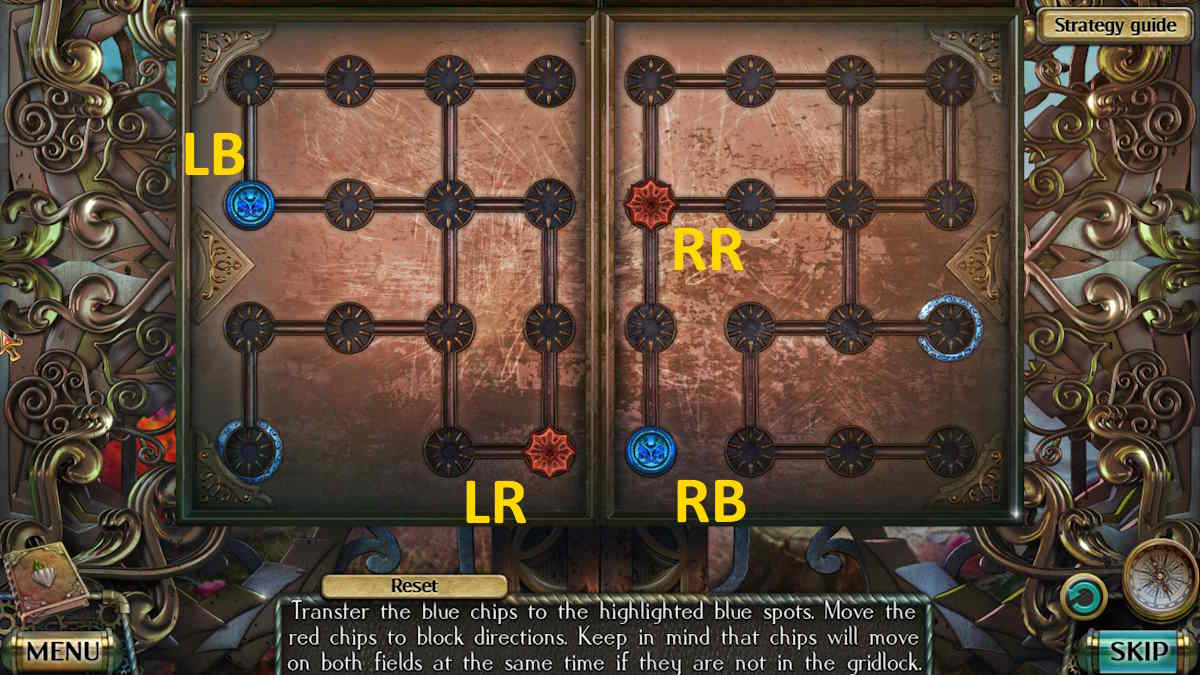
- LR up
- LB right
- LR down and then left
- LB down and then left
- RR up, then right, and then down
- RB up
- RR left
- LB down
- RR right and then up
- RB right, then down, then right
Once complete, the gage will open. Head through the gate to Colin’s yard.
Camilla
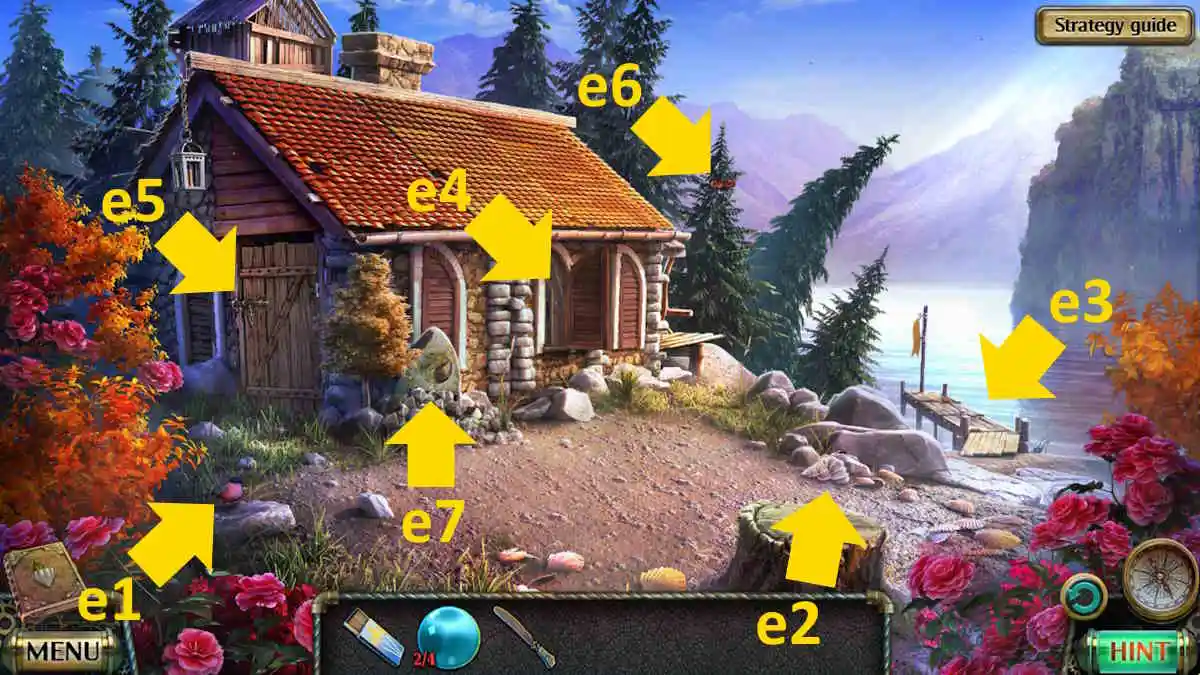
After a long cut scene, take the bird Collectible (e1) and the Morphing Object from above the treestump (e2). Get the Clay from the jetty (e3), then click the door (e4) to go inside Colin’s house.

The Collectible is on the roof beam (f1) and the Morphing Object is on the floor (f2). Take the Hook by the door (f3), then use the knife to open the metal cabinet (f4) and take the Lubricant (you’ll also get a Dull Knife back). Take the Bear Figurine from the music box (f5), and then head back outside to the yard.
Related: AE Mysteries Picture Perfect walkthrough
Use the lubricant on the rusty door bolt (e5), taking the Hoe and the Ski from inside the shed. You can now use the ski in the jetty close-up (e3) to flip the diver helmet and take the Mousetrap from inside. Use the hook in the trees (e6) to take the Tied-up Package, and then open it in your inventory to find your second Bear Figurine and a Rag.
Head back into Colin’s house and add the bear figurines to the wall safe to open it and find Stain Remover. Take it to the yard next, use the rag and stain remover to clean the stone (e7), and use the clay on the pattern. This opens a drawer below, where you’ll find a Lever (you also take the Cast of the pattern).
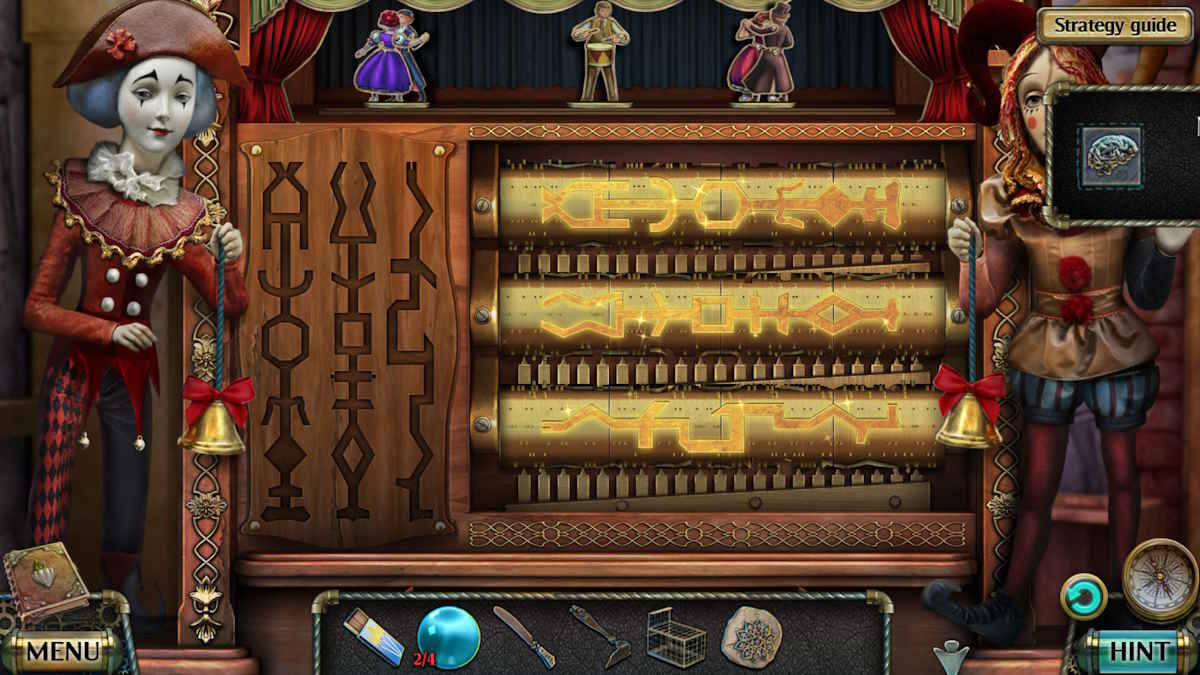
Go back into the house and use the lever on the music box (f5), then turn the handle to start a pattern-matching puzzle. Once complete, it should look like the image above. Take the Key. Head back to your house, only to see your mum being kidnapped!
Kidnapping
Select the shed (d4), put the mousetrap on the floor, and use the grain sack already in the clock-up to bait the trap. Take the Mouse. Go into the corridor and use the mouse to make the cat chase it, allowing you to take a third Glass Sphere from the chair (b4). Now go back to the yard and follow the kidnappers along the forest path (d8).
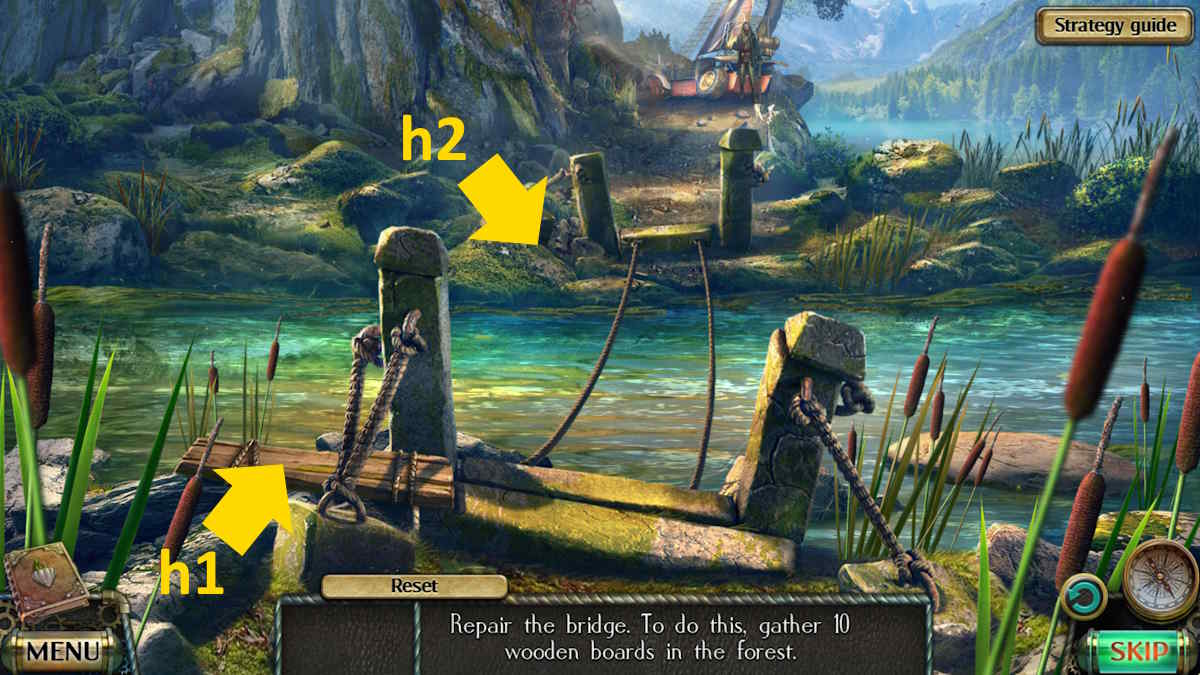
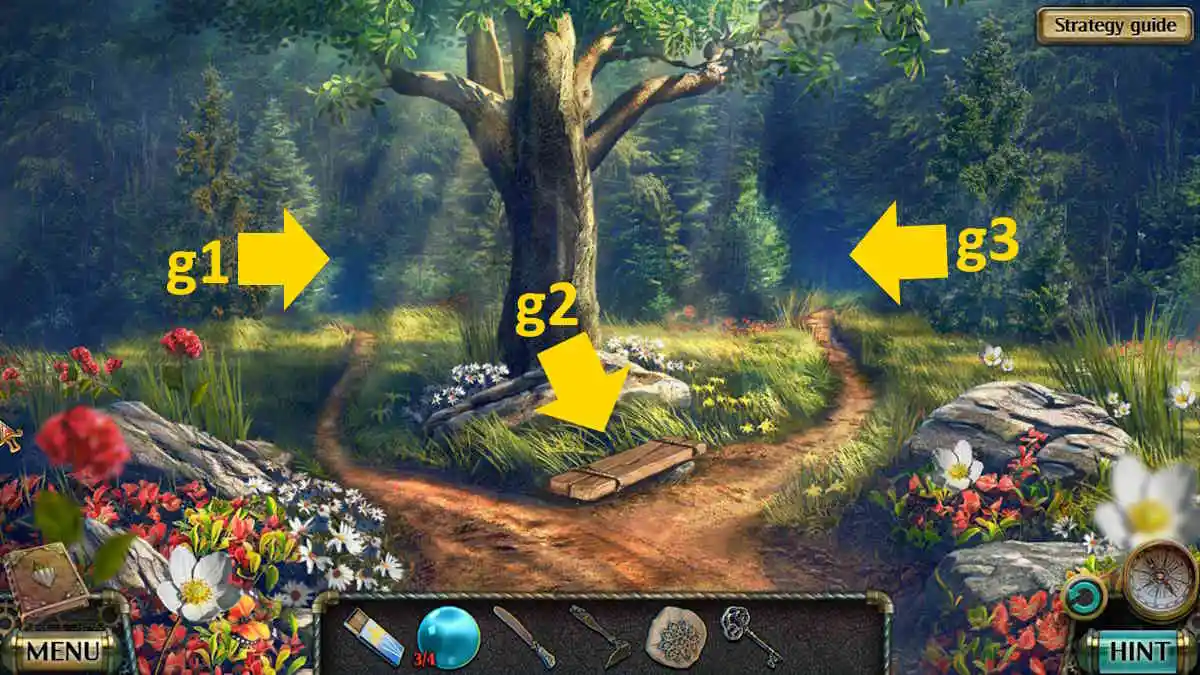
Once in the forest, take the left fork in the path (g1) to come to a broken bridge. You need 10 pieces of wood to fix it. Take the first Wooden Board from next to the bridge (h1), then move back to the entrance to the forest and take a second Wooden Board (g2).
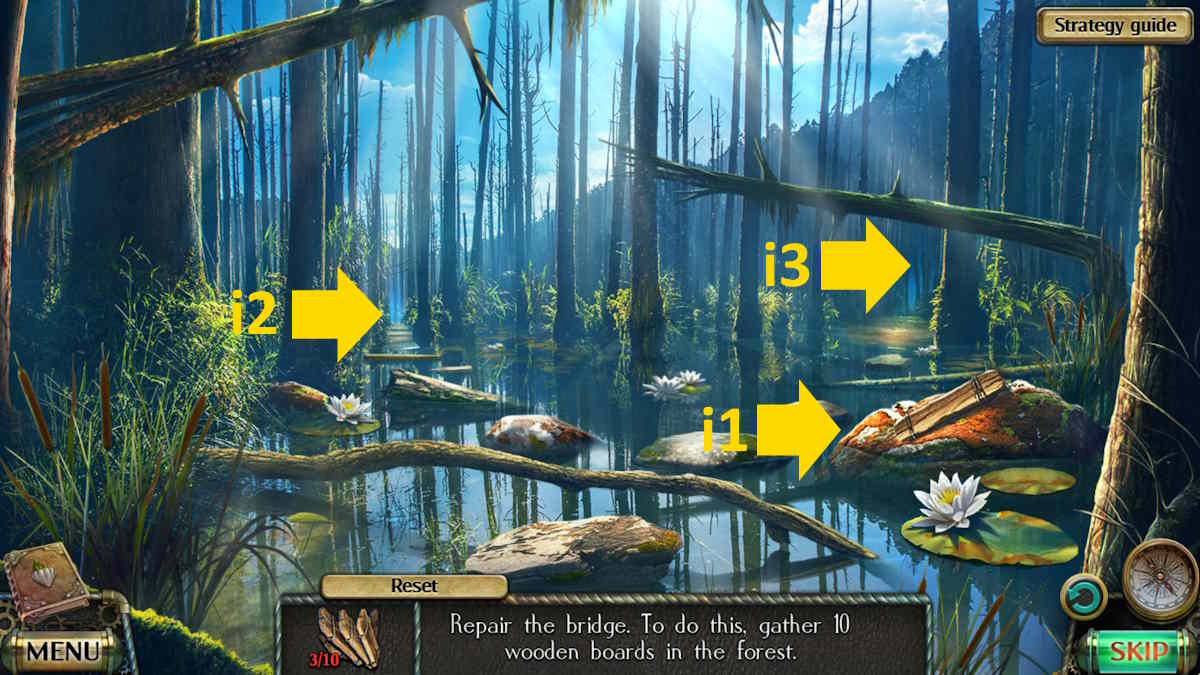
Take the right path here (g3) and take the third Wooden Board before continuing down the path. Clear the moss from the rock (i1) to find your fourth Wooden Board then continue forward down the left path (i2).
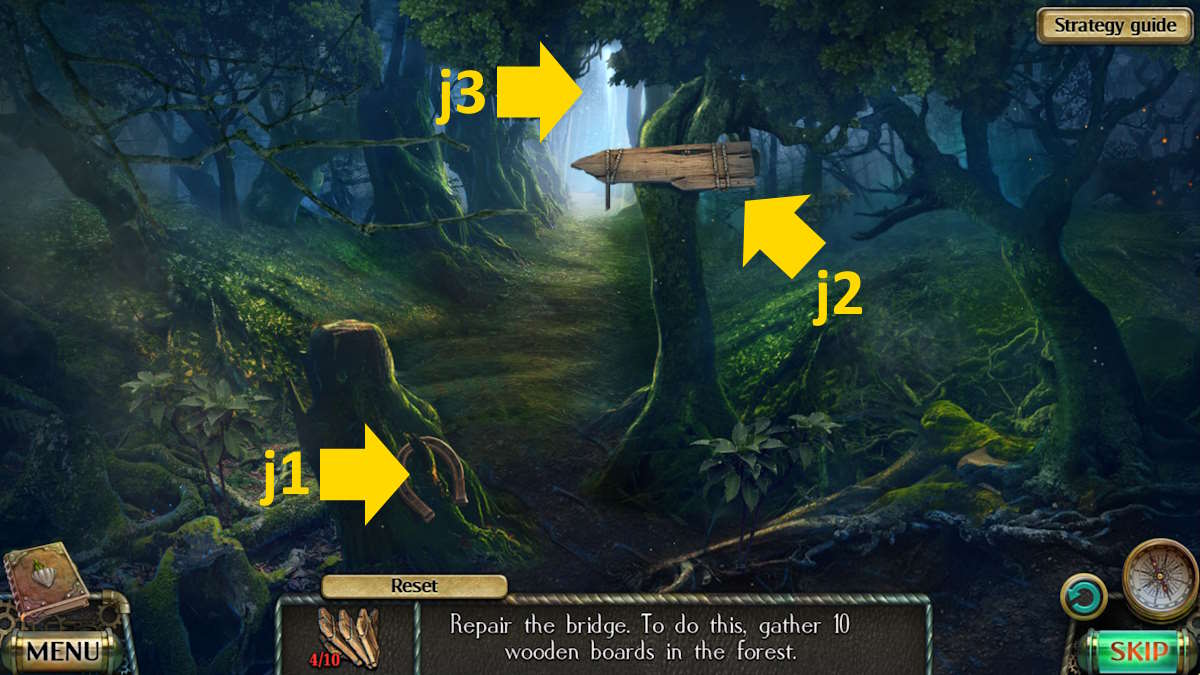
Use the Horseshoe (j1) to knock down a fifth Wooden Board (j2) and then continue forward (j3). Take the sixth Wooden Board from the tree in the middle here (k1), then go left once more (k2).
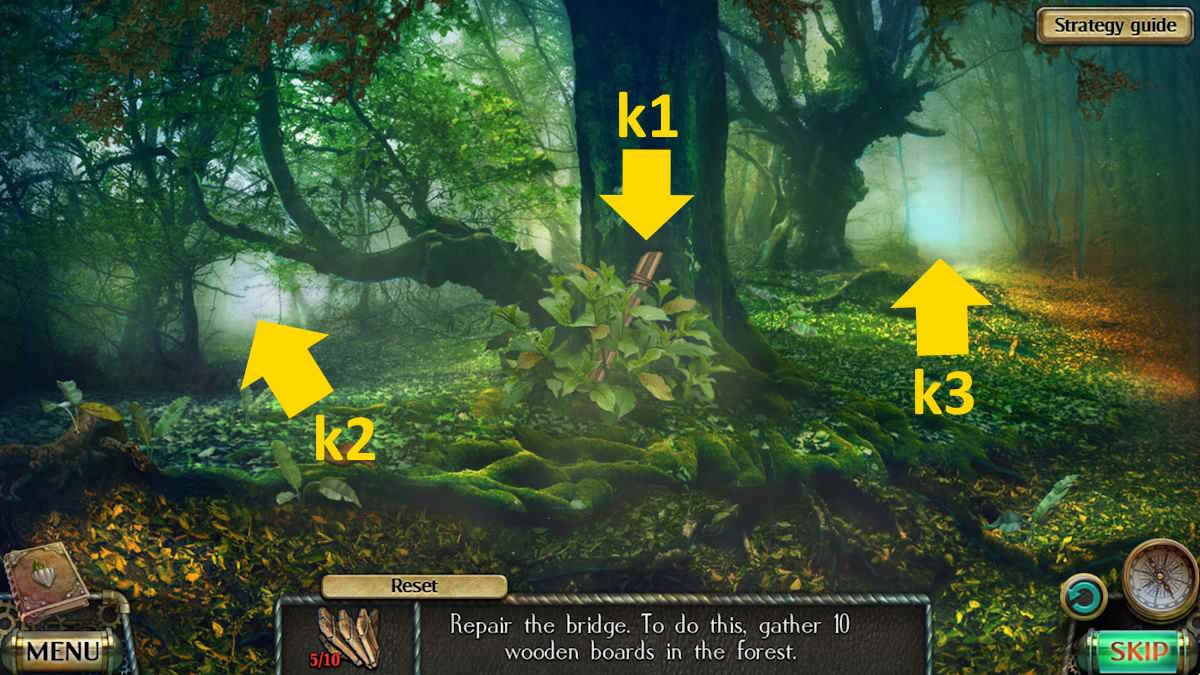
Use the piece of Slate (l1) to dig up your seventh Wooden Board (l2), then move back down the path and take the right fork (k3). Take the eighth Wooden Board from there, then move back three steps to the swampy scene and take the right fork (i3).

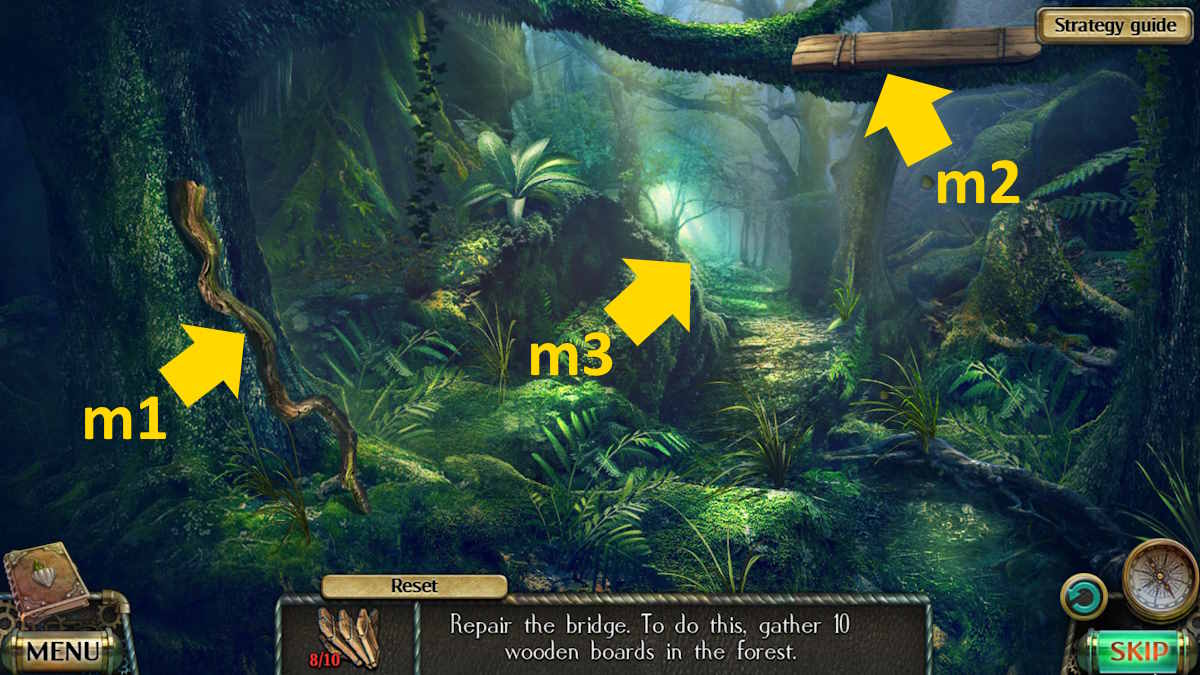
Use the Stick (m1) to knock down and collect your ninth Wooden Board, then continue down the path (m3). Take your final Wooden Board there, and return to the Forest (you can use the map again now). Add the boards to the bridge (h2) and continue to the road.
Fixing the vehicle

After a cutscene with the driver, you’ll receive a Wrench. You can spot the Collectible on the rock face (n1), while the Morphing Object is on the path (n2). Grab the Board (n3), Ship in a Bottle (n4), and then move the twigs (n5) to get your fourth Glass Sphere. In the same close-up, place the board on the rocks here to start a missing objects mini-game (n6). Once complete, take the Wheel.
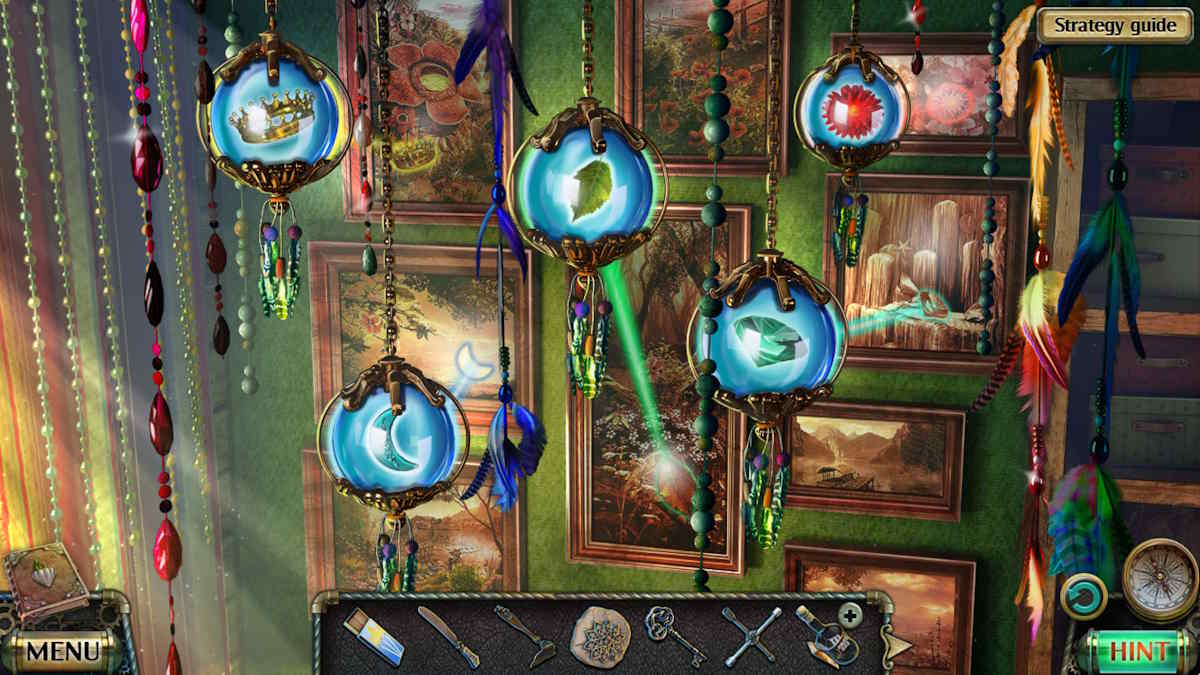
Now you need to go right back to your bedroom and add the glass spheres to the hanging ornament (a7) to start a matching puzzle. If you’re stuck, note you click the top of each sphere and swap them around (you need to swap the two on the left with each other, and the two on the right with each other). Note the highlighted images.
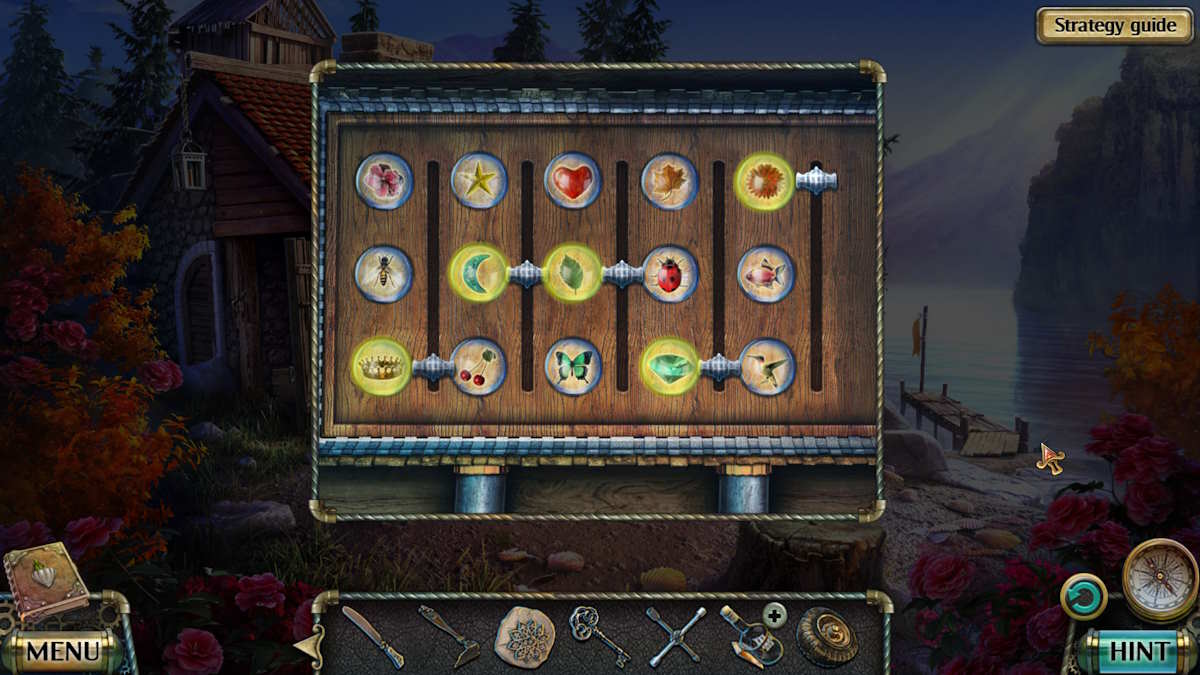
Go to Colin’s yard next, select the shed (e5), and click the puzzle box inside. Change the switches so that the images from the previous puzzle are highlighted (see the image if you’re stuck) and then take the Jack.
Return to the broken vehicle, use the jack to raise it, then click where the missing wheel should be (n7) for a close-up. Add the wheel, use the wrench to tighten it, and the vehicle will be fixed. When it is back upright, you’ll notice you can now access a trunk at the base of the tree (n8). Clear the leaves from the lock in the close-up, use the key to open the trunk, and take the Gardening Scissors from inside.
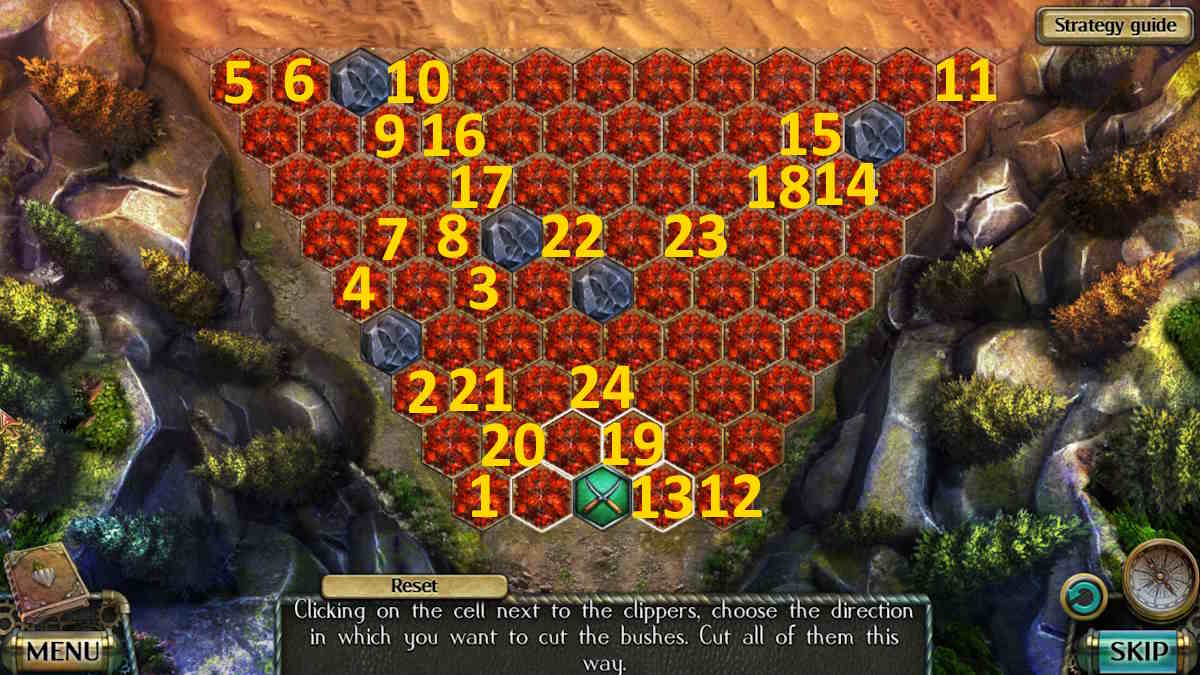
Use the scissors on the weeds blocking the road (n4) to start a puzzle. You need to clear all of the weeds to complete the puzzle. I’ve marked all spots to move to (each time in a straight line from the last marker) on the image above if you’re stuck (the last two are obvious). Once complete, enjoy the cutscene.
That’s it for part one of my walkthrough. To continue the journey with us here at Pro Game Guides, click through to our Darkness and Flame 4 walkthrough, part 2 – Enemy in Reflection.


")
