
The fourth installment in the Darkness and Flame point-and-click puzzle RPG series sees you once more taking on the role of Alice, our intrepid adventurer. If you’re around the middle of the story, read on for part 3 of my Darkness and Flame 4 walkthrough.
Darkness and Flame 4 walkthrough, Part 3 – All puzzle solutions
This section of my Darkness and Flame 4 walkthrough covers the story from when Alice discovers that people are trapped in the town hall in the settlement, up until you complete the diorama puzzle in the gorgon’s crypt. If you’re looking for earlier or later parts of the story, instead head over to my Darkness and Flame 4 walkthrough – Enemy in Reflection hub page. There you can find links to all parts of the game, including all puzzle solutions and item locations.
Entering the town hall
The Collectible is on the fence (a1) and the Morphing Object is on the steps (a2). Take the Handle and the Golden Key from the chair (a3), and the Hatchet from the control hut in the distance (a4). In that same close-up, use the hatchet on the tree there to gain Yew Wood.
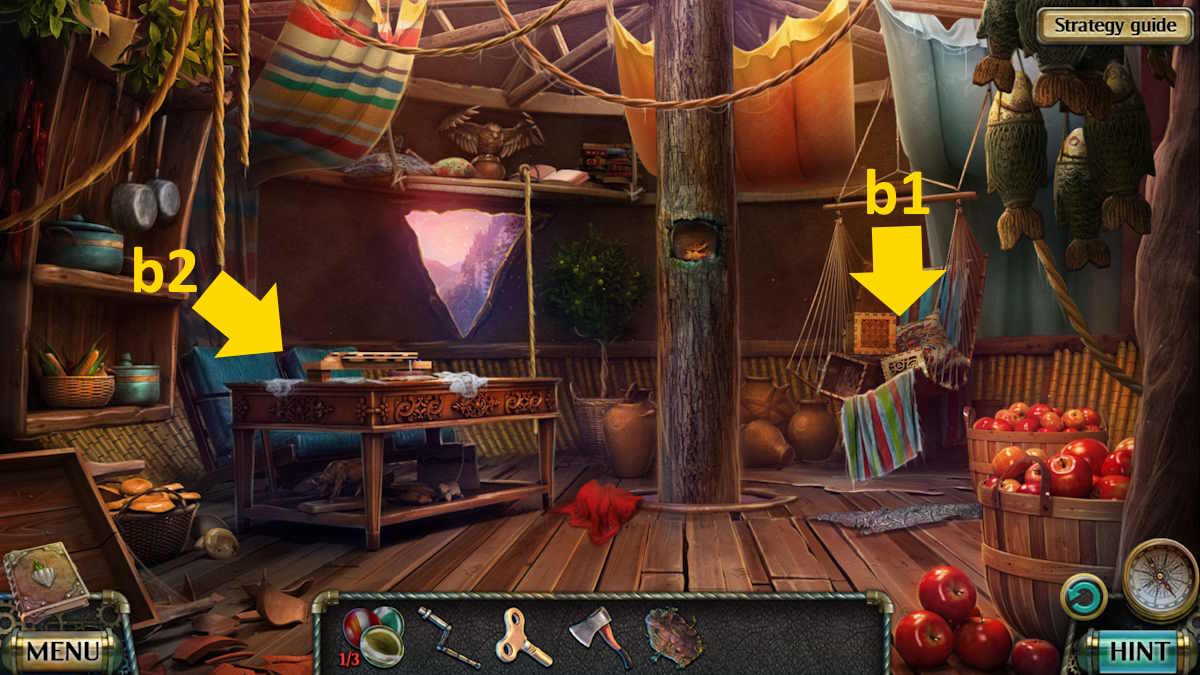
Head back down to Roger’s house and use the golden key on the gold box on the chair (b1) to open it and take a Lever. Now select the workbench (b2) and add the yew wood. Copy the pattern for the town hall yew key, tracing a single line. Start from the top outside dot, draw all around the outside, then go into the middle and draw the star. Once complete, take the Key to the Town Hall.
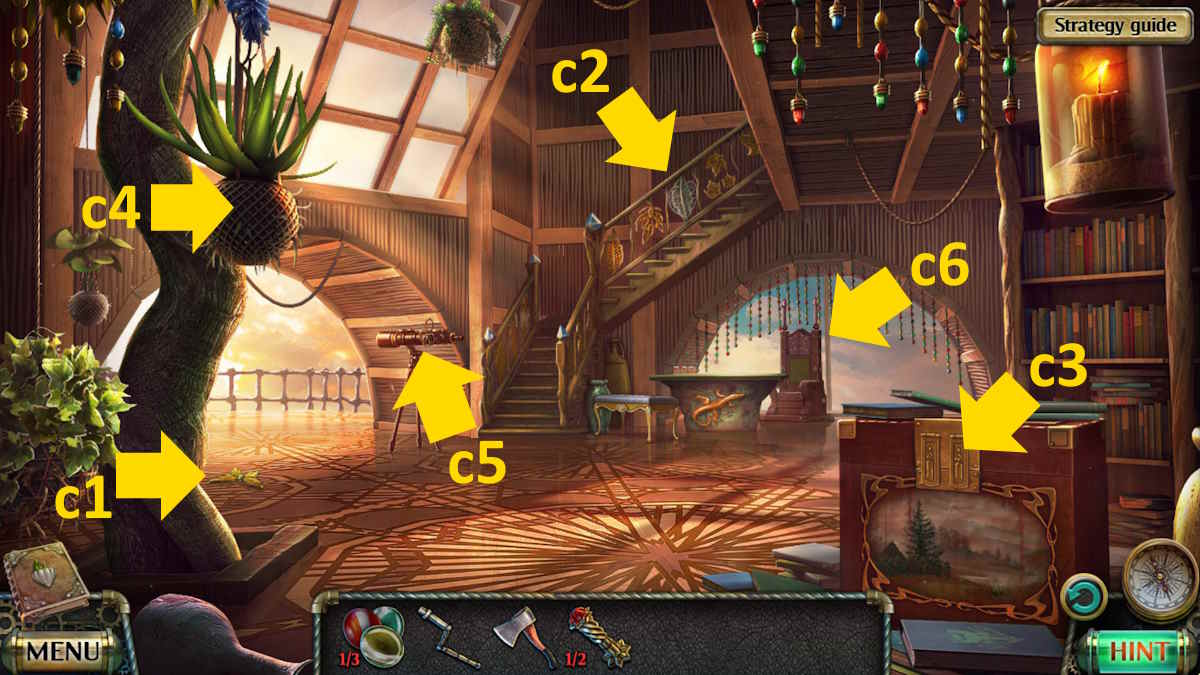
Use the key on the town hall door (a5) and then head inside. After the cut scene, you’ll find the Collectible on the floor (c1) and the Morphing Object on the staircase (c2), where you’ll also find a Bronze Key. Use the bronze key back in Roger’s house to open the final box (b1), taking a Lens and a Lever from inside.
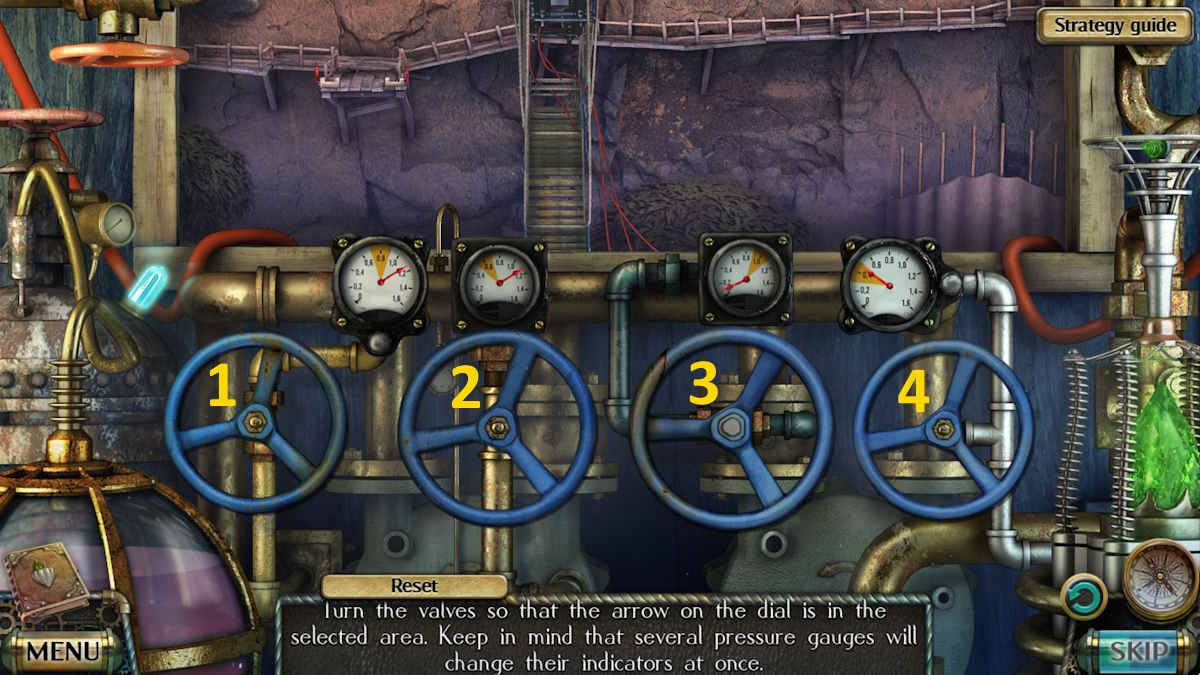
Back in the town hall use the levers to open the box (c3) and take the Valve. Return to the control hut (a4) and add the valve to the control mechanism to begin a pressure puzzle. To complete it, from a reset, turn the dials in the following order:

Once you arrive at the old part of the settlement, you’ll find the Collectible above the door (d1) and the Morphing Object on the floor outside the door (d2). Take a Belt from the tree (d3), and then use the hatchet on the tree to get a piece of Ash Wood. Use the belt to tie back the branches blocking the door (d4), then head back to Roger’s house.
Related: Lost Lands 5 Walkthrough
Awakening Albert
Place the ash wood on the desk and follow the pattern to make a Key for Albert’s House. I started on the center dot, did the left side of the pattern (inner part first), and then completed the right side to finish back in the middle. Take the Arboreal Key. Use the key to open Albert’s door (d4) and head inside.
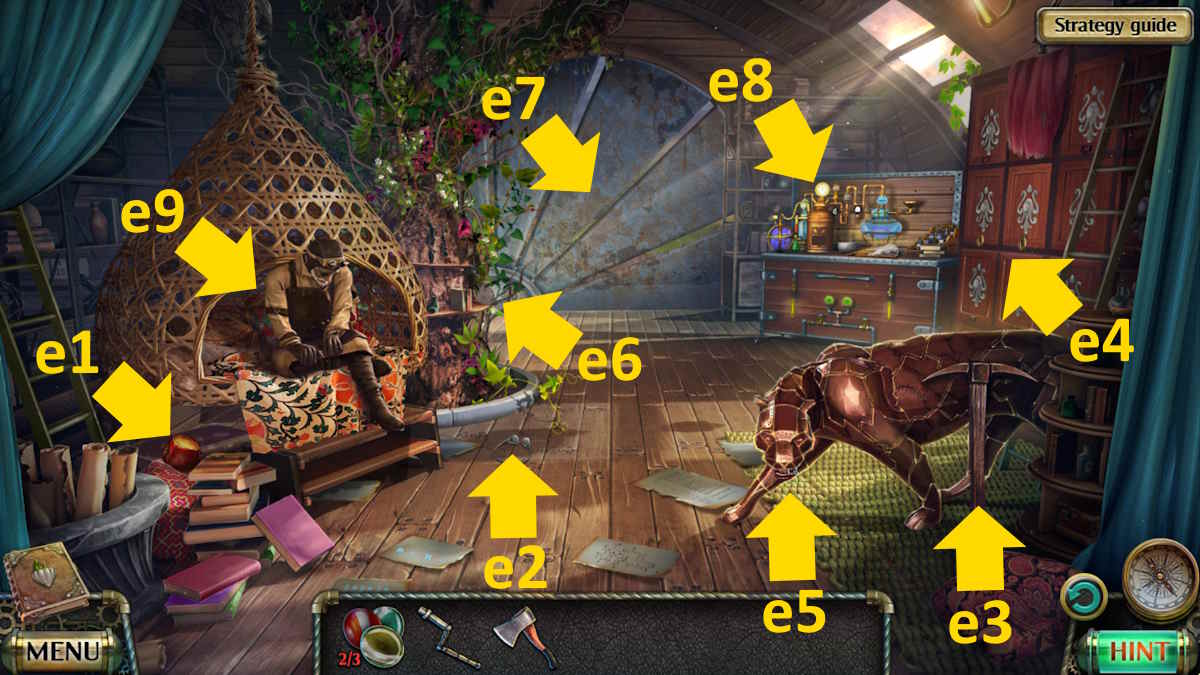
The Collectible is by the books on the left (e1) and the Morphing Object is in front of Albert’s chair (e2). Take the Pickaxe (e3), then open the top drawer (e4) to find a Screwdriver. Use it on the model (e5) to loosen the mouth and take the Key. Use your handle on the door device (e6) to open it, and take the Basket from outside (e7).
Use the key to open the remaining draws (e4) and take the Awakening Pollen Recipe, Empty Spray Bottle, Square Valve, Pot, Empty Jar, and Flask. Use the pot to gather some Poison From the River (e7), then take the Fan from the workbench (e8). You can also add the empty jar and poison to the recipe in your inventory to unclutter it.
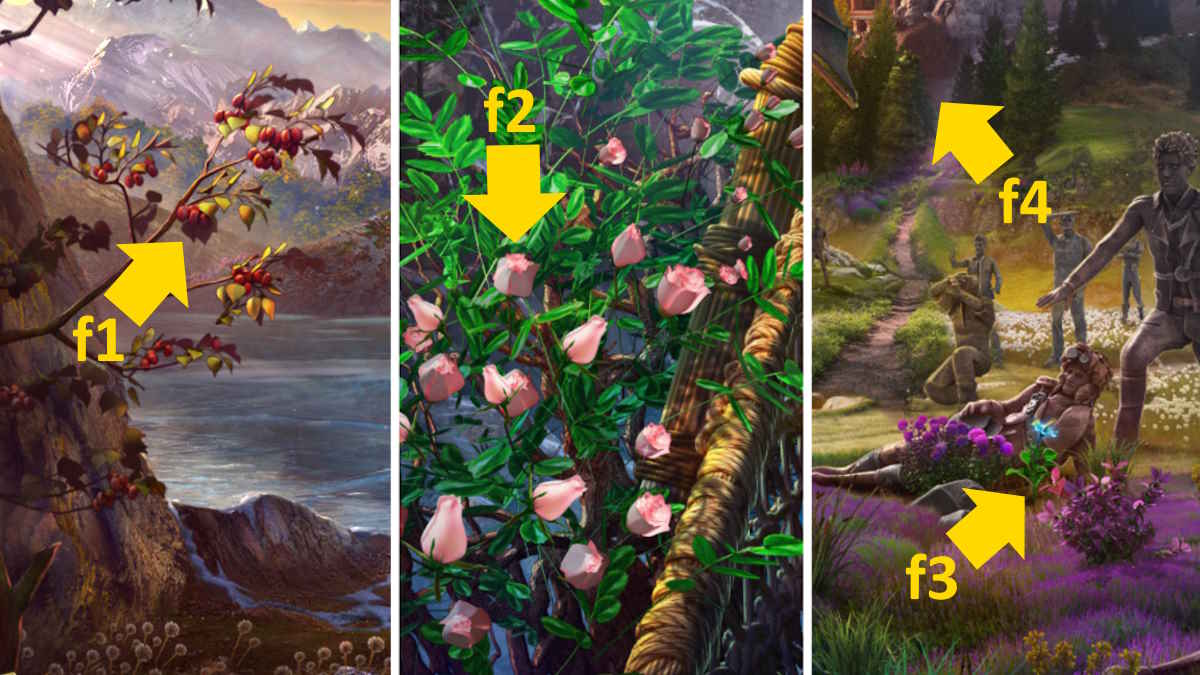
Now you need to collect the rest of the ingredients. Go to the frozen lake and use the basket to get the Red Berries (f1), then to the town hall and use the flask to get the Aloe Juice (c4). You can add both of these to the recipe too.
Collecting the ingredients
Now move to the central part of the settlement and use the pickaxe on the rocks (a6), use the hatchet to get some Amaranth Wood, and then go to Roger’s house and make the Key for the Plumber’s House using the amaranth wood. Take the Arboreal Key, go to the plumber’s house (d5), and head inside for a missing objects mini-game.
The ropes order (numbering them left to right) is 5, 4, 5, 1, 4, 5, 3, 1, 4, 5, 2, 3, 1, 4, 5. The shapes need to click refers to the number of sides, so it is middle-bottom, top right, and then top left. To complete the sliding puzzle, use the image below. On completion, you’ll receive a Lever Arm.
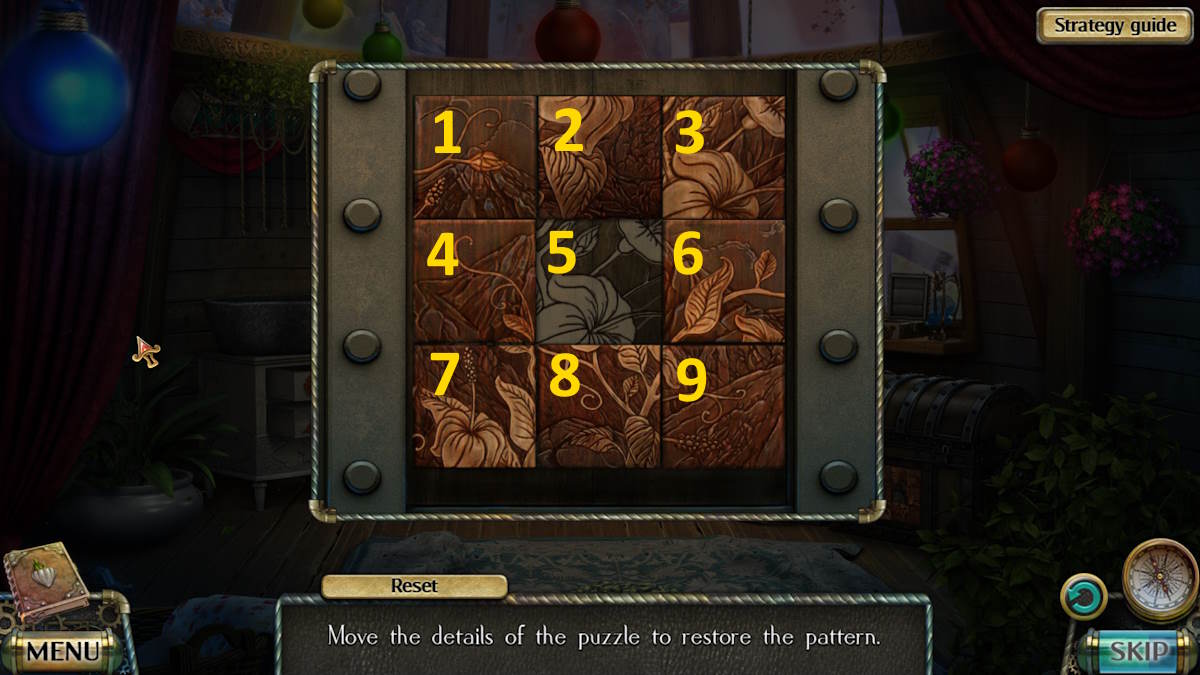
- 2, 1, 4, 5, 6
- 3, 2, 5, 4, 7
- 8, 5, 6, 9
Add the lever arm to the tap (d6) and use the empty spray bottle in the water to get a Spray Bottle. Select the mobiles for a close-up (d7), add the valve, and use it to turn the mobiles. Now click the small house to start a mini-game. You can’t fail here because the items are highlighted as you move the mouse over them. Once complete, take the Reaping Hook from behind the door.
Now you can move to the bridge (f2), spray the flowers with water, and then use the reaping hook to collect the Red Rose. Finally, move to the meadow and use the reaping hook to gather a Somnolent Flower Bud (f3). Add both flowers to the recipe to receive the Basket With Ingredients, and return to Albert’s house.
Add the ingredients to the workbench (e8) and follow the instructions to make the pollen.
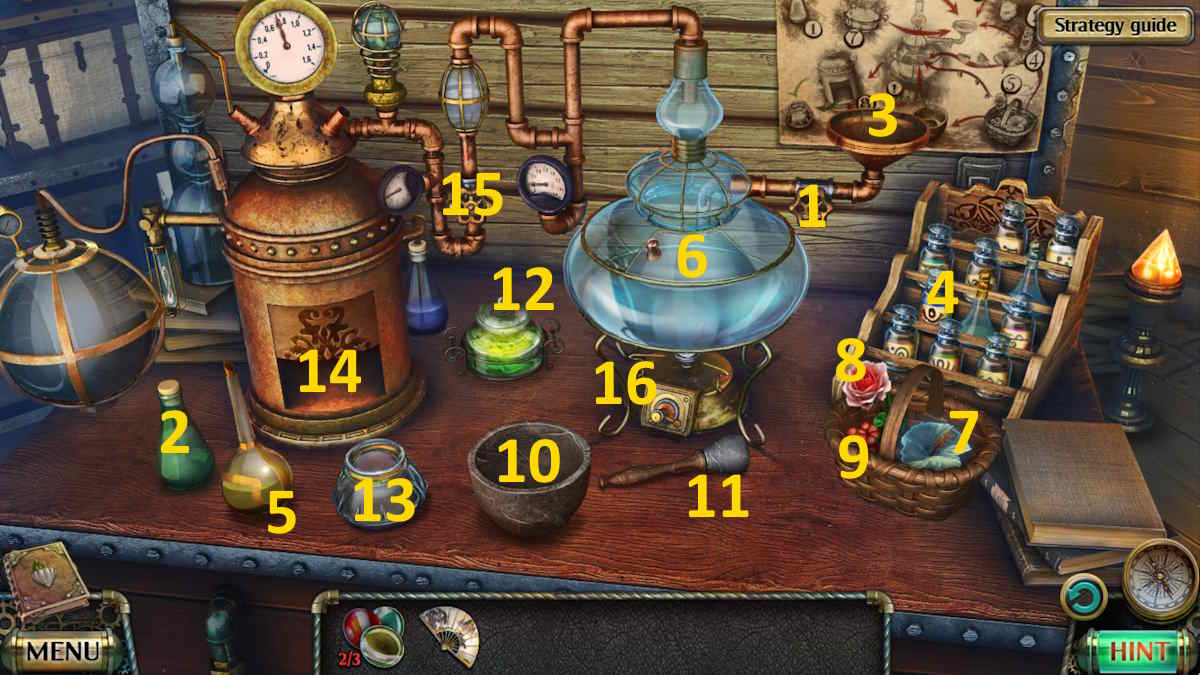
- Turn the gauge (1)
- Add 2 to 3, 4 to 3, and then 5 to 3
- Open the hatch (6), and add 7 followed by 8
- Place 9 in 10, use 11 on 10, then place 10 in 6
- Place 12 in 6, 13 in 14, and then shut 14
- Tuen 15, turn 1, close 6, and turn 16
- Take the Jar with Wake-up Pollen
Select Albert on his chair (e9), add the pollen, and then use the fan to wake up Albert.
Going to the gorgon’s temple
Now that Albert has moved, select his chair (e9) and move the cushions to find your third Lense. Go to the town hall, watch the cut scene, and receive the Cup Shaped Key. Add the lenses to the telescope (c5), and note the pattern (middle left, third from left on the top row, and bottom right). Select these buttons on the cabinet (c6) to open it.
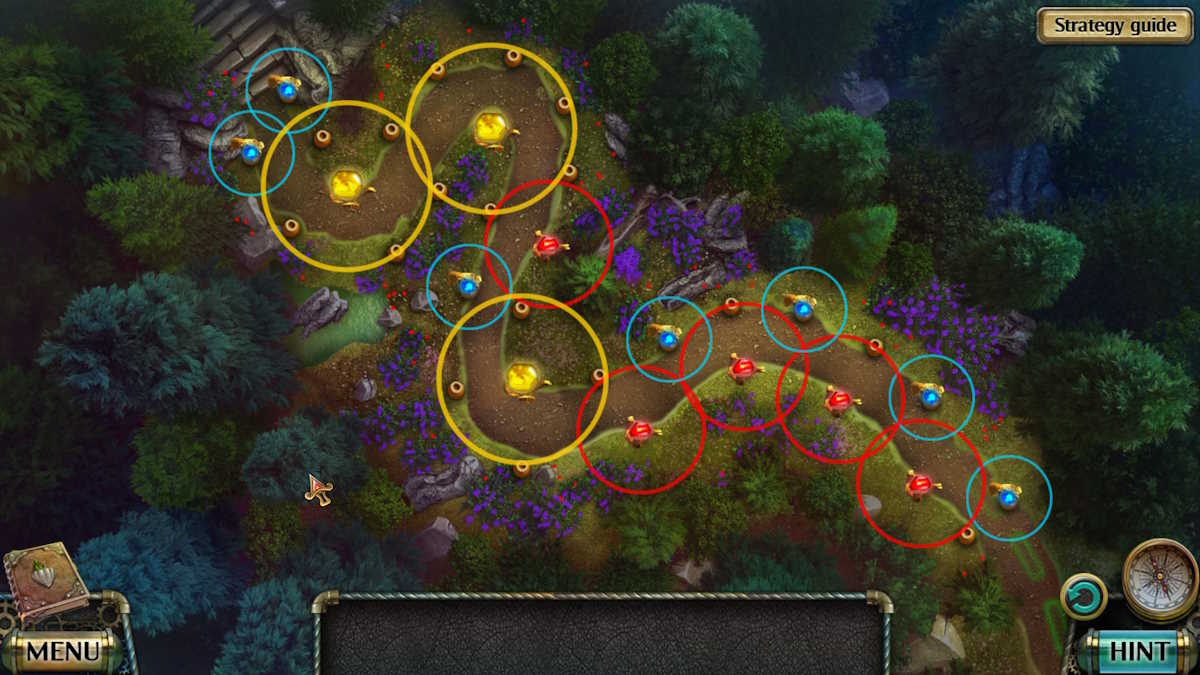
Add the key to the unseen door (c2) to start a missing objects mini-game. Once complete, take the Crystals. Go to the meadow, select the crystals in your inventory, and click the path into the forest (f4) to start an illumination puzzle (see the solution above). Once complete, you’ll arrive at the snake temple.
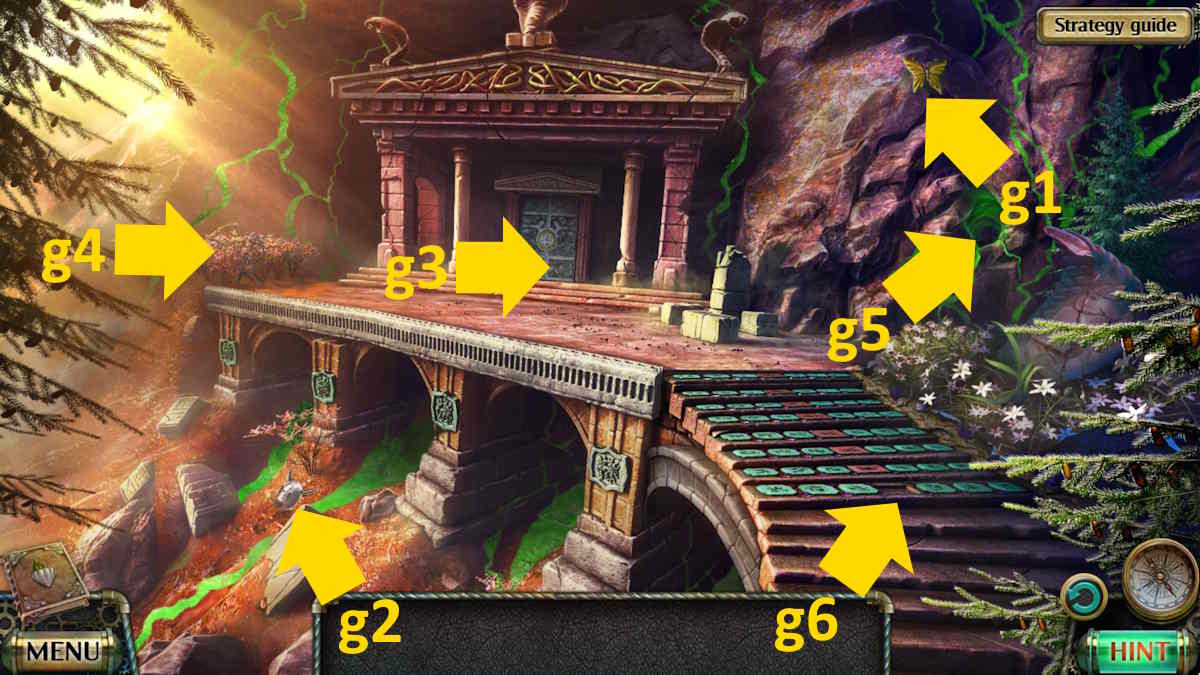
The Collectible is on the cliff face (g1) and the Morphing Object is on the slope (g2). Examine the temple door (g3), remove the Twisted Fork, then select the bushes (g4) to find a Liana and a Snake Key. Use the liana to recover the Handle (g5), and then use the handle to open the temple door. Head inside.
Get to the library
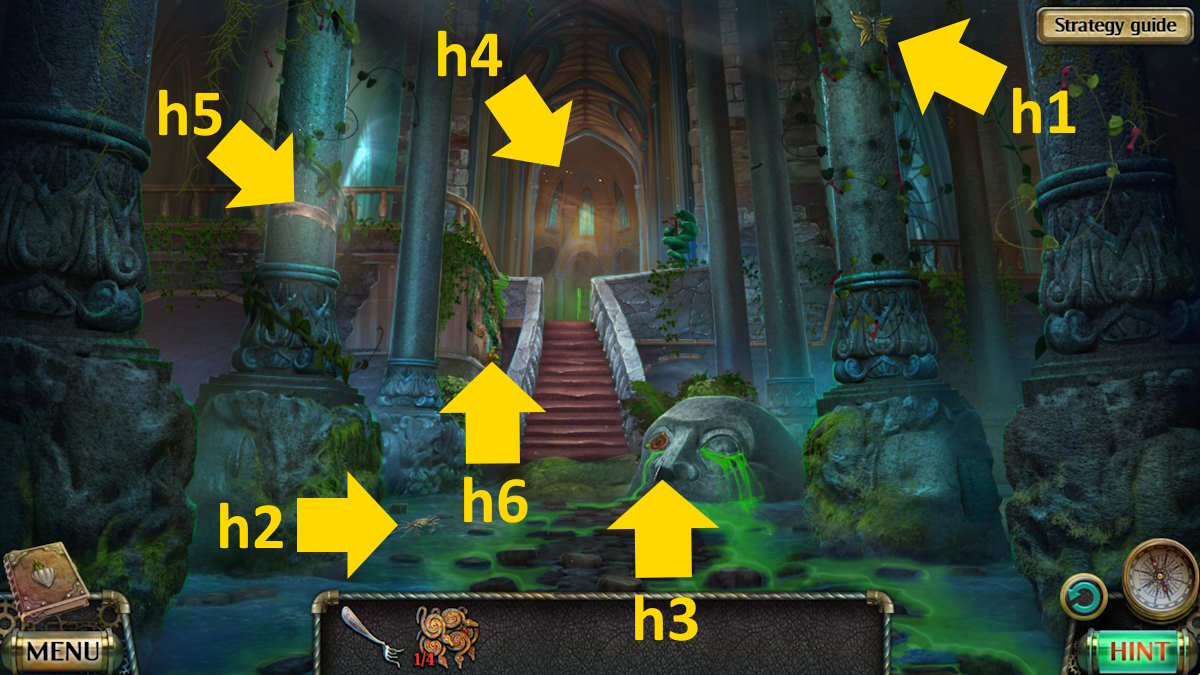
Take the Collectible from the pillar (h1), the Morphing Object from the floor (h2), and the Poker from the head close-up (h3). Move forward to the central hall (h4).
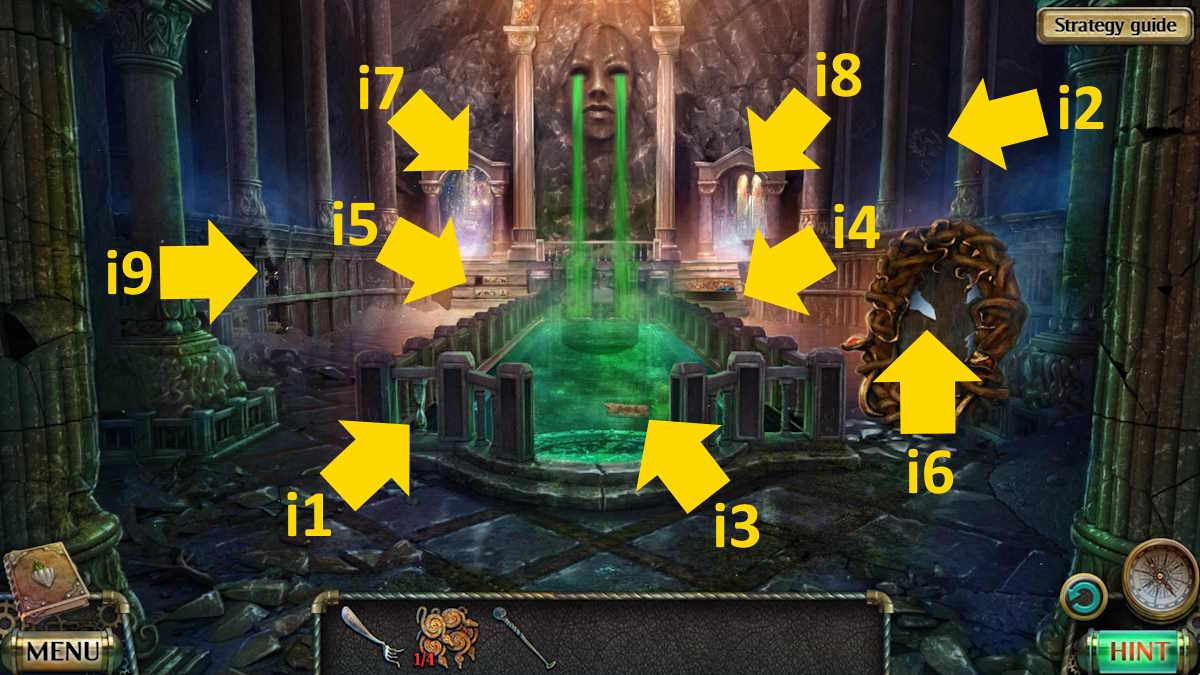
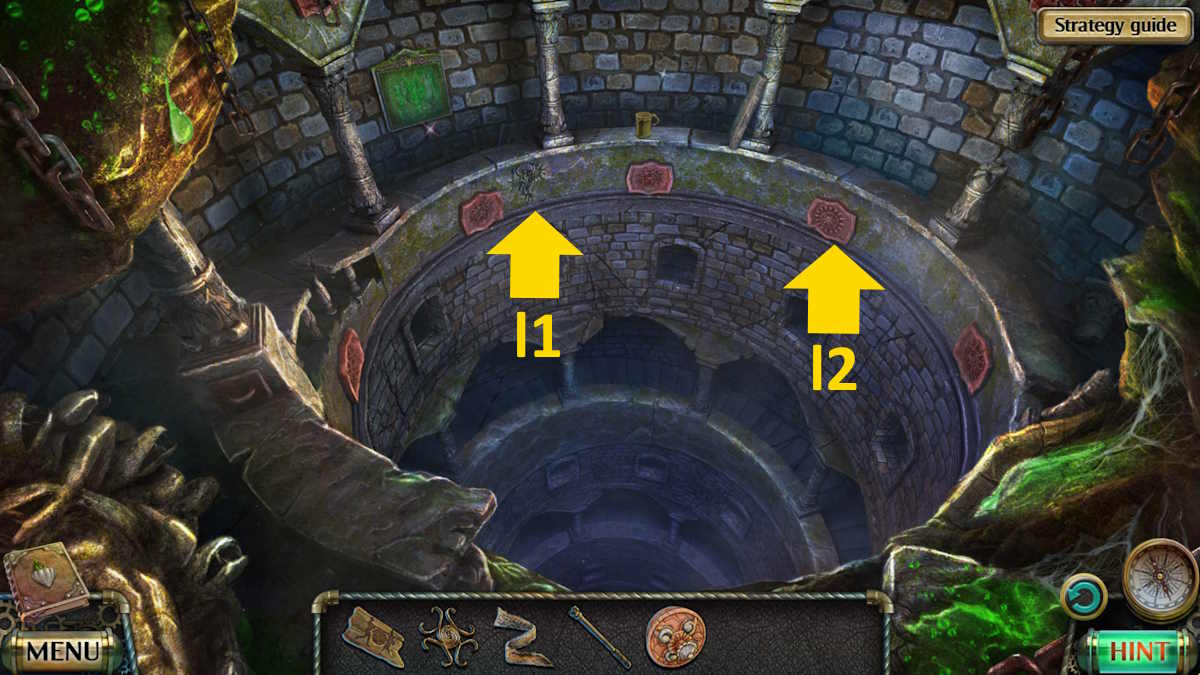
The Morphing Object is one of the stone struts (i1), while the Collectible is on the righthand wall (i2). Use the poker to retrieve the Tablet With Engraving (i3), take the Garden Glove (i4), use the fork to get the Forged Symbol (i5), take a Mirror Fragment (i6), and then head back to the foot of the temple.
Use the mirror fragment to collect the Strip of Fabric (h5), and then use the glove to remove the ivy (h6). Move back into the central hall and head into the room on the left (i7).
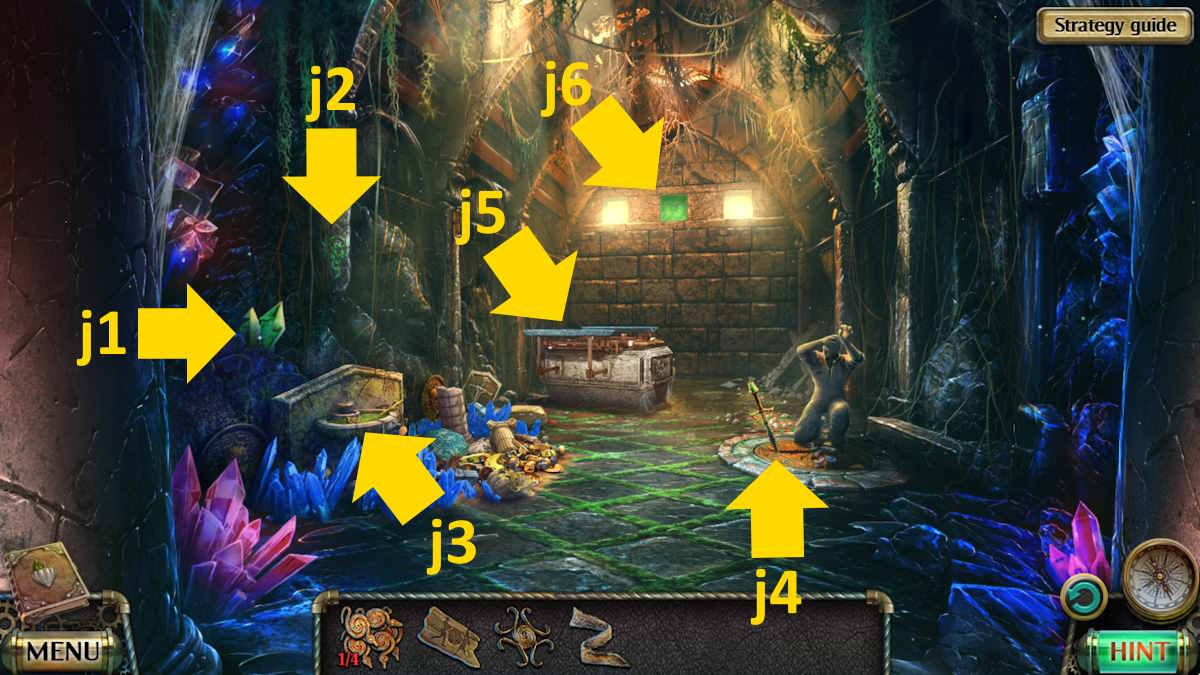
Take the Morphing Object on the left of the room (j1), and the Collectible on the wall just above it (j2), and then select the stash to start a symbol activation mini-game (j3). Once complete, take the Snake Key.
Select the sword (j4) to find a Solar Charm and some Stones, and then add the stones to the mechanism (j5) to find a Lever, a Metal Brush, and a button. Press the button to access the wall above (j6), where you can place the solar charm to find another Snake Key and a Puzzle Piece.
Related: Abandoned Walkthrough & Puzzle Solutions
Back at the foot of the temple, use the brush to clear the moss (h6), then click the third clay circle from the left and take the Clay Key (this also opens a compartment in the pillar to the right of the head).
Head to the central hall and add the puzzle piece to the steps (i5) to start an odd-one-out puzzle. The animals to select are the second ones from the left in each row (the rabbit and the tortoise). This shuts off the flow of poison from the left eye. Now head through the righthand door (i8) into the abandoned library.
The abandoned library
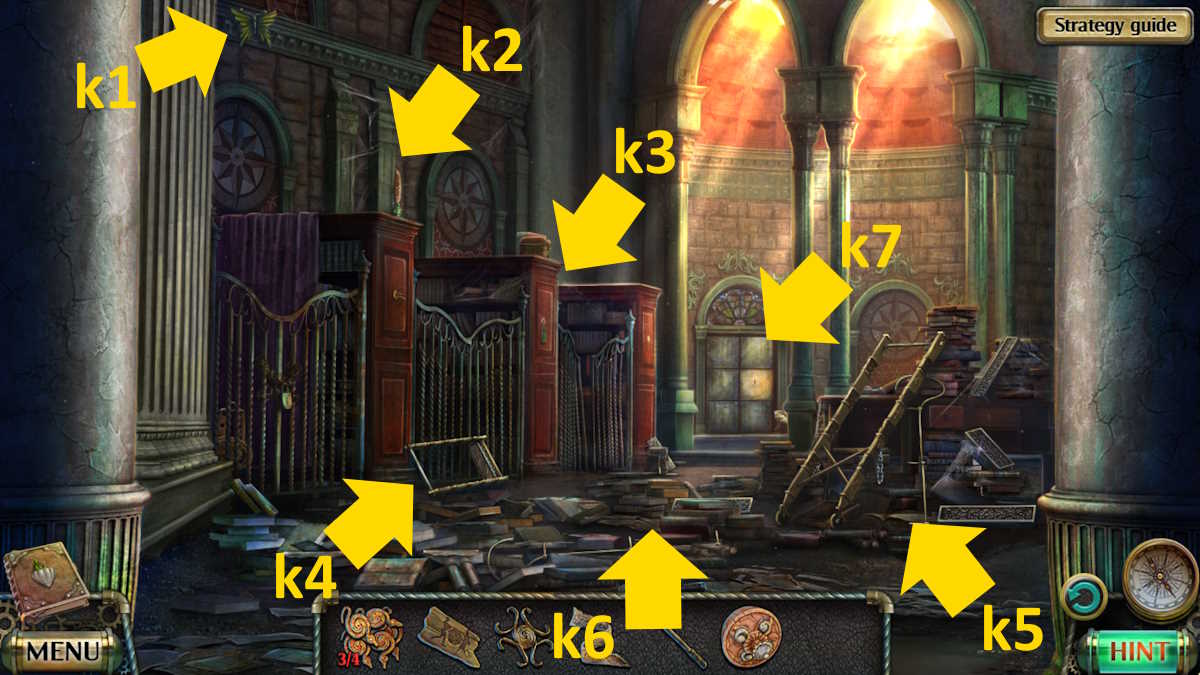
After collecting the Collectible (k1) and Morphing Object (k2), take the Disk With Pattern (k3), Ladder Part (k4), second Ladder Part, three Steps, and a Handle (k5), and two more Steps and a second Handle (k6). Once you have them all, put the Ladder together and use it to get the Plate With A Drawing (k3).
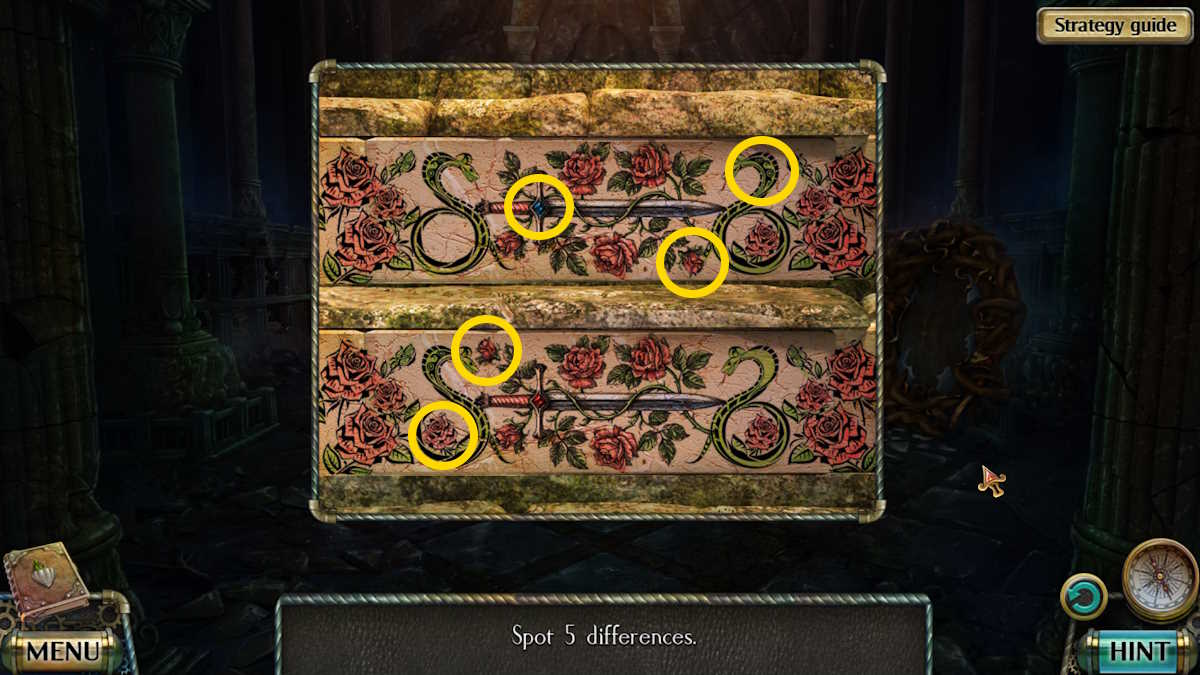
Go to the central hall and add the plate to the righthand stairs (i4). You need to spot five differences, which I’ve marked in the image above. Once complete, the second poison stream will stop. Note the symbol that has appeared on the eyes and forehead of the statue.
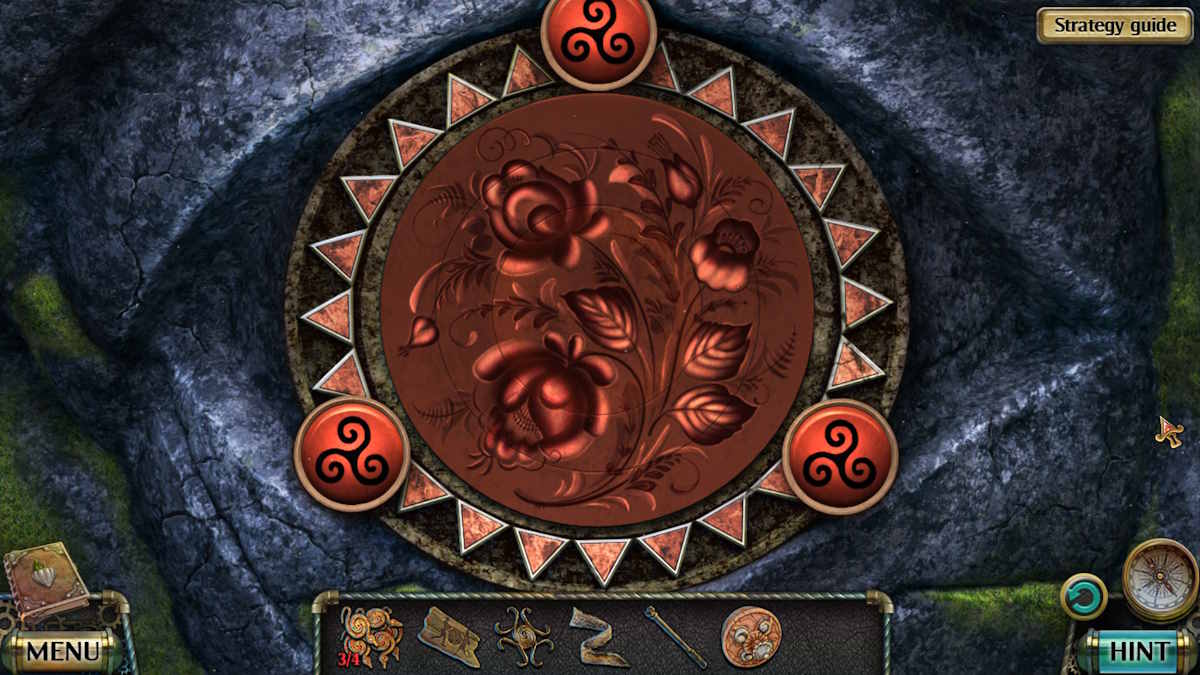
Return to the foot of the temple, select the head (h3), and add the disk to the middle of the puzzle device. Click each of the three outside circles until they’re red, as this is the symbol that matches the one you’ve just seen. Now twist the circle parts to create a complete image (see above), after which you can take the Valve.
Use the valve on the pipes in the central hall (i9) to drain the poison from the pool. Select the pool (i3), take the Colored Tile, and then head outside the temple entrance and add it to the stairs (g6) to start a matching puzzle. Taking each row, select the following green tiles (numbering from left to right, ignoring the red central tile):
- 2 and 6
- 1 and 4
- 1 and 5
- 2 and 6
- 1 and 5
- 2 and 5
- 1 and 6
- 2 and 5
- 2 and 6
Once complete, take the final Snake Key. Go back to the central hall, select the empty pool once more (i3), and add the snake keys. The floor will open, allowing you to enter the spiral staircase.
The gorgon’s crypt
The Collectible is on the wall (l1) and the Morphing Object is on one of the red details (l2). Take the Mug from the far side of the stairs, then head down to the gorgon’s crypt.
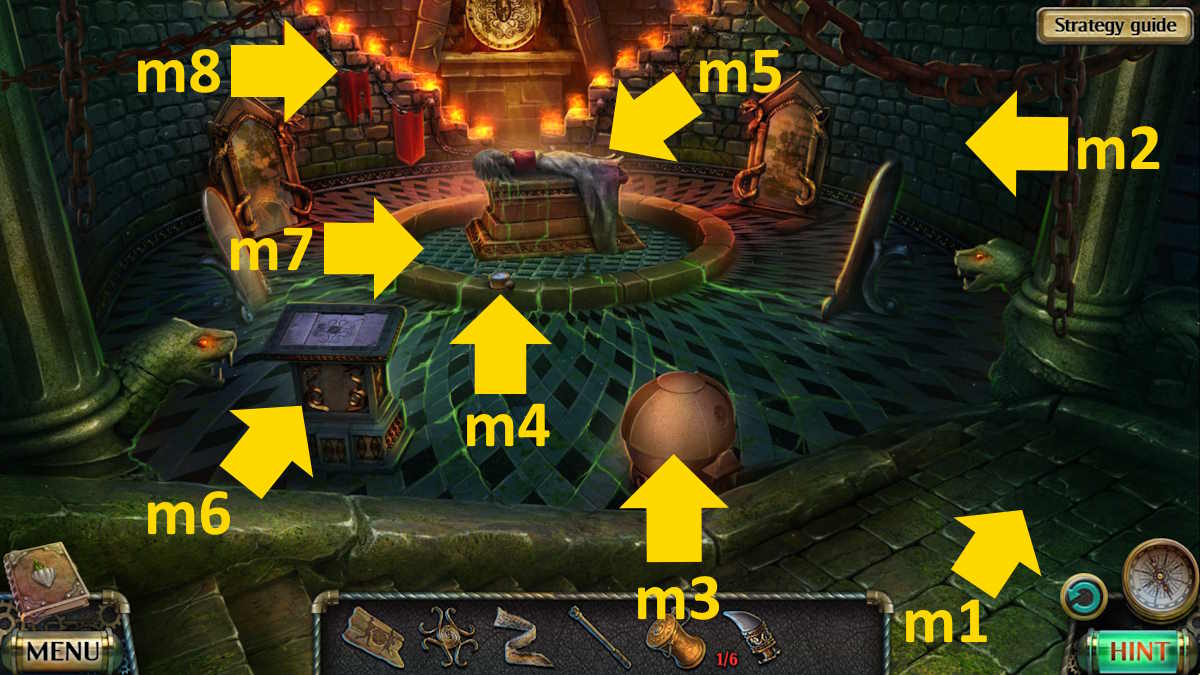
Take the Morphing Object from the floor (m1), the Collectible from the wall (m2), and a Fang from the clay bowl (m3) before adding the clay key to it for a cut scene. Take the Pressure Gauge (m4), a Rag from the sarcophagus (m5), then add the forge symbol to the altar (m6) to discover a bijous puzzle. If you’re stuck on this, use this sequence (1-3 top row, 4 in the middle, and 5-7 bottom row) from a fresh reset to solve it.
- 4, 2, 3, 7, 6
- 4, 2, 3, 7, 6
- 4, 1, 5, 6, 4
You can now select the diorama (m7) to start an object placement mini-game. Once complete, take the Eagle Head Figurine and use the mug to get a Mug With Water. Use the mug of water on the fire (m8) to get a Mug of Boiling Water. Head back to the library now and use the mug to steam up the window (k7) to find a code (3145).
To complete your journey with us here at Pro Game Guides, click through to my Darkness and Flame 4 walkthrough, Part 4 – All puzzle solutions!
")


