
We're nearing the end of the fourth episode of the Darkness and Flame RPG puzzle series, Enemy in Reflection. If you're stuck on some puzzles or can't figure out what to do, read on for part 4 of my full walkthrough.
Dark and Flame 4 walkthrough, Part 4 – All puzzle solutions
This part of the guide takes you from right after completing the diorama puzzle in the gorgon's crypt to the end of the main storyline. If you are looking for an earlier part of the walkthrough, or the bonus chapter, instead go to my Darkness and Flame 4 walkthrough – Enemy in Reflection hub page for links to all the difficult puzzle solutions and item locations.
Find the book about the gorgon
Move to the spiral staircase, use the rag to clean the wall hanging (a1), and add the wood carving. Once you have understood well, a room (a2) will open. Take the tank, Hammer with Chiseland saw from within it.
Now go to the foot of the temple and use the hammer and chisel to get the Old Torch (b1). Open the torch in your inventory, remove the old ash from the end, and add your strip of cloth to make Torch. Light the torch in the gorgon's crypt (c1) to get a Burning Torchwhich you can then use at the foot of the temple to scare away the scorpion (b2) and take the Bottle With Acid.
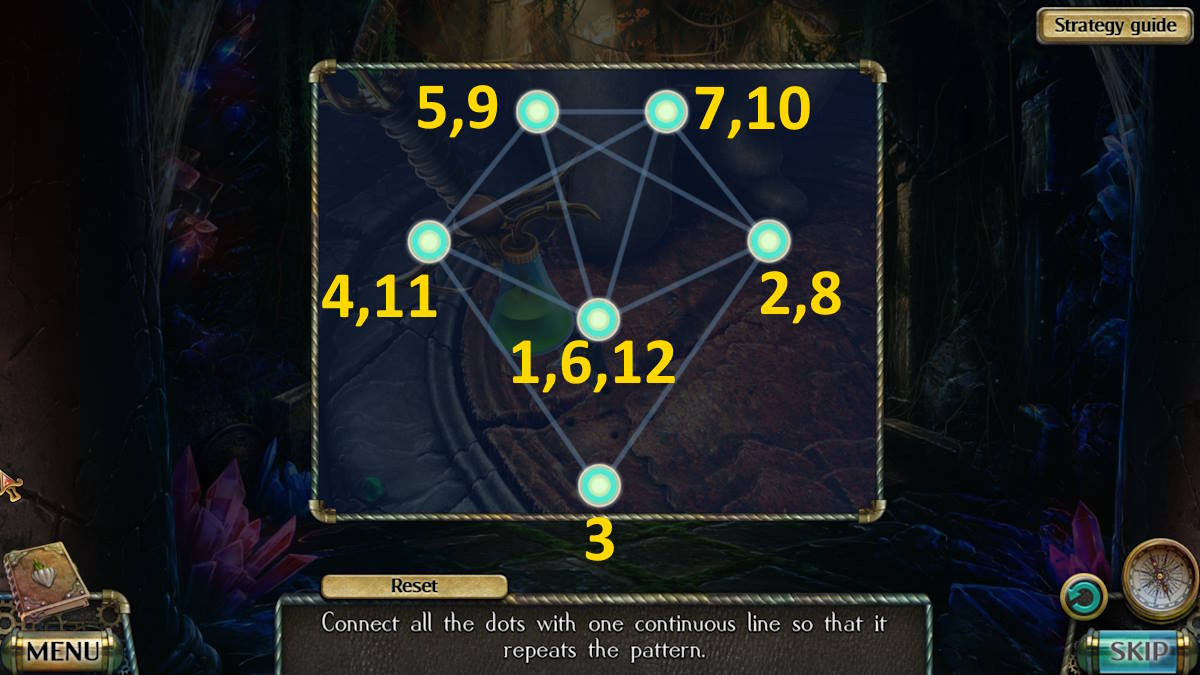
Go to the vault next and use the acid on the rust (d1). I have included a picture of how to copy the template above. The acid will dissolve the rust now, allowing you to take the sword (Roger will take it for now). Note that there is a second code in the hole you pulled the sword from, 1523.
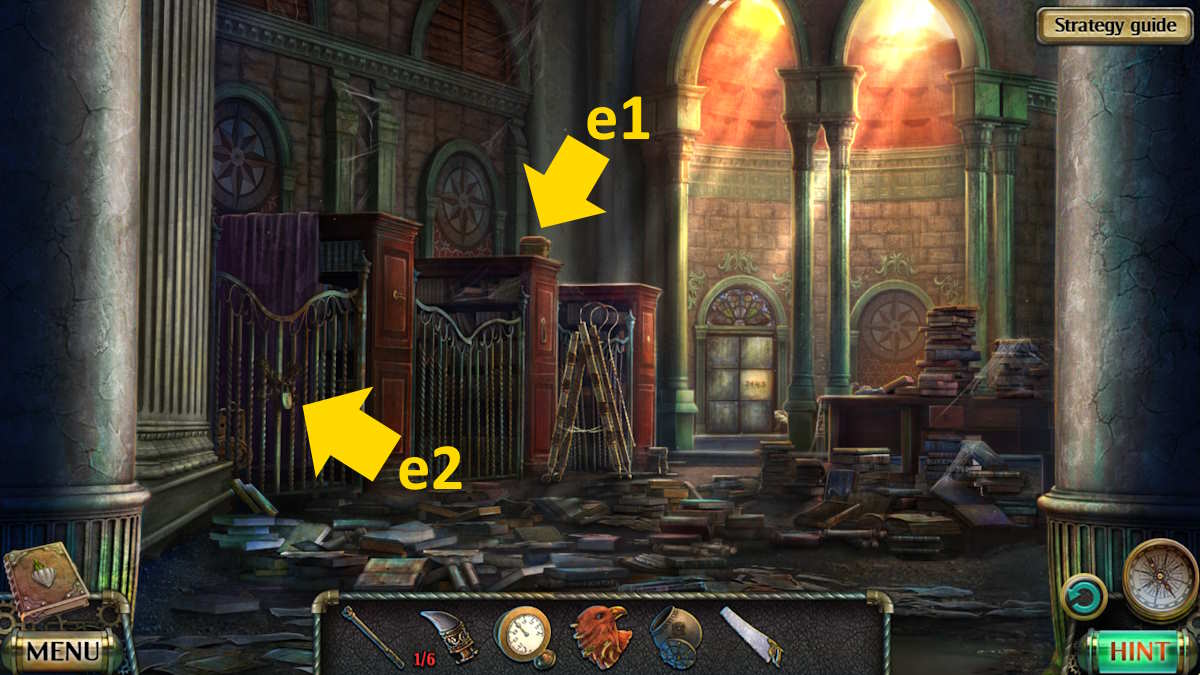
Then move to the abandoned library and select the container on the bookshelves (e1). Enter the two codes you have when setting up 3145 on the top row and 1523 on the bottom row (it won't work the other way around). The case will open, allowing you to take the a key. Use the key to open the padlock (e2), and take the anchoring. Once you have it, click on the room you just opened to start a missing objects minigame. Once you're done, you'll get the Book About Gorgon which triggers a cutscene.
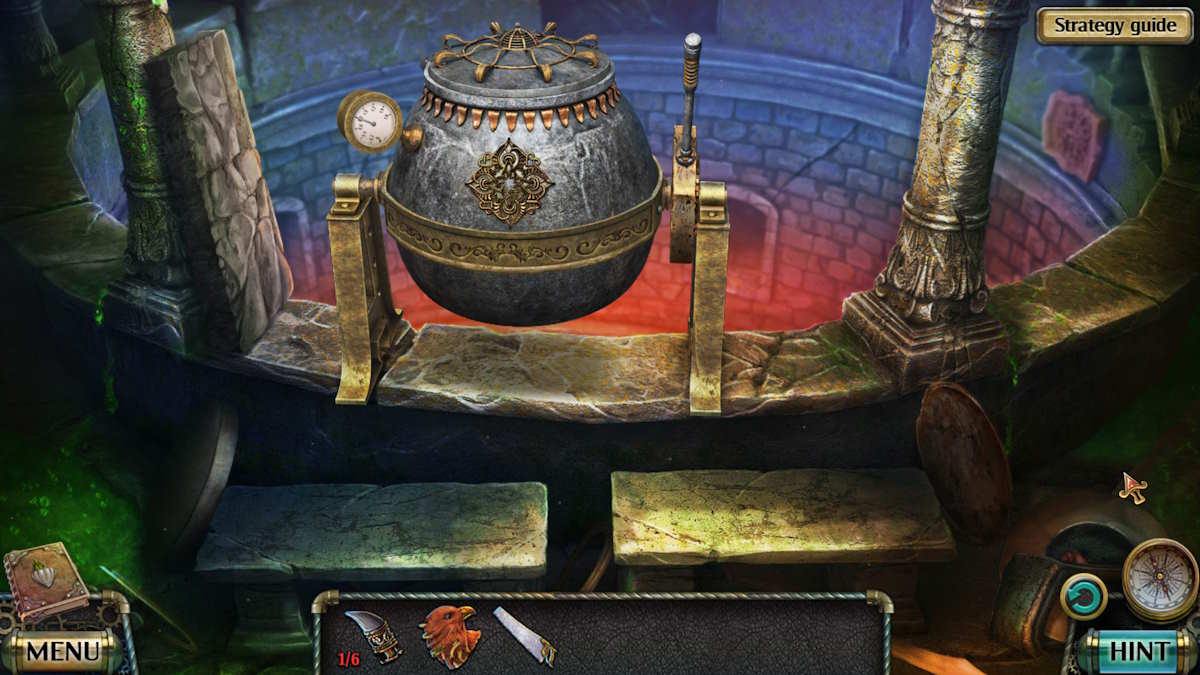
While you are still in the temple, you can place the tank, anchorage, lever and pressure gauge on the spiral staircase (a3). You can now assemble the device (I pictured it above).
Related: Lost Lands 4 Prosecutor
Crossing the poisonous river

Return to Albert's house for another cutscene, after which you'll get some a rope. You can use the rope at the back of Albert's house (f1) to climb down to the pristine shore. But before you do, go to the town hall. Select the chair at the back of the room (g1) and add the eagle's head to start a puzzle. You have to move the sliders so that the heads all fall on the correct animals. I have included a solution below.
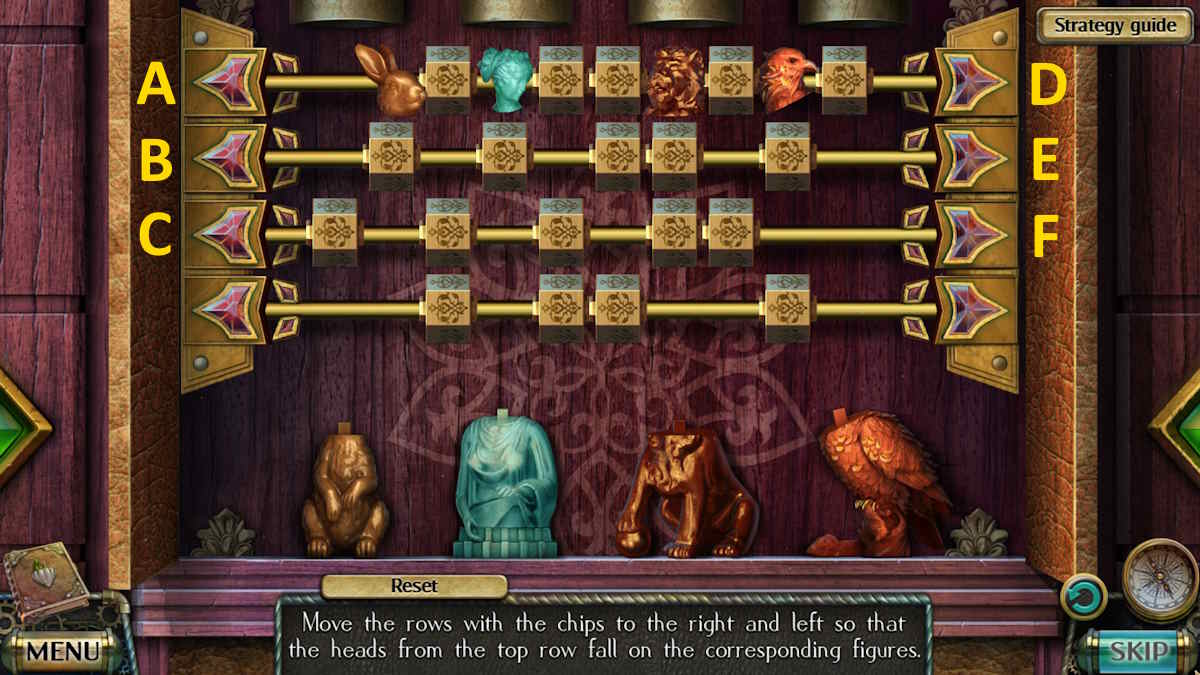
- A, F, D, E, F, C twice, F, B twice
Once done, you can collect two fangs from the compartment behind the puzzle. Now go to the clean coast.

You will find the Collectable on the grass (h1), while the Morph Object is next to the tree stump (h2). Take the Fang in the anchor close-up (h3), before continuing along the road (h4) to the poisonous river.
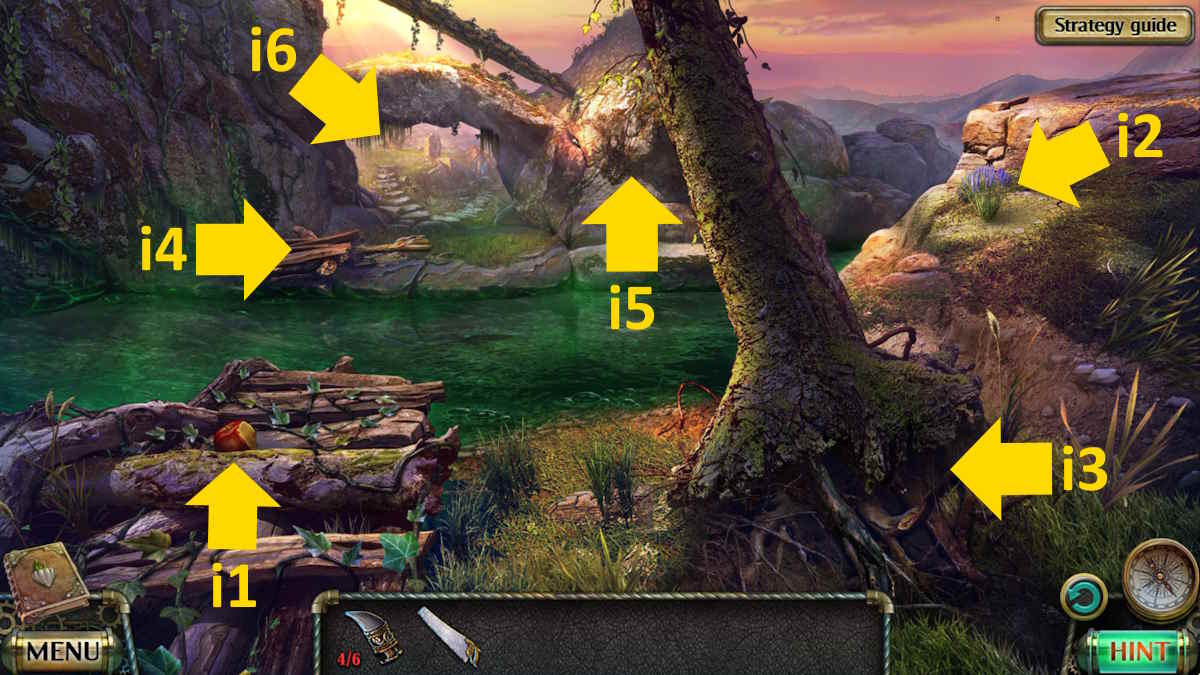
Take the Collectable of the rotting branches (i1) and the Morph Object from the shore on the right (i2). Use the saw to cut the tree root (i3), causing the tree to fall across the river. Now you can click the skeleton (i4) on the far side and take the Skeleton Foot. Use the claw in the slot (i5) to dig out a Honey Spoonand then continue forward (i6) to the entrance to the mine.
Entering the mine

After taking the Collectable from the grass (j1) and the Morph Object on the road (j2), take the Garden Shovel (j3) and four Multicolor Chips from the road They're all in the same close-up, but you have to root around a bit to find them. Also take the Scissors next to the mine entrance (j4), the Slingshot on the tree (j5), and then go back to the coast.
Use the saw to cut the tree roots (h5) and then the shovel to dig under the tree. Open the bag there to find a Swimming Mask. Now use the slingshot to knock down the bird's nest (h6) to get a brush, and the brush on the arm of the statue on the beach (h3) to raise a rock from the sea. Try to pick up the figurine on the rock (h7), but you'll knock it into the water.
Put on your swimming mask and click on the water in the close-up to start a missing object minigame. This one is timed, but everything you need is there in the picture, and you can reset the timer by restarting it (there are no hard parts to it). Once done, you will find the Owl Figure.
Use the scissors on the rock (h7) to take the chain and then tie it to the anchor (h3), taking an Anchor With Chain. Now go back to the mine entrance and use the anchor to move part of the tree (j5), taking the final Multicolor Chip. Also, use the spoon to get a Spoon With Honey.
Select the check box next (j6) and add the figurine. When the box opens, add the chips to start a movement puzzle. If you're stuck on this one, here's a solution (be sure to reset the puzzle first). Click the color and then the button on the right the specified number of times.
- Purple x2
- green x7
- yellow x4
- Purple x7
- orange x8
This opens the door (j4), so you can now enter the mine.
Related: How to beat Trace Escape Room – Trace Walkthrough
Finding the mirrarrium
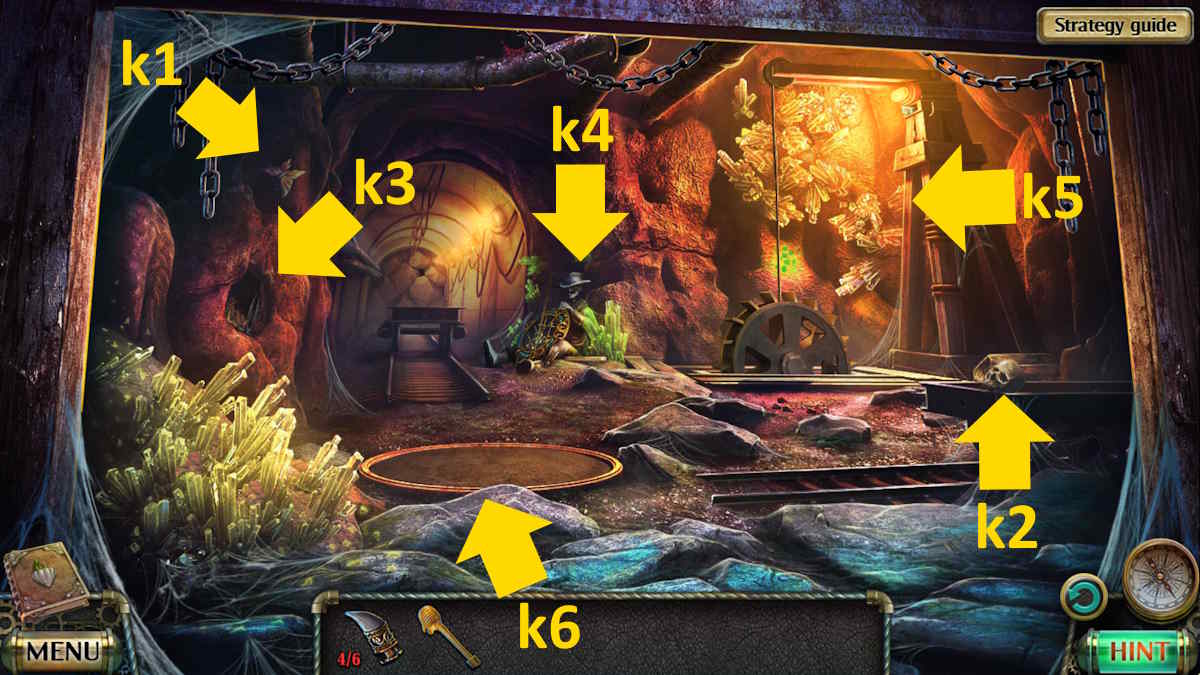
You can find the Collectable on the wall (k1) and the final Morph Object on the cart (k2) Use the honey to attract the bugs (k3) so you can take the Dental Forceps and yours fifth tusk.
Go back to the poisonous river and use the forceps on the skeleton (i4) to take the terminal tusk and then go back into the mine. Select the shield (k4) and add the fangs to start a blocking minigame. You have to remove the arrows in the correct order by clicking the corresponding fangs that I have marked in the image below. Once complete you can take the Lance.

Select the pulley system (k5) next and use the small green stones in the close-up to drop the red button a little. You can now use the spear to press the button, which opens the hole (k6). Click on the ladder in the hole to drop the ladder down, then click on the hole again to start a hidden object mini-game. Once complete you can take some Mirrarrium.
Enjoy the cutscene after which you will get the Special Sword of Alberta. Go back to the spiral staircase in the temple and add the myrrh to the pot (a3). Congratulations! You have finished the main game.
If you want to continue playing with the bonus content, click on my Darkness and Flame 4 bonus chapter walkthrough here on Pro Game Guides!
 – Free Rewards")

")

