
Enemy in Reflection is the fourth installment in the Darkness and Flame puzzle RPG series, seeing Alice continuing her adventures. If you need some guidance through the puzzles and mini-games, read on for part 2 of my full walkthrough.
Darkness and Flame 4 walkthrough, Part 2 – All puzzle solutions
This part of my walkthrough begins with you hot on the heels of your mom’s kidnappers, having arrived at the foot of the mountains after fixing the car in the forest. It continues up until you fix the stairs to the central part of the settlement.
If you’re looking for the beginning of the guide, or puzzle solutions for events that happen later in the story, click here for my Darkness and Flame 4 walkthrough – Enemy in Reflection hub page where you’ll find links to everything you need.
You’ll find the Morphing Object by a fence post (a1) and the Collectible bird right next to it. Use the hoe on the ground (a2) to find a Corkscrew, take a Grindstone from the backpack in the tent (a3), and take the Dry Leaves and Snips from the elevator (a4). Use your dull knife on the grindstone in your inventory to get a Knife
Add the leaves to the campfire (a5), use the matches to light it, and then place the cast in the fire. Once it is glowing, use the stick that’s on the ground in the close-up to knock the cast out of the fire. Pick up the Hardened Cast. Select the elevator (a4) once more, use the hardened cast as a key on the control mechanism inside, and then click the levers in the close-up to go up.
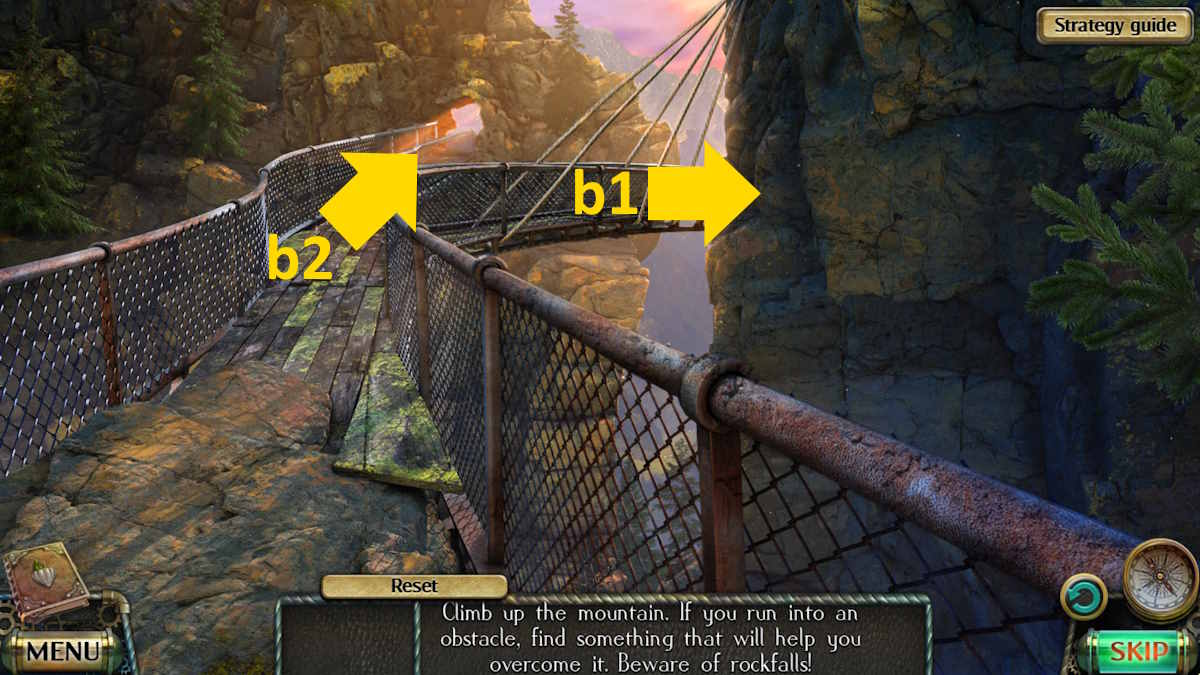
When you arrive at the top, you need to climb the mountain. As you click the various locations, don’t move forward when rocks are falling or you’ll have to restart. Turn right (b1) and move through the next two screens to the end of this path. Pick up the Machete, and then head back to where the elevator drops you and take the forward path (b2).

Use the machete to clear your path on the next screen, then move forward to the stairs. Select the left of the screen (c1) to go up them and take the Board you find there. Go back down the stairs and click the right of the screen (c2) to move forward. Use the board on the next screen, then carry on along this path.
Go down until you get to the skeleton and take the Dynamite. Return to the first screen once more, then take the right path (b1) to where you got the machete and use the dynamite to clear the rockfall there. Head up the steps that clear and you’ll arrive at the Peak.
The snake temple

The Collectible is by the pillar (d1), while the Morphing Object is among the empty boxes (d2). Use the knife on the case (d3), take the Syringe, and then take the Sack from the blue box (d4) to reveal a clock-like puzzle.

Now move out the door (d5) to the entrance to the temple, only to find your way is blocked by snakes. For now, you can only grab the Collectible from the snow (e1), the Morphing Object from the slope (e2), and the Long Spear and the Medalion (using the snips) from the skeleton (e3).
Related: Lost Lands 8 Walkthrough (Sand Captivity)
Head back to the foot of the mountain for a cutscene, after which you’ll receive some Apples. Use the medallion to open the wooden box in the tent (a3) and take the Nail Puller and Magnet from inside. Use the corkscrew on the ship in a bottle in your inventory to remove the lid, and then use the magnet to retrieve the Part of Mechanism.
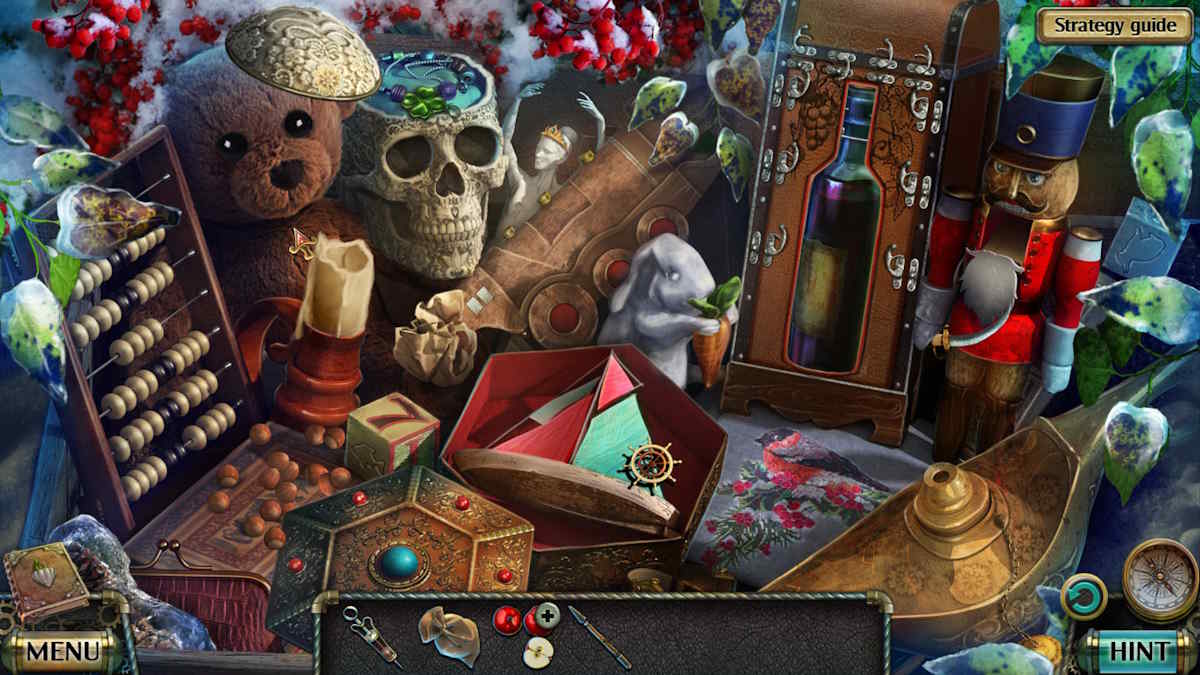
Move back up to the peak and use the nail puller to open the box (d6). This begins a placement puzzle, where you need to add all of the parts to their appropriate items. This one is quite tricky but everything is on the screen so you can’t fail. I’ve included a picture of the completed puzzle above for guidance. On completion, you can take the Bottle of Wine from the image.
Select the apples in your inventory, add the wine, and then use the syringe to make an Apple for the Hedgehog. Return to the base of the mountain, use the apple to lure the hedgehog (a6), and then capture and take the Hedgehog with the sack.
Return to the peak and use the spear to remove some ice (d7) and reveal the Code (159). Use the part of the mechanism and the code on the circular device (d4) to be able to operate it. This looks tricky, but all you need to do is rotate counter-clockwise until the outer arrow is on 1, then clockwise to place the middle arrow on 5, and finally turn counter-clockwise so the middle arrow is facing 9. Once done, you’ll receive the Triangular Chip.
Head up to the temple and release the hedgehog on the snakes (e4) to clear them. Use the lever (e5) to raise the portcullis in front of the door, select the door (e6), and add the chip to start a jumping puzzle. You need to jump chips over other chips so that only one remains. If you’re finding this puzzle tricky there’s a solution below.
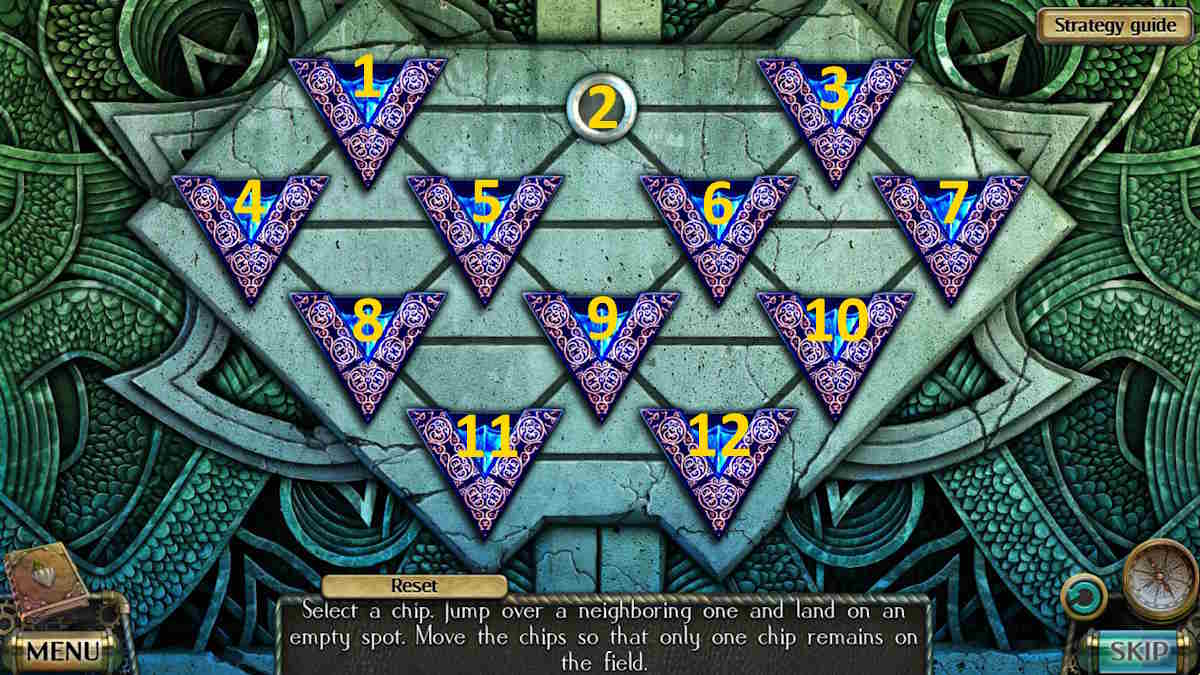
- 8-2, 7-5, 2-8, 12-5
- 1-9, 11-6, 4-11
- 3-9, 11-6, 10-2
Once complete the doors to the temple will open and you can head inside. After the cut scene you’ll arrive right back where you started the game. You’ve been tricked by an elaborate illusion!
The valley of the petrified
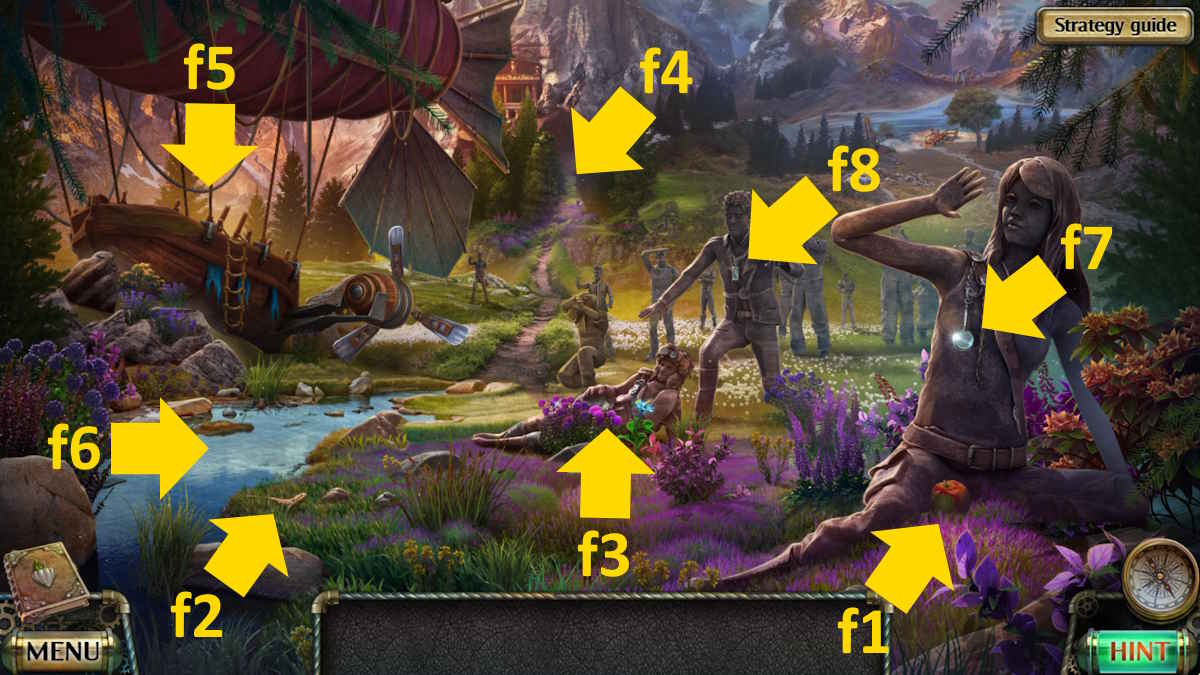
Take the Collectible from the statue on the right (f1) and the Morphing Object from next to the water (f2). Take the Grips from Farador (f3), and move the red flowers in the same close-up to find some Puzzle Pieces and a Hint. Note that bats are blocking your way forward through the forest (f4) before moving onto the zeppelin (f5).
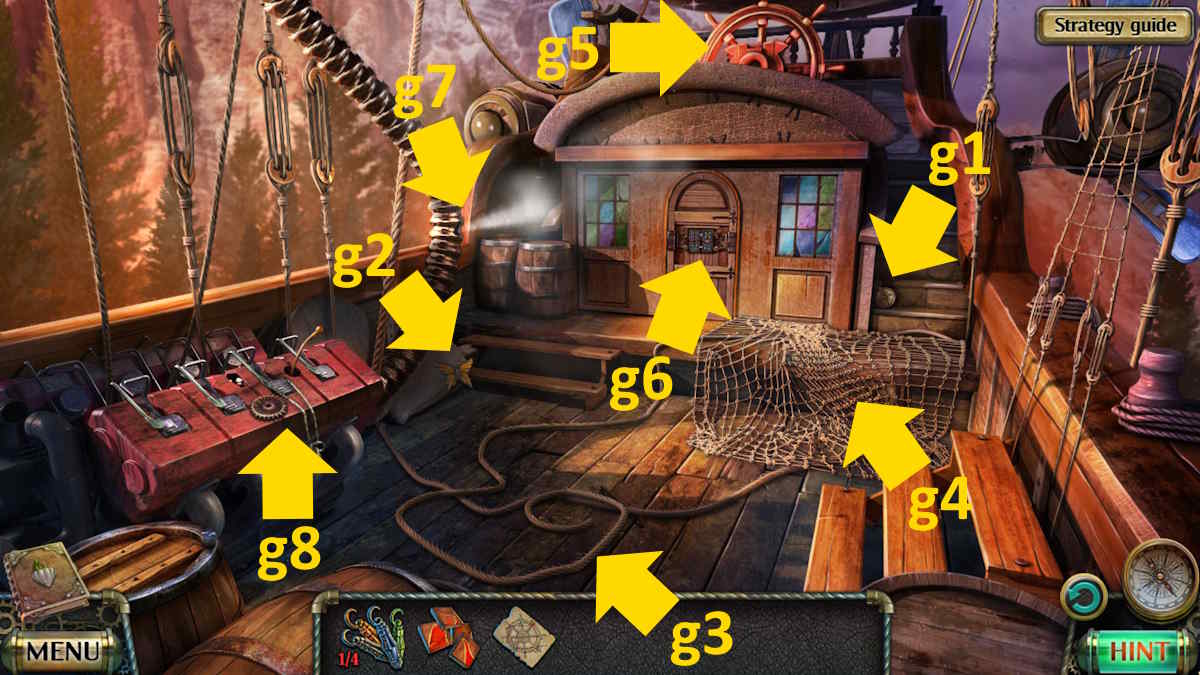
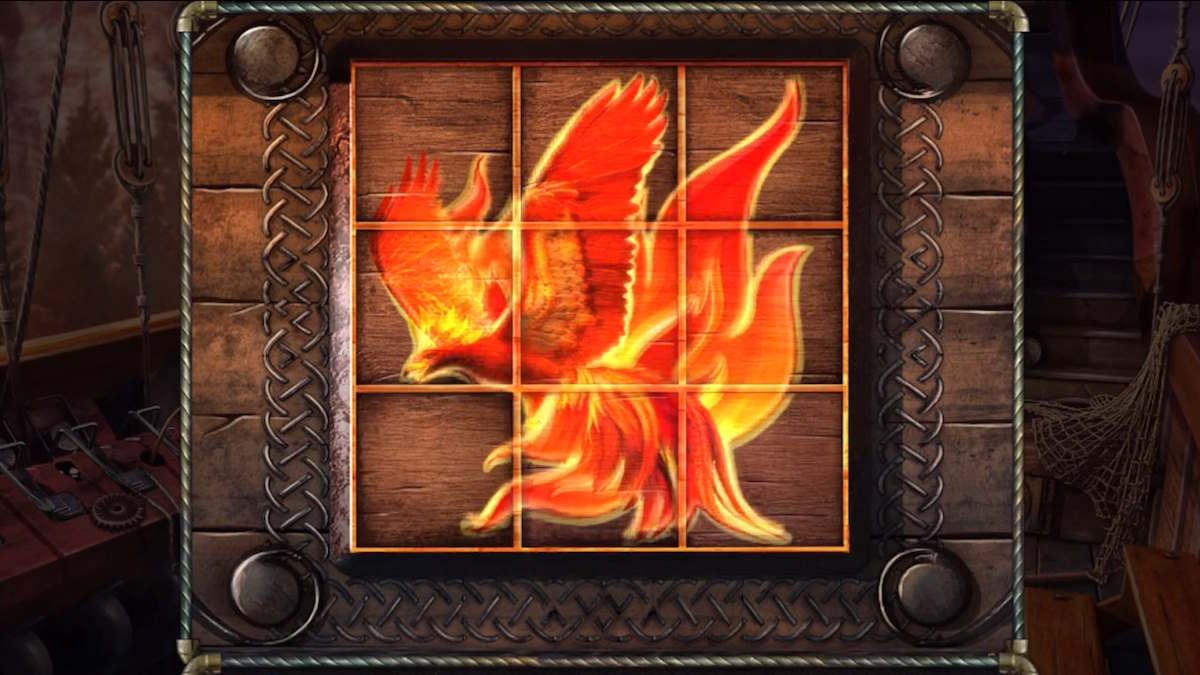
You’ll find the Morphing Object on the steps (g1) and the Collectible on the sack (g2). Take the Rope (g3), then move the net to reveal a sliding puzzle underneath (g4). Add your puzzle pieces and switch them to complete the picture (you can’t fail here, as you simply click pieces to swap them). Once complete (see below), take the Sieve and Clue from the hidden compartment.
Select the ship’s wheel (g5) for a close-up and take the Gears, then add the hint. Press the stones in the order indicated on the hint and the center of the wheel will open, allowing you to take the Pliers. Click the controls (g8) and take more Gears before heading back to the meadow.
Use the sieve in the water (f6) to find a Detail, use the pliers to retrieve the Magnifying Glass (f7) and Pendant (f8), and then return to the zeppelin. Select the doors (g6) and then add the clue and the detail to start a switching puzzle. The solution for this is below. Once complete, head into the cabin.

- W, E, X
- E, X
- N, S, X
- N, S, X twice
- S, X
- E, X twice
- E
The zeppelin’s cabin
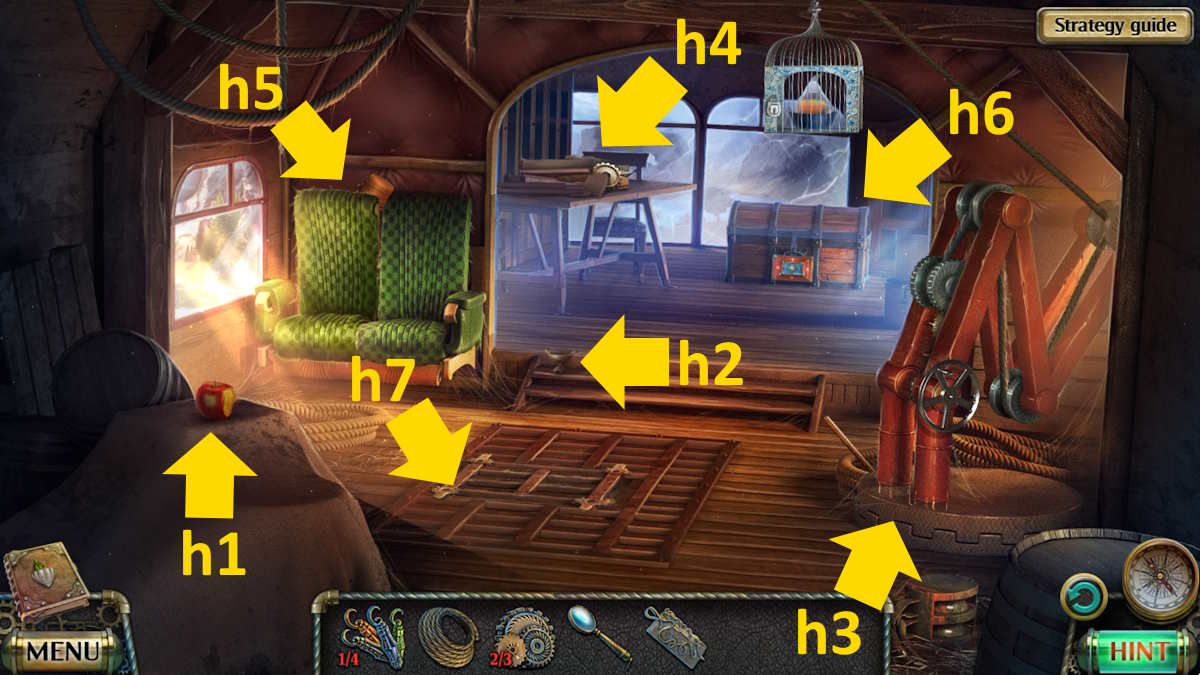
Grab the Collectible from the brown cover (h1), the Morphing Object from the steps (h2), the Rebar from the pulley system (h3), and the Razor Blade, Duct Tape, and final Gears from the table (h4). Add the gears to the pulley system (h3) and it will drop the cage.
Select the seats (h5), click the cushion for a close-up, and use the razor blade on the stitching to find an Ice Skate Blade (as you do), and then use the rebar on the back of the chair and take the Tube. Open the tube in your inventory to receive a second Grips.
Related: Vanishing Act walkthrough (Adventure Escape Mysteries)
Select the chest at the back of the cabin (h6) to start a button puzzle. For a simple answer to this one from a fresh reset, click the bottom button, then the left button, followed by the bottom one three more times. Take the Auger and the Wrench from the chest.
Head back out onto the deck and use the tape to fix the hole in the tube (g7). You can now operate the mechanism (g8), allowing you to take the Key. Back in the cabin, you can use the key to open the dropped cage, taking the Oil from inside. Return to the meadow, use the oil on Farador’s finger (f3), and take the Signet Ring.
Head back into the cabin once more and use the signet ring to open the book on the table (h4). This starts a coloring mini-game. This is slightly frustrating, as you have to do the colors in the correct order but remove all the sections that aren’t that color each time.
So, starting with red, click the red button then click every section except the lips and the two snakes’ mouths. Select blue next, deleting all the snake and face sections afterward. Now select green, clearing the face sections but also the bottom-right snake section (if you don’t the yellow paint can’t flow in). Now add the yellow, clear the bottom right of the snake, and re-add the green to complete the image. Take the third of the Grips.
The frozen lake
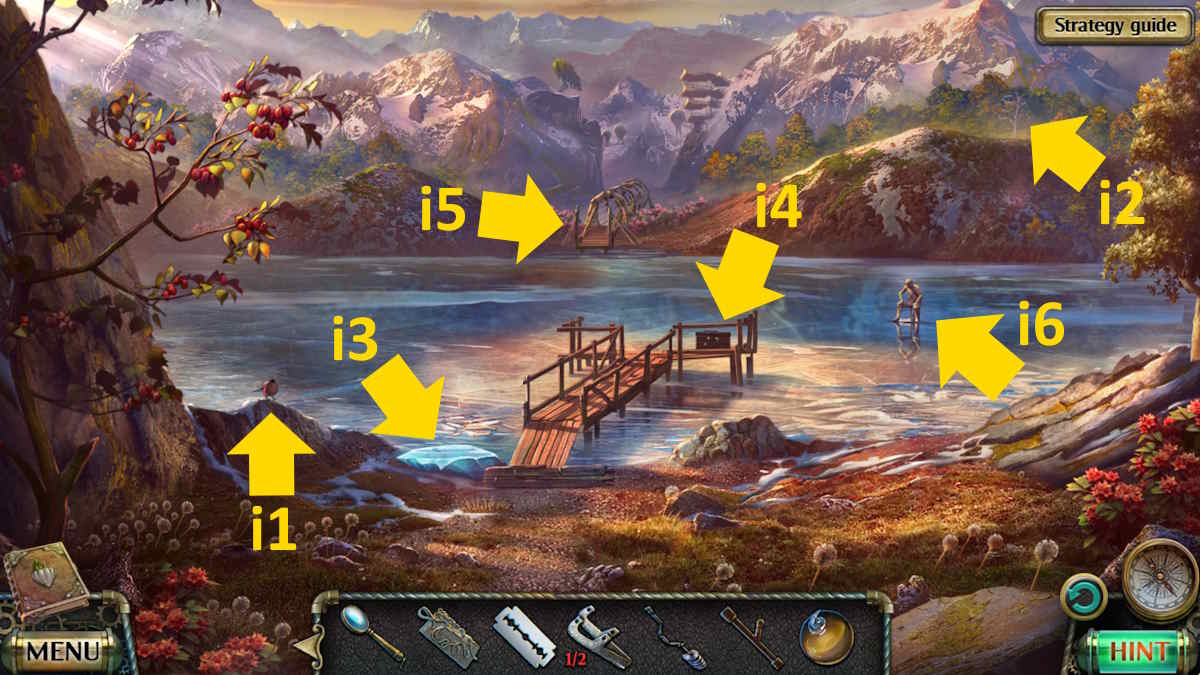
You’ll find the Collectible to the left of the pier (i1) and the Morphing Object on the far shore (i2). Select the ice (i3), pour on some oil, and use the magnifying glass to melt the ice and take the final one of the Grips you’re missing. Get a close-up of the pier (i4) and use the wrench to unhook the second Ice Skate Blade.
Go back into the cabin and use the grips to open the hold (h7), which starts coin finding mini-game. Once complete, take the Ice Skate Shoes. Select the shoes in your inventory, add the blades, and use the wrench to tighten them up and receive the Ice Skates. Head back to the frozen lake, select the skates, and click the other side of the lake (i5) to try and skate across.
After failing, use the auger on the ice by the frozen fisherman (i6) to find a clock Hand. Add the hand to the device on the pier (i4) to start a puzzle. You can’t fail here, as you just need to turn each dial until the images associated with it are in the holes of the hand. These are as follows (from outside to in):
- Cat: Mouse, eye, leaf (orange)
- Bird: Nest, feather, wind (blue)
- Fish: Shell, fishing hook, water (blue)
When you’re done you’ll receive the Grapple and Pick-up Tool. Select the grapple in your inventory and add the rope to get a Grappling Hook. Select the far side of the lake once more (i5), add the grappling hook in the close-up, use the auger on the ice here, then click the grappling hook to attach it to the auger and make a rope bridge across to the opposite shore. Click the device once more to move to the bridge to the settlement.
Toward the settlement
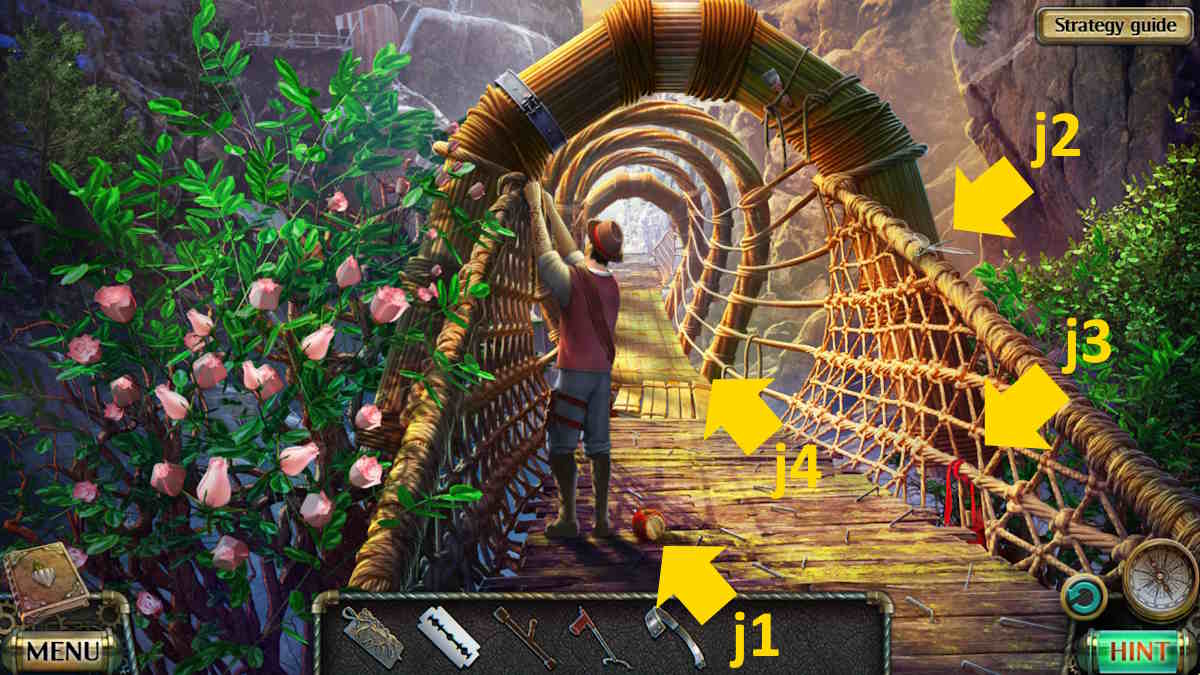
Click Roger on the bridge for a cutscene, after which you’ll receive a Clamp. Take the Collectible from the bridge (j1), and the Morphing Object from the ropes (j2), and then click Roger again and use the grappler to pull in your side of the bridge. Use the razor to cut the rope in the close-up that follows and take the Putty Knife. Finally, add the clamp and use the wrench to tighten it.
After Roger leaves, select the red ribbon (j3) and take the Scoop, Silver Key, and the Empty Bag. Now click the far side of the bridge (j4) to catch up with Roger. Click the wreckage of the steps to clear it, after which Roger will give you the Arboreal Key.
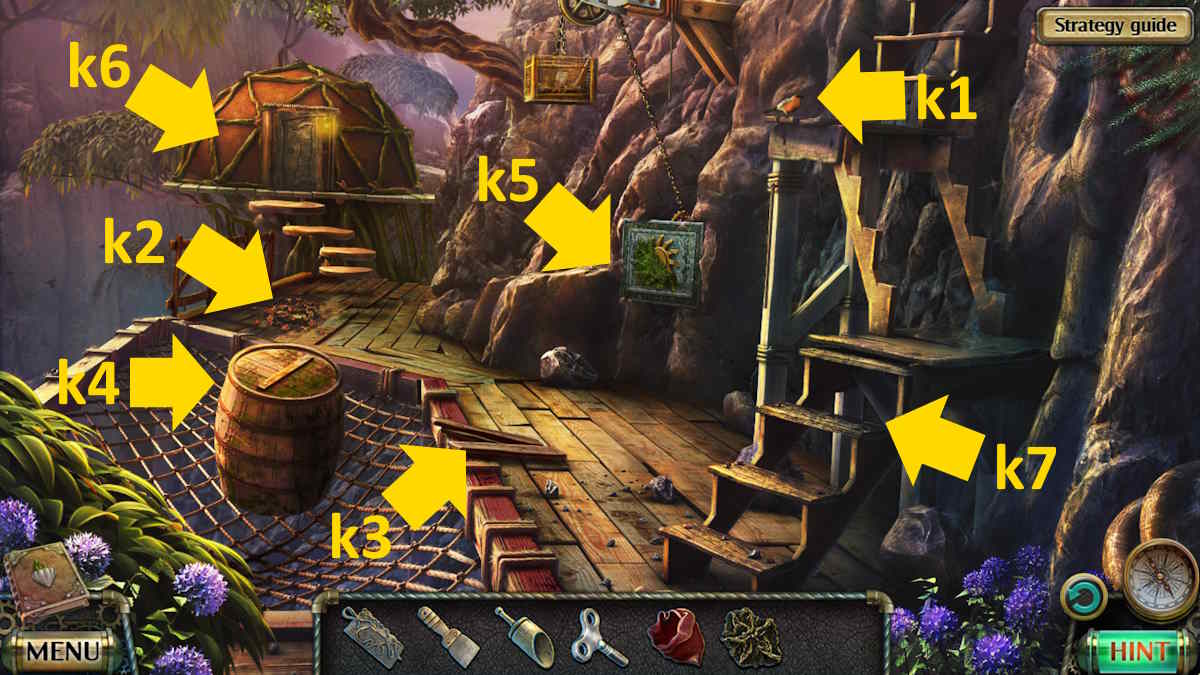
You’ll find the Collectible on the staircase (k1) and the Morphing Object on the boardwalk (k2). Take the Boards (k3), open the barrel (k4), add the sack, and then use the scoop to get a Bag of Grain while also finding a Lense.
Use the putty knife to clear the moss from the wall mechanism (k5), then add the pendant to trigger it and drop the cage above. Take the Hammer from the cage and then use the arboreal key to open the hut door (k6) and head inside.
Fixing the stairs

After taking the Collectible from the floor (l1) and the Morphing Object from under the table (l2), move the red cloth (l3) to reveal a bird’s nest. Use the grain to distract the birds and take the Curtain Wand. Select the hammock (l4) and use the silver key to open the silver box and get the Nails.
Select the carving next (l5) to start a bird-finding puzzle (just keep clicking the image until you find them all, you can’t fail). On completion, take the Carved Key. Use the wand on the bookshelf (l6) to gain access to it, then use the carved key to open the book there and take the Set of Patterns. You can also select the table (l7) and add the set of patterns, but you need some yew wood to do more.
Go back outside, add the boards to the steps (k7), secure them with the nails, and use the hammer to complete the repairs. You now have access to the central part of the settlement.
To continue the journey with me here at Pro Game Guides, click through to our Darkness and Flame 4 walkthrough, part 3 – Enemy in Reflection.


