Nancy Drew Mystery of the Seven Keys Walkthrough, Part 2

Our hero finds herself in Eastern Europe in puzzle adventure Nancy Drew: Mystery of the Seven Keys. If you’re working through the puzzles, read on for the second part of my complete walkthrough.
For information about earlier events in the game, refer to the first part of my Nancy Drew Mystery of the Seven Keys Walkthrough.
Nancy Drew Mystery of the Seven Keys complete walkthrough guide, Part 2
This full guide and walkthrough for Nancy Drew: Mystery of the Seven Keys picks up just after Nancy has cracked the Zlaty Custom Jewelry safe and been given the DAGAS file she found inside by Vladena.
Checking the DAGAS files
Briefly pop next door from the jewelry shop to the exhibition and ask Oskar about his argument with Vladena. It turns out Vladena’s family were once the assessors of the crown jewels before being ousted.
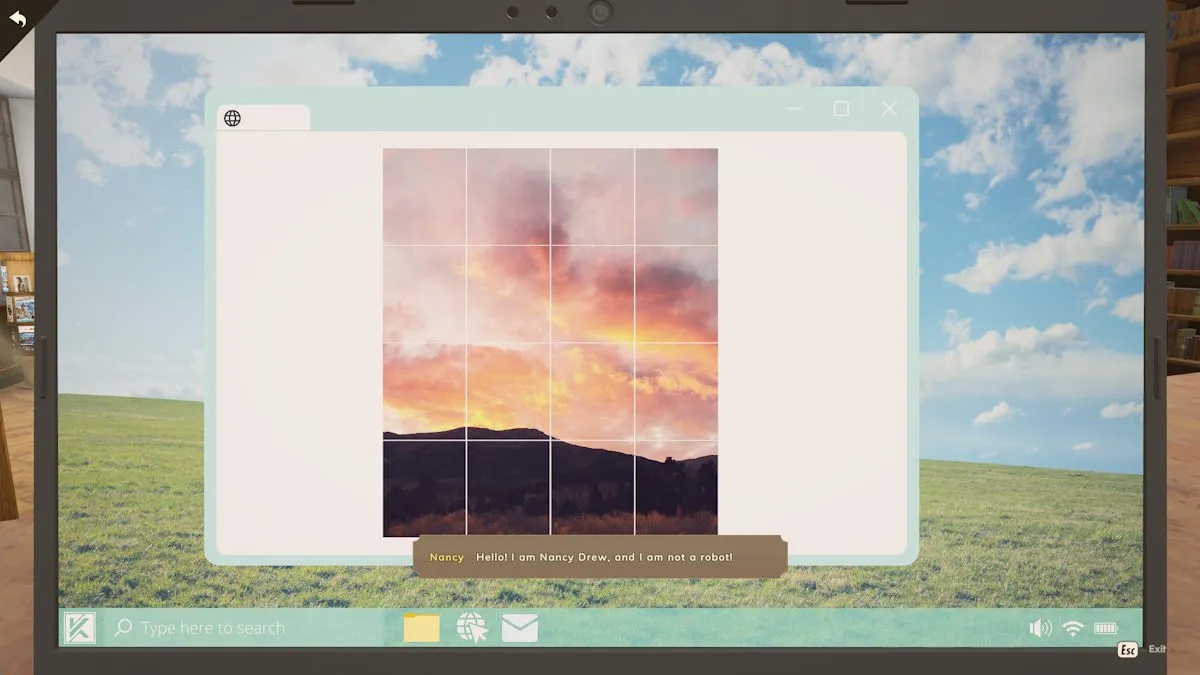
Return to the cafe, take the laptop charger from its familiar place on the table, and try again to examine the DAGAS file. The document will open once you’ve completed the CAPTCHA slide puzzle (see above). Click the right arrow twice on the computer image to get to the correct DAGAS file (you’ll know you have the correct one when Nancy comments on it).
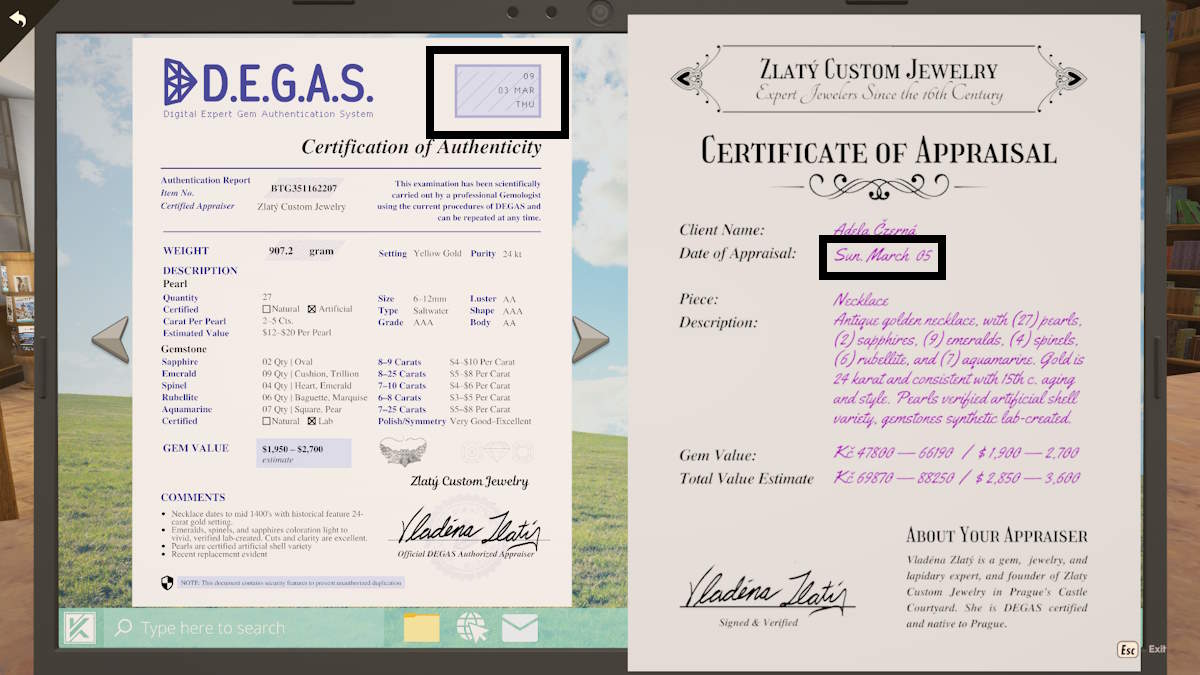
This begins a spot-the-difference puzzle. Move the cursor over the images until the symbol changes, click the detail to highlight it, and then find the corresponding information on the other document. Similarities will show with green lines and discrepancies with red. There are eight details to match up in total but the important one is the date, which is different (see above).
Take this new information back to Vladena at Zlaty Custom Jewelry. After she tells you she should have been the only one able to edit the online version of the DAGAS file, you’ll get a message from the Hardy Boys. Now call Agent Zane at DAGAS with all this new information. After telling him about Rezidente’s possible involvement, tell him about the DEGAS file timestamp discrepancies. You also find out that the Dean of St Vitus may be in danger, as the odds are someone is planning to steal the crown jewels.
Searching for the Dean of St Vitus
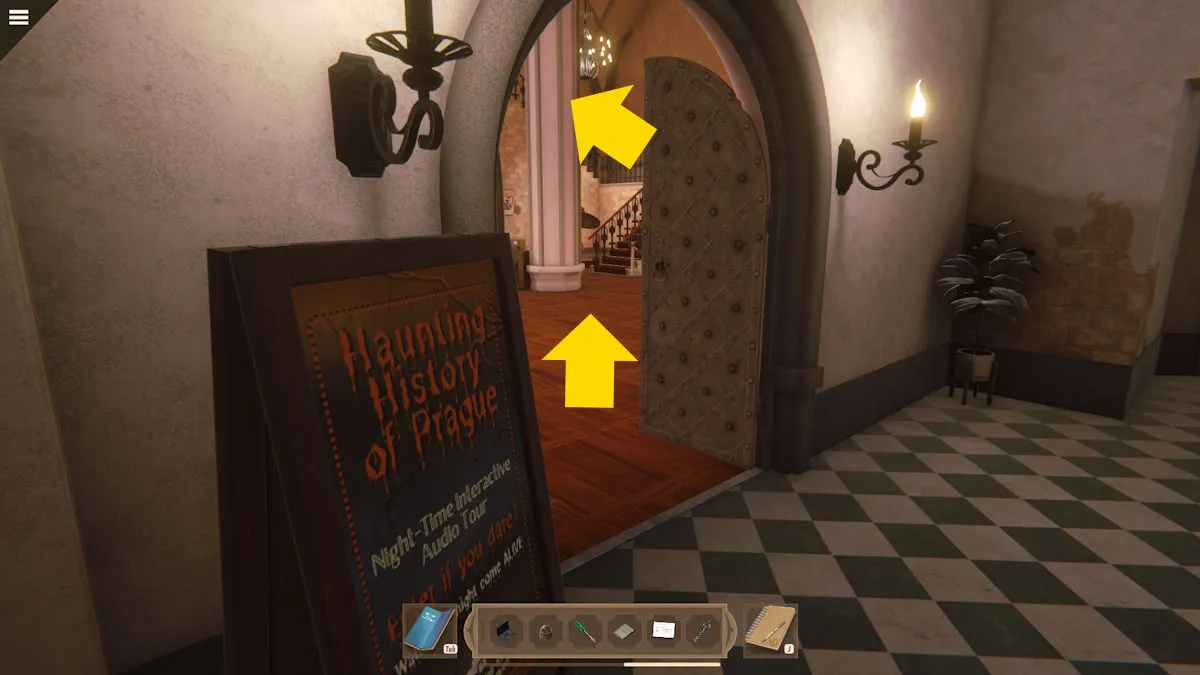
Go back into the exhibition room (where Oskar remains) and head up the stairs and along the corridor toward the Dean’s office.
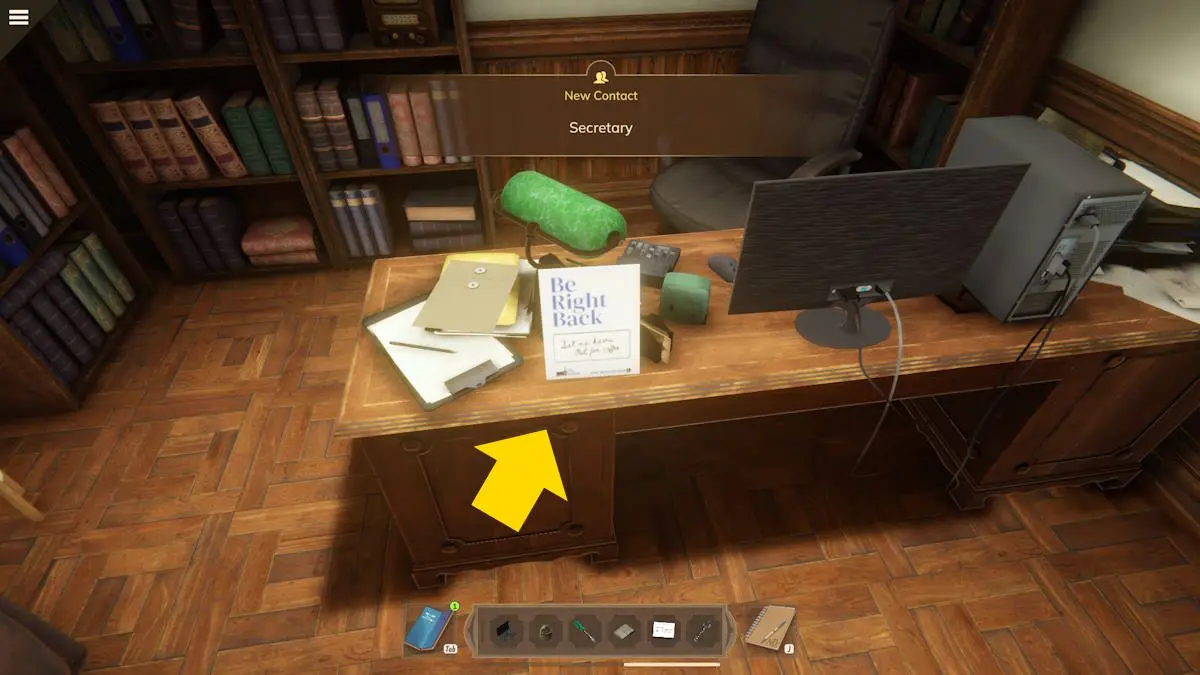
When you arrive at the Dean’s secretary’s desk, there is no one around. Click the ‘gone for coffee’ note on the desk and you’ll get the secretary’s contact details added to your phone. You can optionally use the knife on the secretary’s desk to open the paper file there. It shows a note from Leo, saying he is off to Rome. You’ll also see the Dean’s office door is open, so head inside.
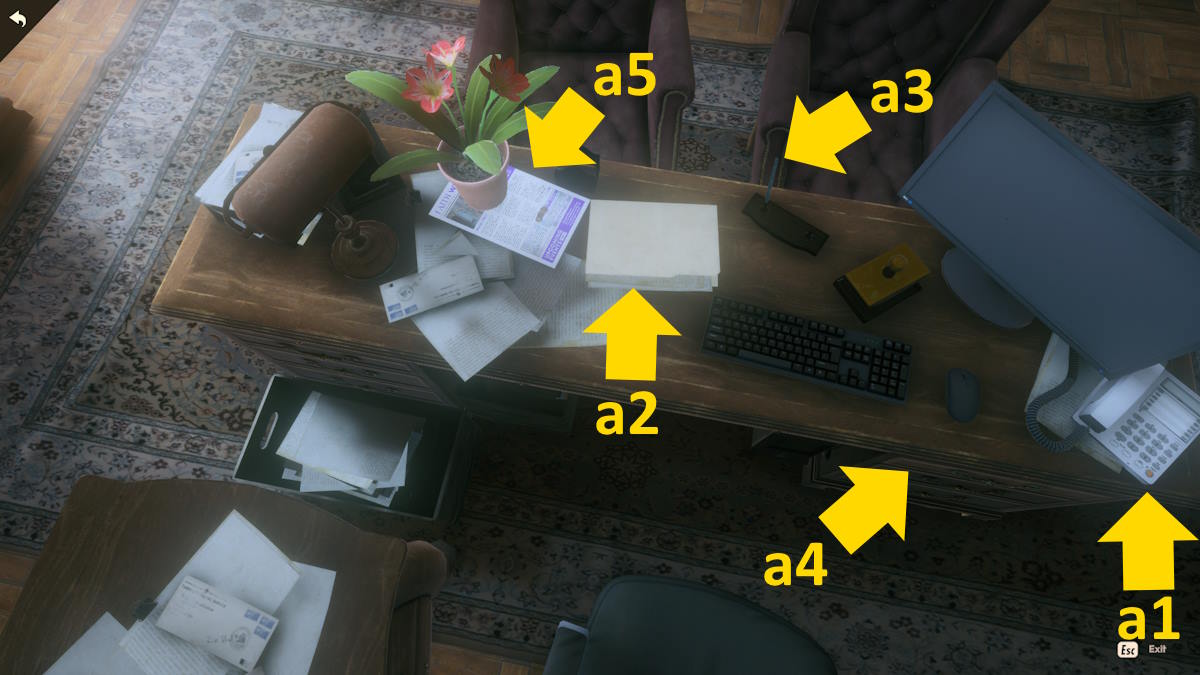
When you enter the Dean’s office the door will shut behind you and you’ll hear another frustrated conversation between Oskar and the Dean’s secretary. You’re trapped! Head over to the Dean’s desk and examine it. Click the telephone (a1) to listen to Leo’s messages, open the folder (a2) to find a pen open, and place it in the pen holder (a3) to open a secret drawer (a4). Check the calendar inside, read the Faith Weekly magazine (a5), and then turn your attention to the wall behind the desk.
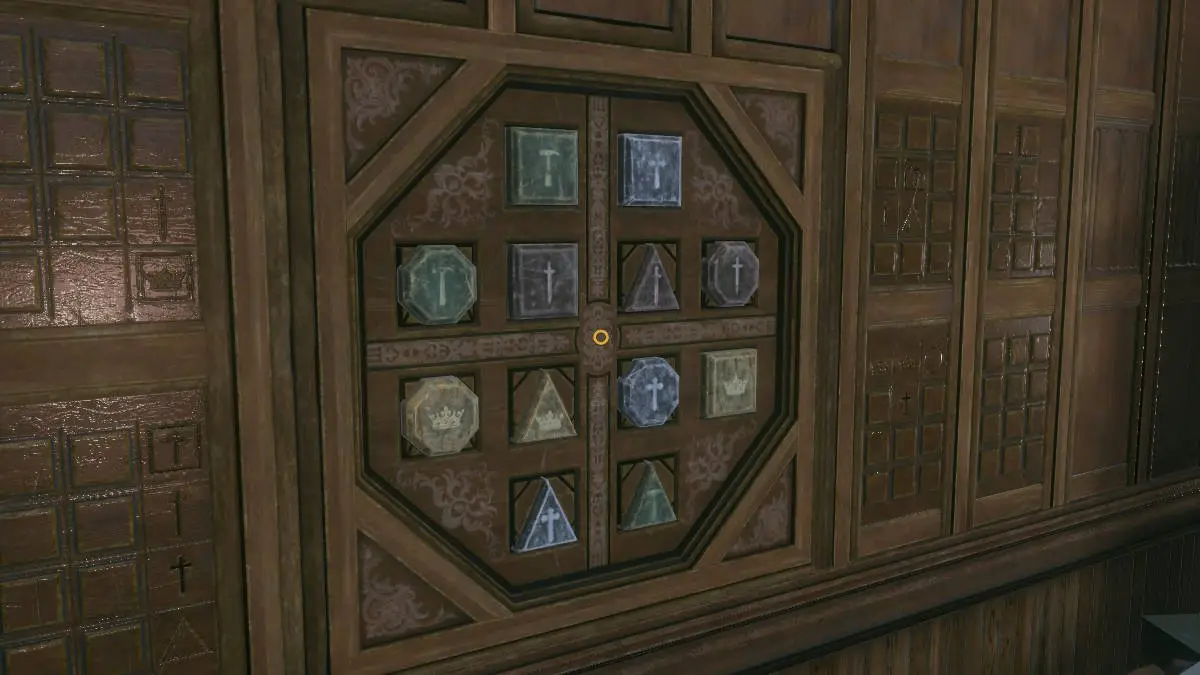
The trick to this puzzle is making sure that all the symbol sets carved into the wood outside of the central pattern are represented in the middle by swapping the symbols. The image above shows the completed pattern.
Entering the tunnels
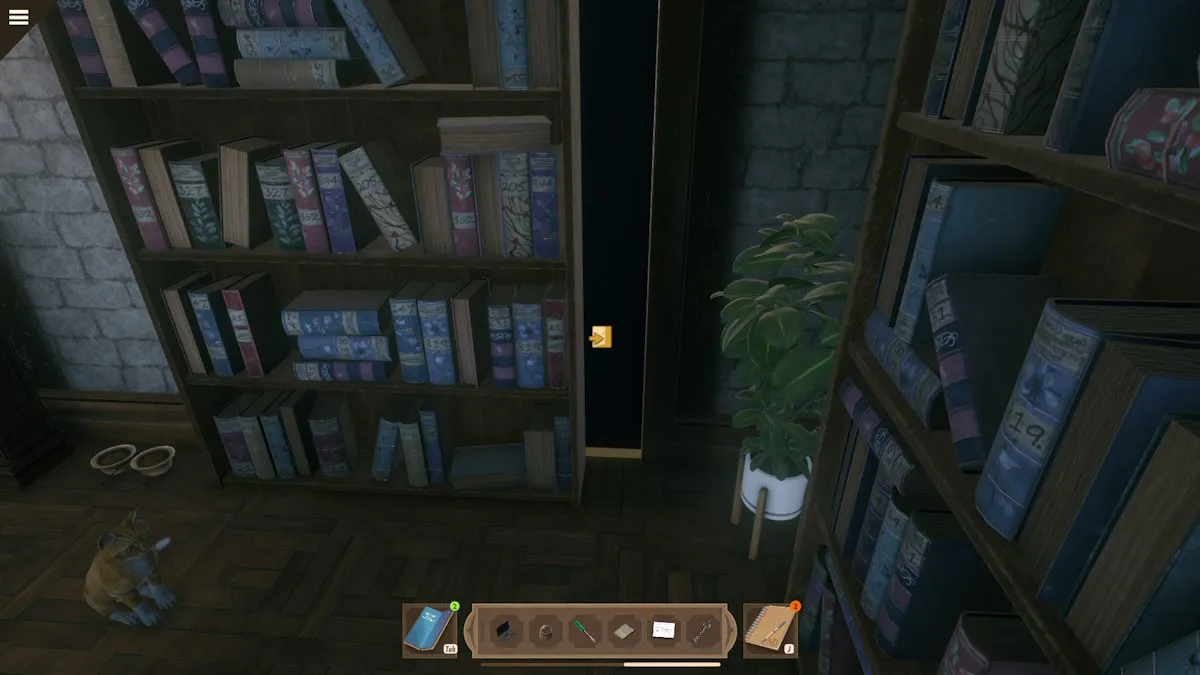
Once done, a bookcase will move on the wall next to you, giving you an exit. Don’t forget to pet the cat on the way out. However, it’s also important to note that the next section is a maze in which you’re being chased.
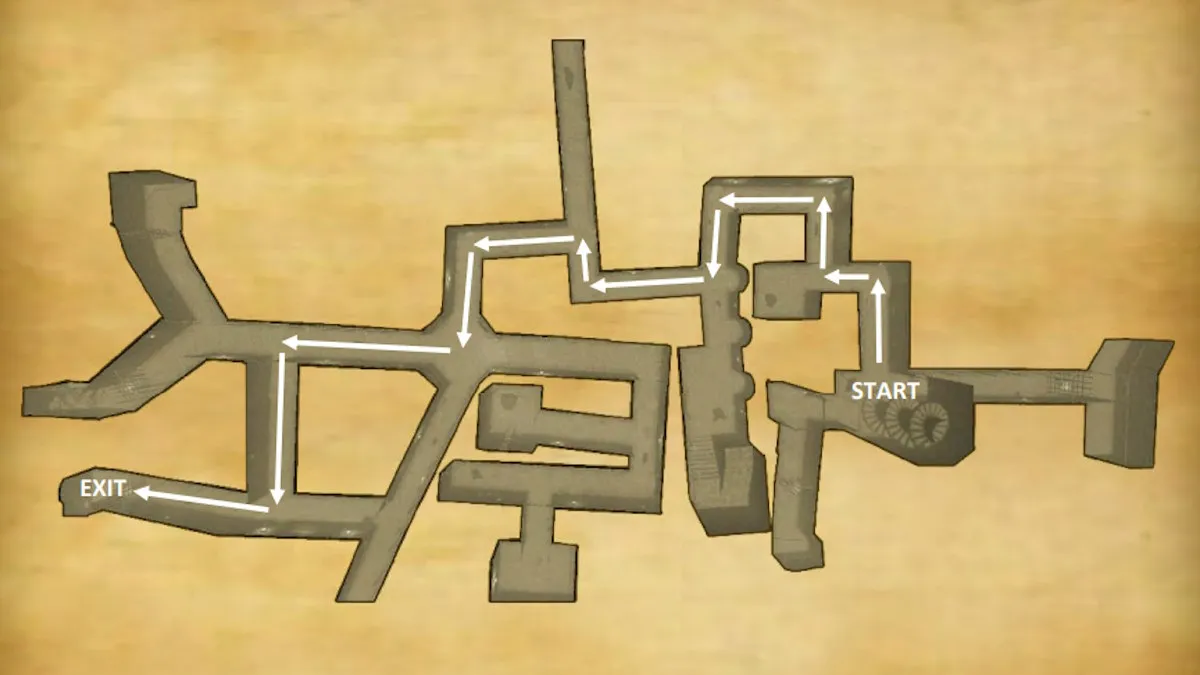
As soon as you arrive in the tunnels you’ll start to be chased by ghostly apparitions. If they catch you, you fail, and you have to start again. You can do this as many times as you like so there’s no need to panic. The map above should help you make it out without too much trouble. However, while you can get out safely in the end, it looks as if the Dean may not have headed to Rome as planned.
Once you’re out and have spoken to the police you’ll find a message from Adela, so go and meet her in the cafe. You can also call the Dean’s secretary, but he doesn’t have much light to shed on matters.
Adela and the hackers
Once you sit down with Adela in the usual spot in the cafe, you’ll find she has been hacked. Luckily, it is a similar Cyber Block program to the one Elka taught you to beat. This time there are three levels to beat and an increasing number of turns.
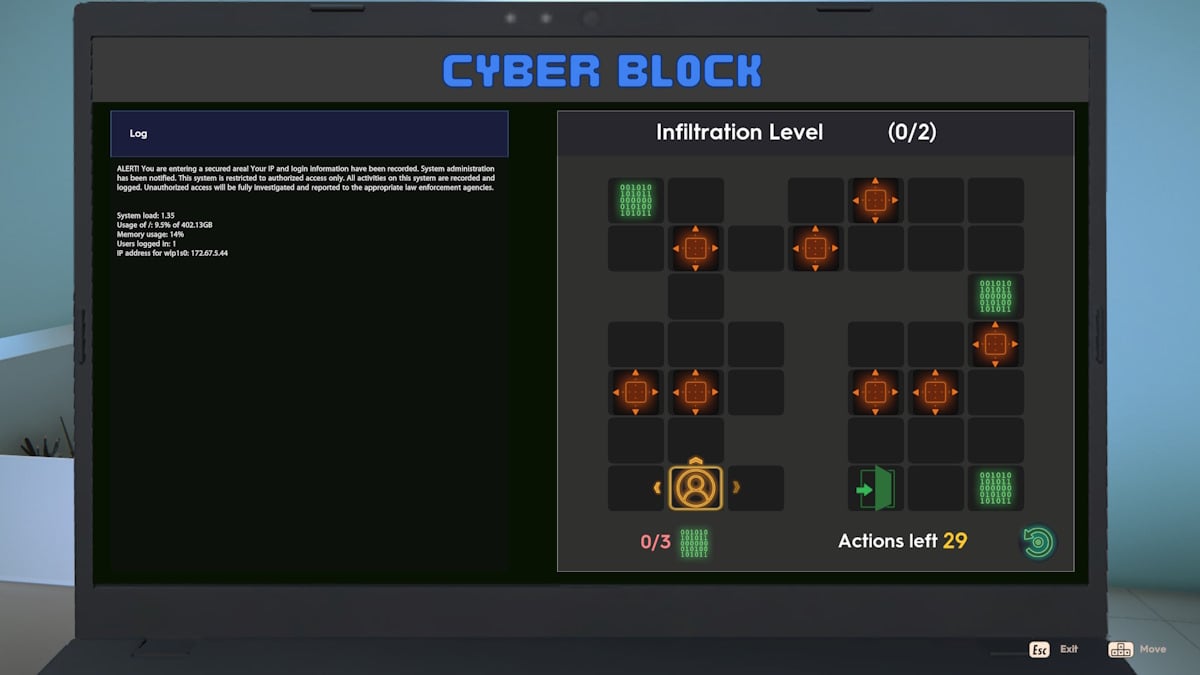
Cyber Block Level 1
- Left, Down, Left (x2), Right (x2)
- Down, Right, Up, Right, Left
- Down (x3), Left, Down, Up (x2)
- Left (x2), Up, Left, Right, Down (x2), Left
Cyber Block Level 2
- Up, Right, Up, Right, Up, Right, Up
- Left, Up, Down, Right (x2), Up, Right, Up
- Down, Left, Down, Right, Down, Right, Left (x2)
- Down, Left, Down (x2), Right (x3)
Cyber Block Level 3
- Right, Up (x2), Left, Up, Left
- Right, Down, Right (x3), Up (x2)
- Left, Up, Left (x2), Up, Left
- Right, Down, Right (x2), Down, Right (x2)
- Up, Right, Left, Down, Left, Down (x4), Right (x2)
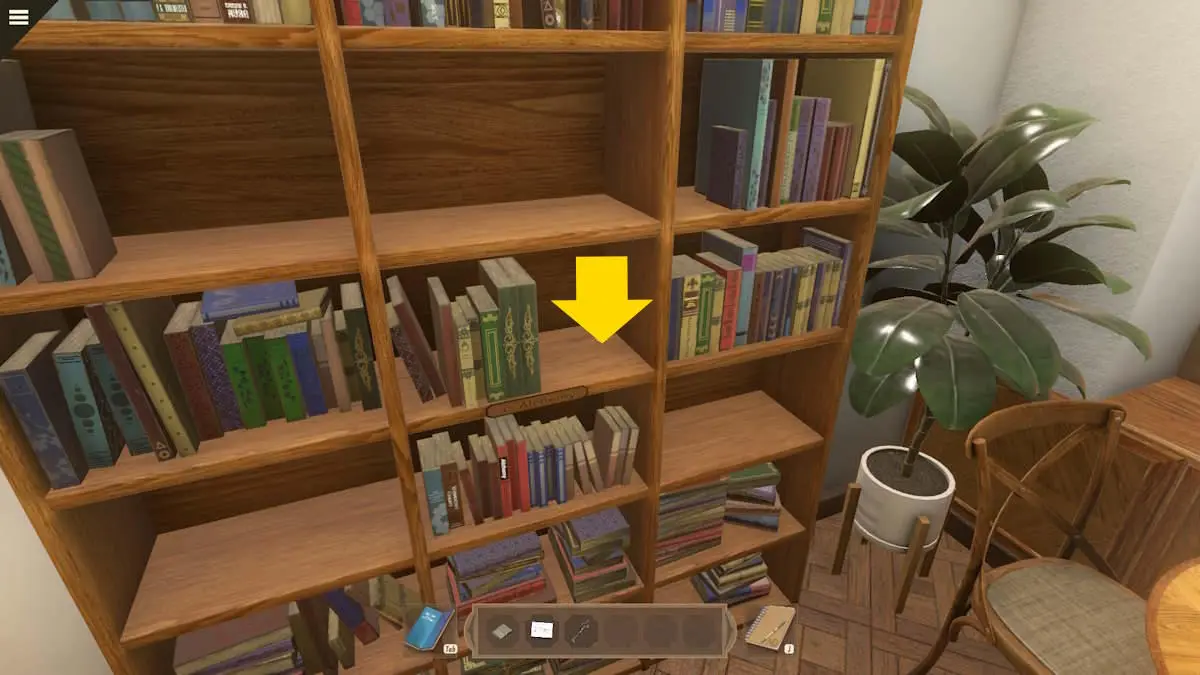
Speak to Adela once you’ve cleaned up the hack and give her a case update. Once you’ve exhausted all conversation options with her, also have a catch-up with Patricie behind the cafe counter. While in the cafe, also head to the Alchemy section (right as you come in through the door, in the corner, see above) and take the book Alchemy’s Golden History from the shelf there.
Investigate Oscar’s artifact
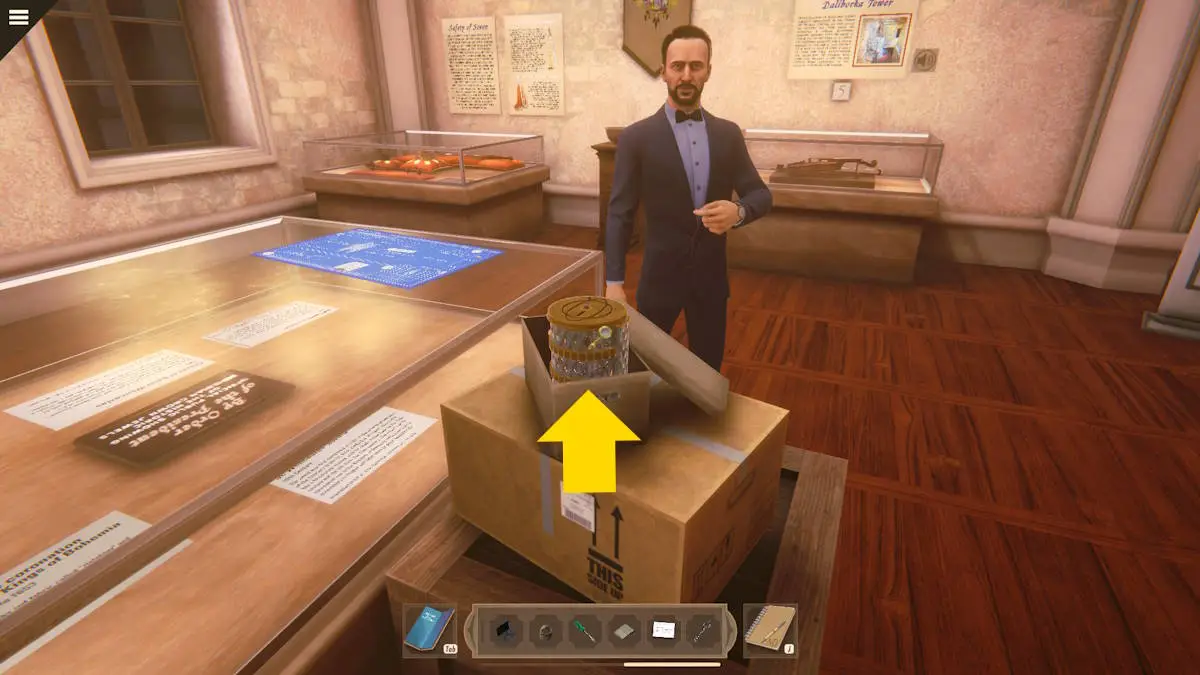
Go back to the museum exhibition and speak to Oskar about the Dean, the Rezidente, and alchemy. You can check out the exhibition, but what you need to do is get into Oskar’s artifact (pictured above). To get anywhere you first need to solve the lid puzzle.
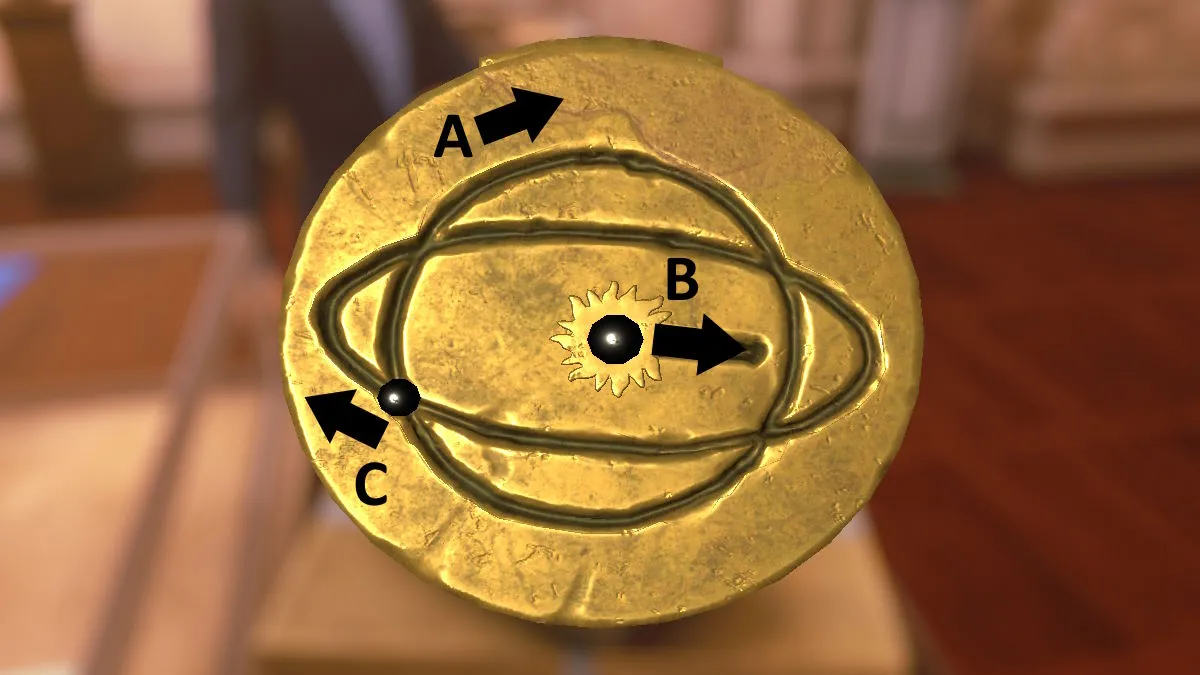
Examine the object and click the top to get a face-on view of it. First, drag the planet (A) clockwise around the circle back to its starting point. Now slide the sun (B) across from left to right. Finally, drag the planet (C) completely around the ellipses. This opens up the rest of the puzzle.
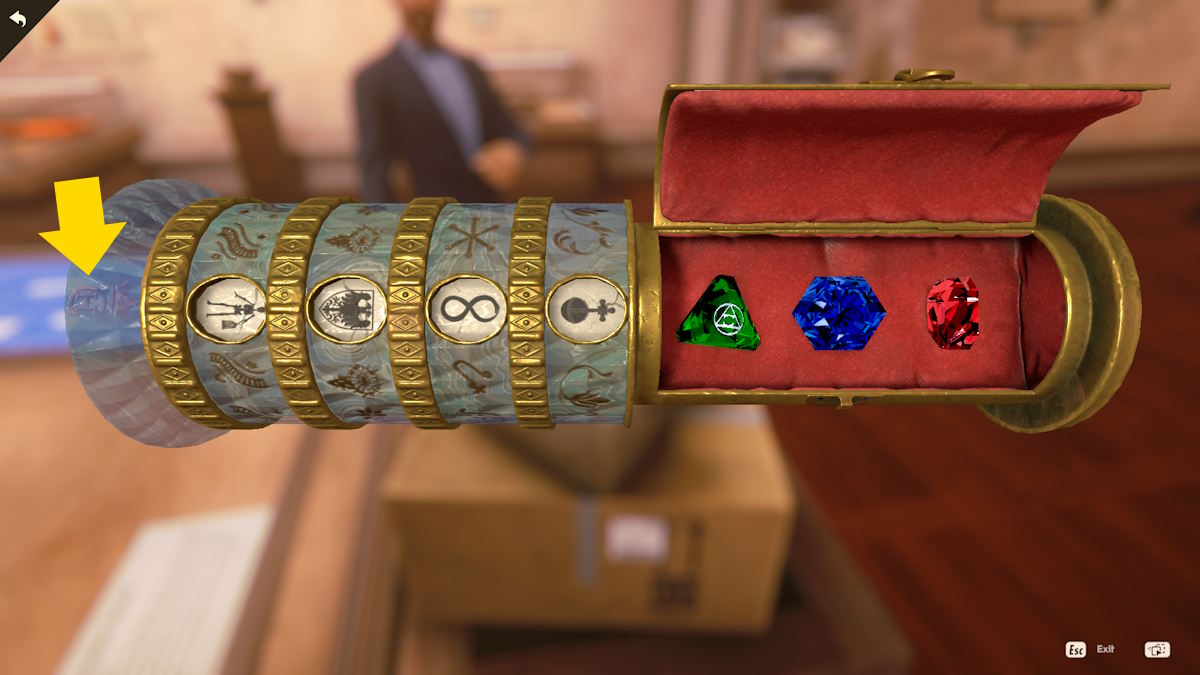
You now need to line up the correct four symbols to open the device. See the image above for the pattern required and the button to press once you’ve aligned the correct symbols. When you try and examine the artifact further, Oskar will intervene. Come out of the close-up and he will explain where the artifact was found.
Learn more about alchemy
Head outside and talk to Radek in the square (in his usual spot at the marionette caravan) about the Rezidente and alchemy. Now return to the Old Town Square and speak first to Elka and then Marek in Aparat Computers.
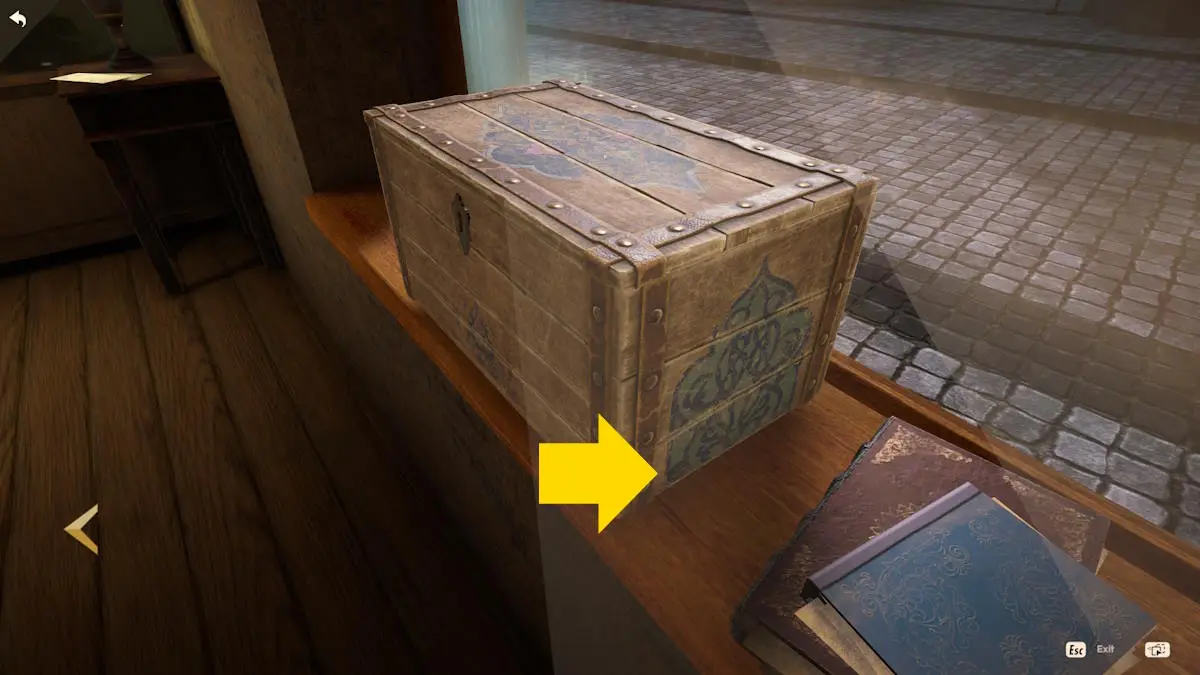
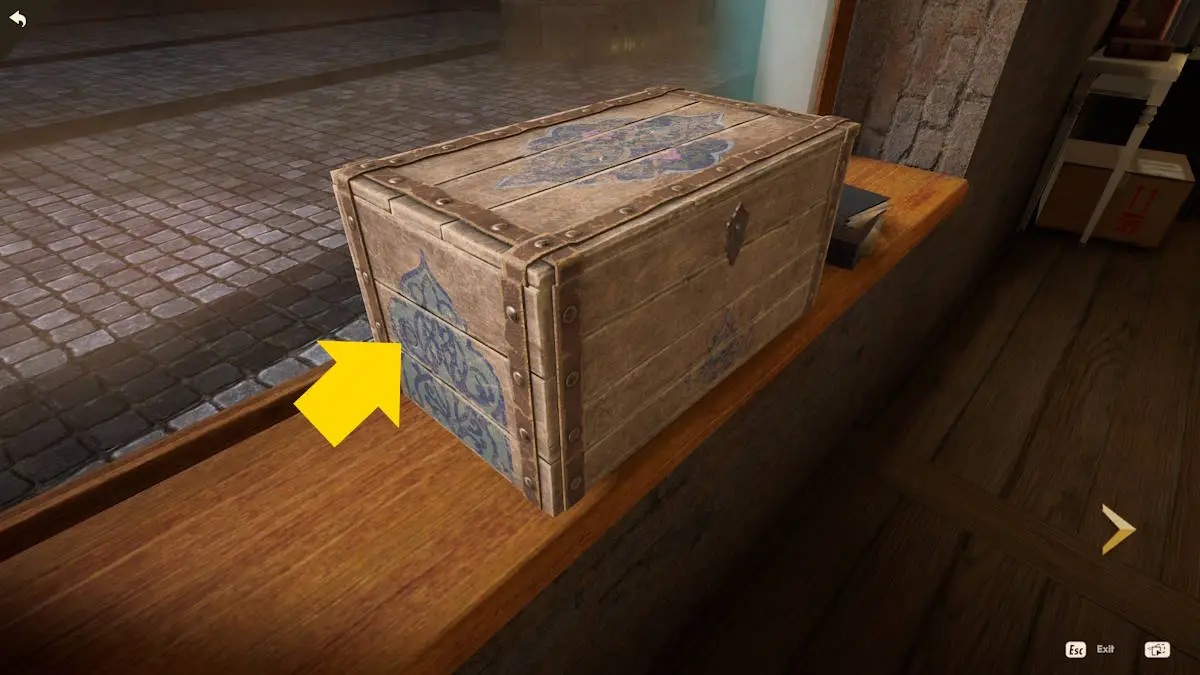
After exhausting all the conversation topics with Marek, you’ll be able to examine the old alchemist’s case on the windowsill in his section of the store. When you examine it, click the left arrow to look at the left side and click the button there. Now click the right arrow twice and click the button you’ll now find on the opposite end of the box (both buttons are shown above).
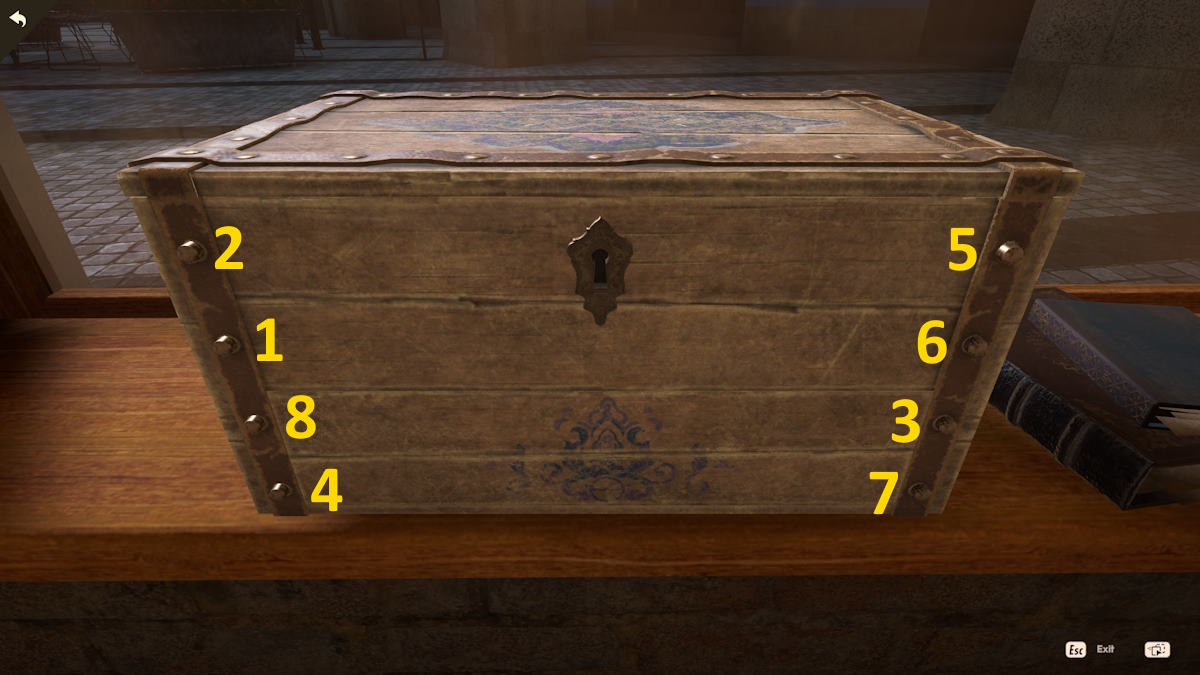
You’ll automatically be taken back to the front view of the box and the eight bolts holding it together are now clickable. Click them in the order shown above and the top of the box will open, revealing a marionette. Click the marionette to remove it, noting the symbol underneath (a circle in a square in a triangle in another circle).
The haunted tour
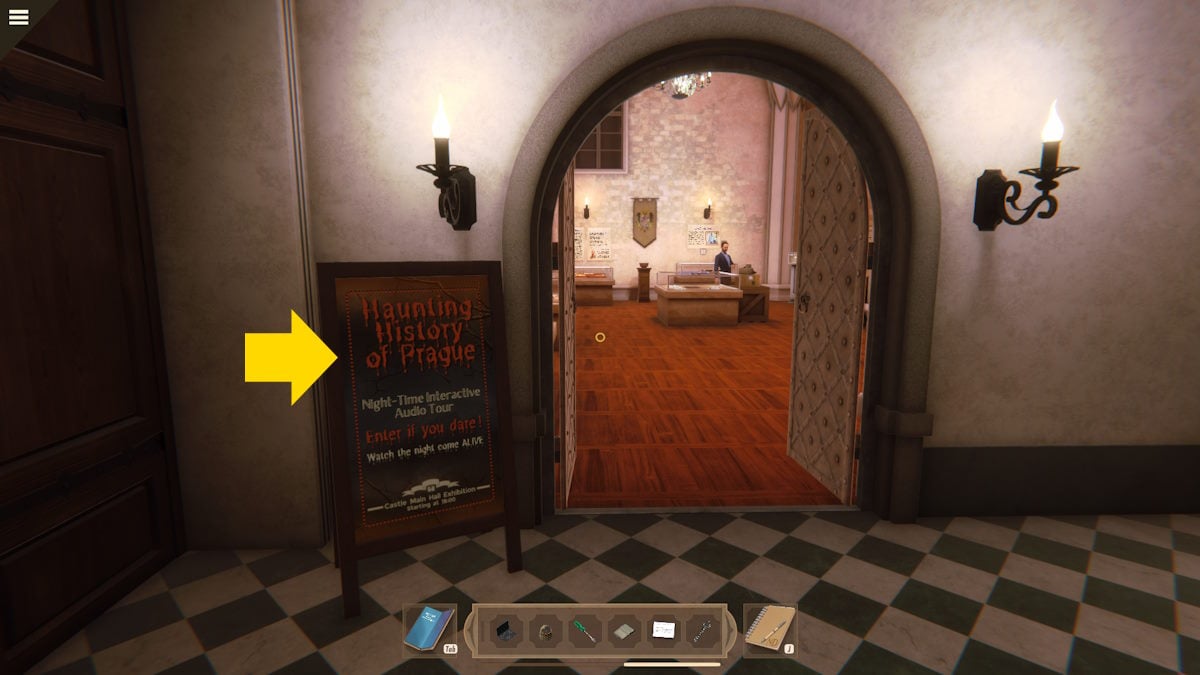
Return to the exhibition but instead of going inside, click the poster for the Haunted Tour outside (pictured) to begin the tour. You can do this earlier, but there’s a reason to do it now. As Oskar isn’t here, you can select the artifact you’ve recently opened and take the jewels (you can’t do this until you’ve seen the symbol in the old case). You can optionally take the tour itself by clicking the guided tour button next to each of the five numbered pictures on the walls (you’ll have to do it today to progress anyway). Click the Haunted Tour poster again to exit.
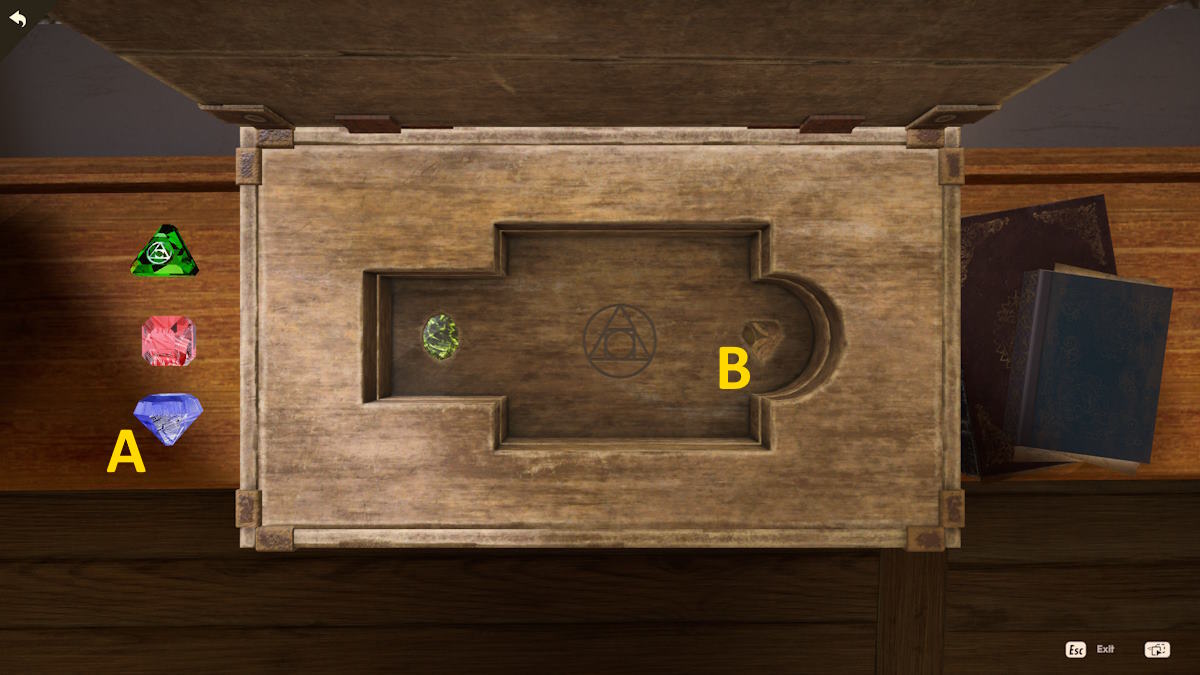
Return to Marek’s workshop and look again at the old case. You’ll note the three gems you ‘borrowed’ from Oskar’s artifact are now on the left of the close-up (see above). Place the blue gem (A) in the empty slot (B) and the top layer of the puzzle will be removed. Place the remaining two gems into the slots matching their shape on the next level to get to the real puzzle below. To finish opening the box, do the following:
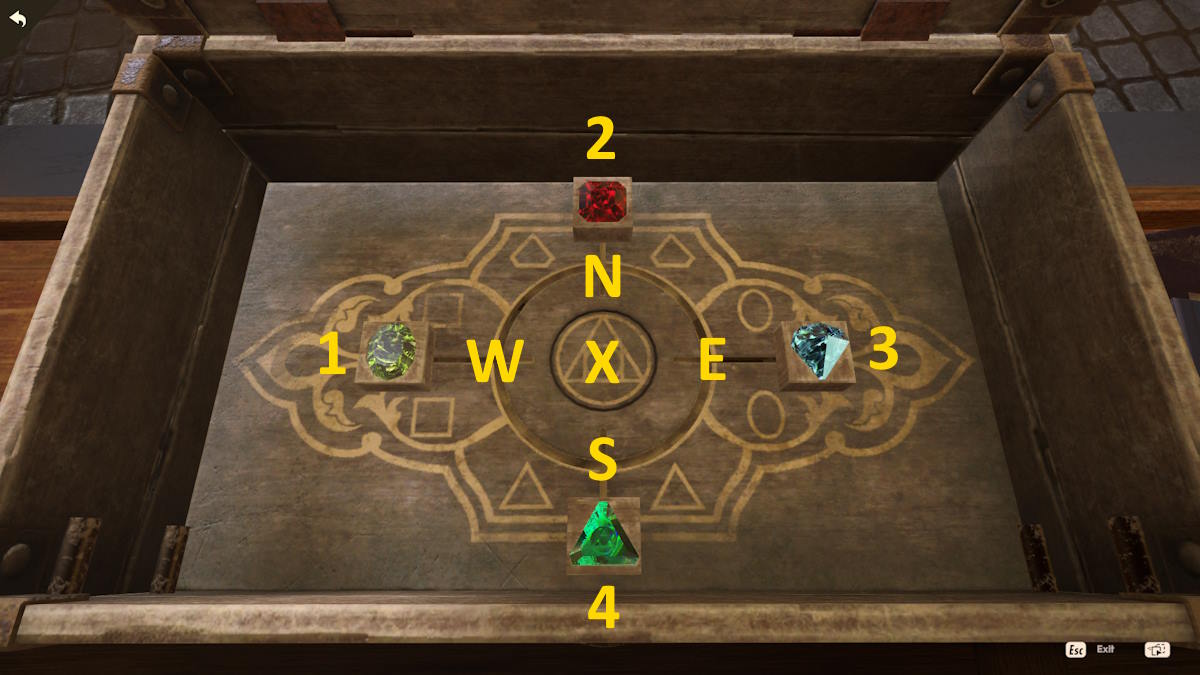
- Slide 1 to position S
- Slide 3 to position E
- Slide 2 to position W (which also rotates 3 and then 1)
- Slide 4 to position S
- Press X
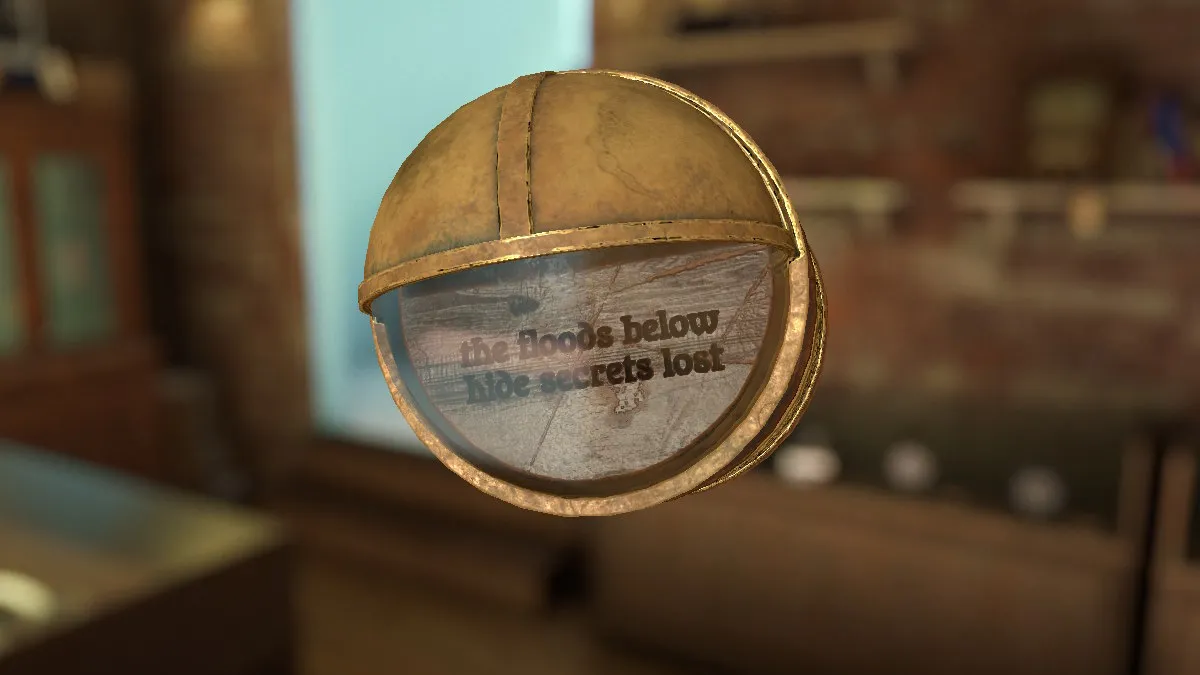
A tray will now slide open allowing you to take a Small Key. This completes the Marek’s Trunk task. The small key can be used at the bottom of the Snow Globe, revealing some kind of larger key and the message The floods below hide secrets lost.
Back to the tunnels
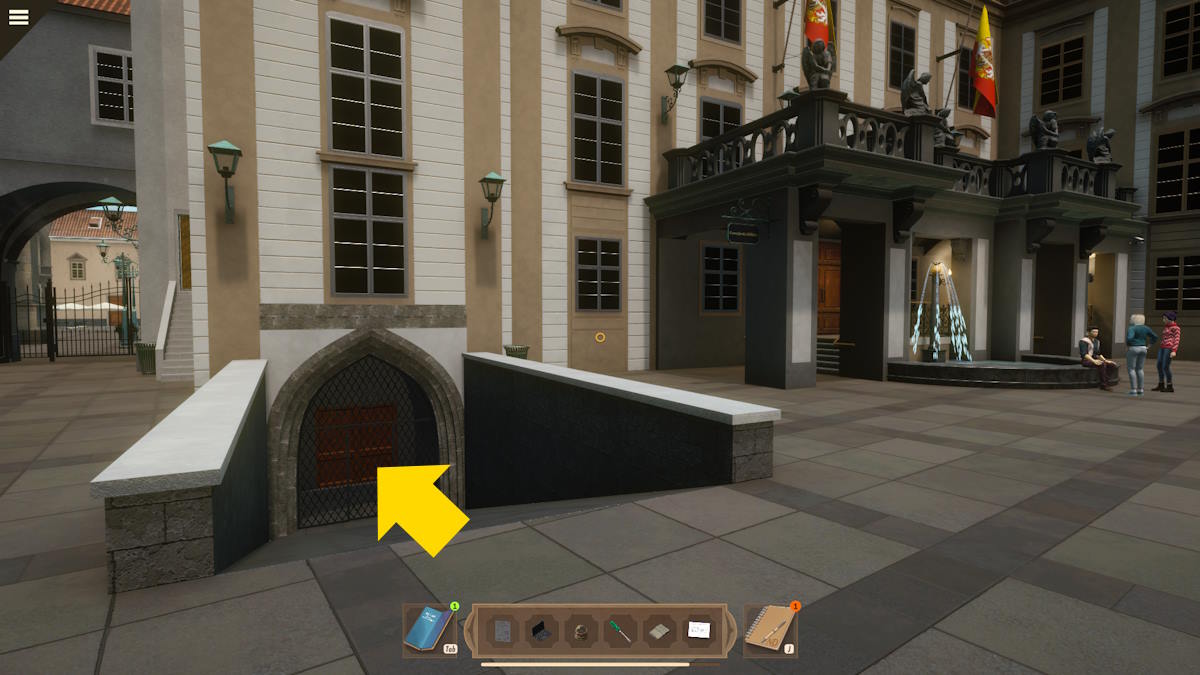
Go back to Castle Square, stand outside the exhibition, and go down the slop (pictured above) back into the tunnels below Prague. Don’t worry, you’re not going to be attacked this time!
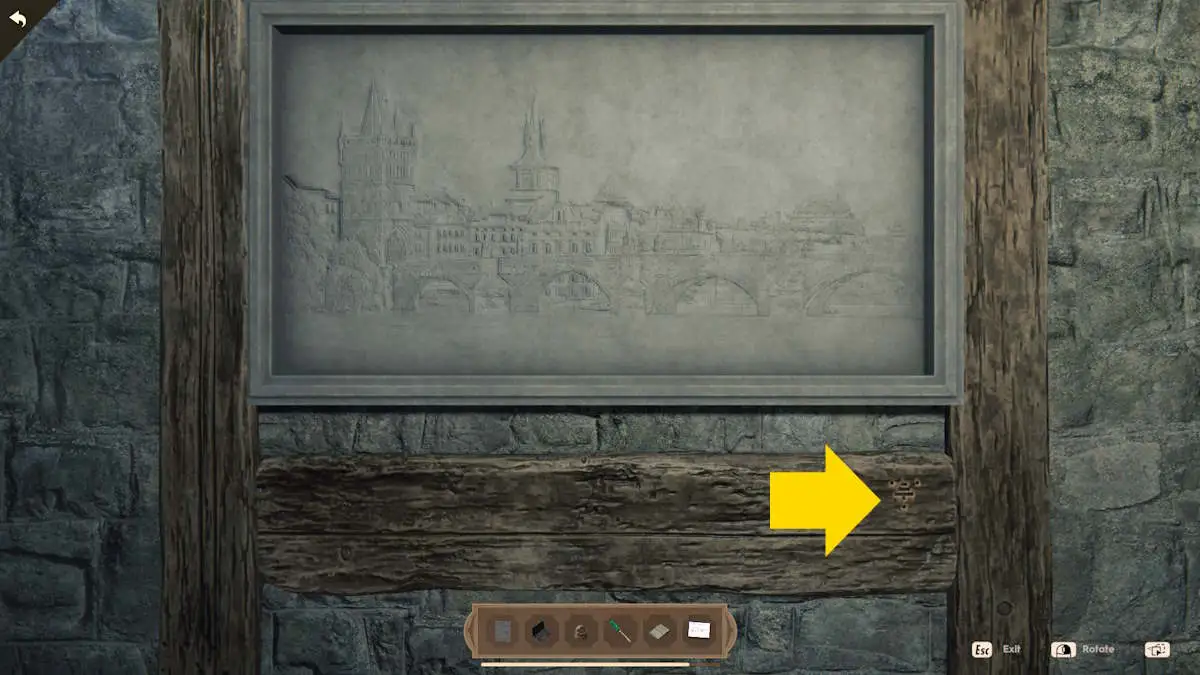
Walk forward, take the first left, and at the end of that passage, you’ll see an engraving on the wall to your right (pictured above). Walk over to the engraving and examine it for a closer look and then use the Snow Globe in the spot marked above to begin a light puzzle.
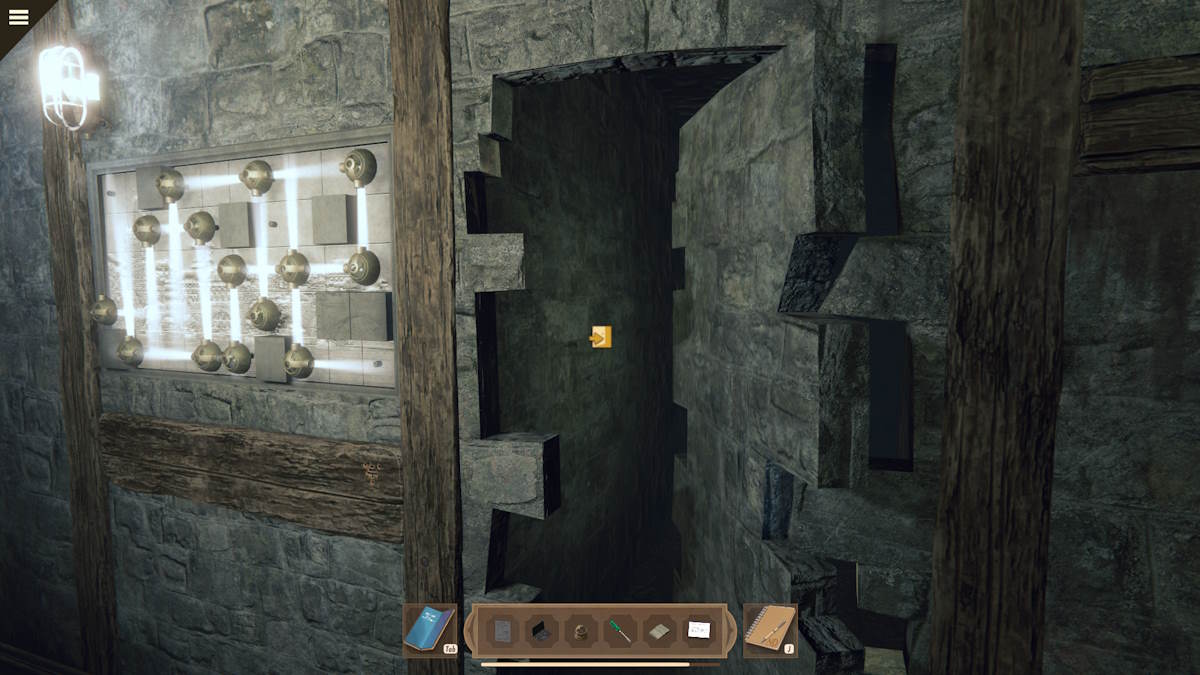
Drag the pieces from the bottom onto the engraving so that every space on it is lit up. You can see the solution above, as well as the door it opens next to it. Note that pieces with two or three refractors can be rotated. Once the door opens, head through.
The secret alchemy lab research
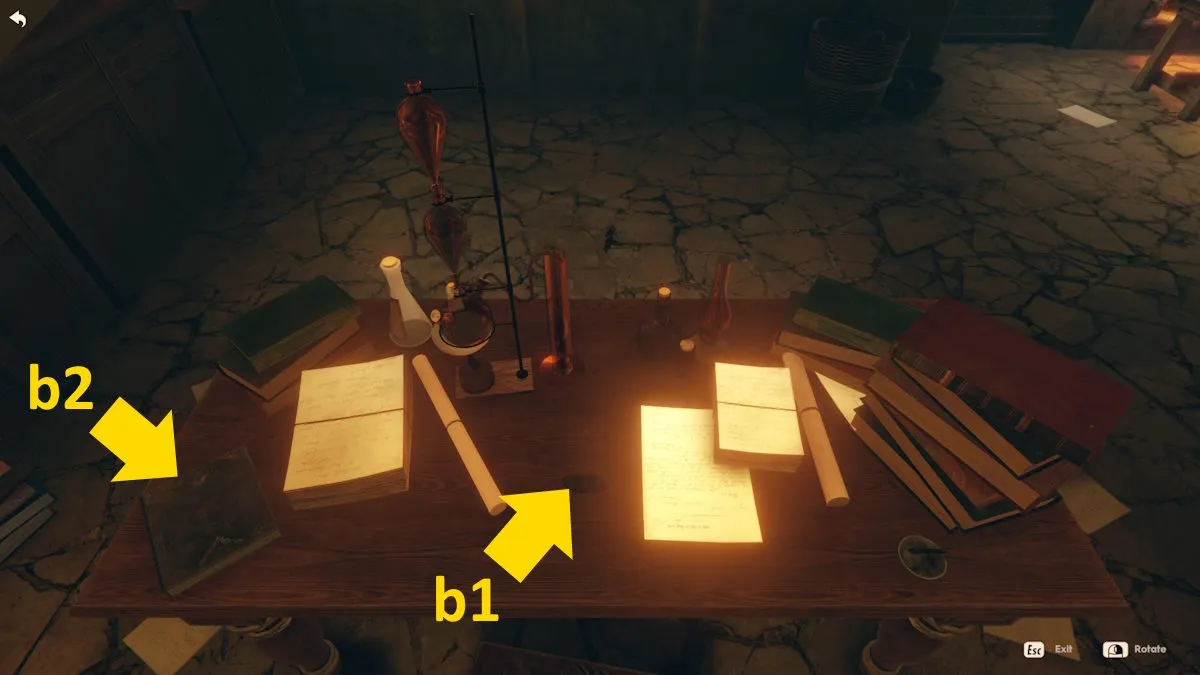
Walk across to the desk opposite where you come in and examine it for a close-up (above). Pick up the Black Stone (b1) and then open the book (b2).
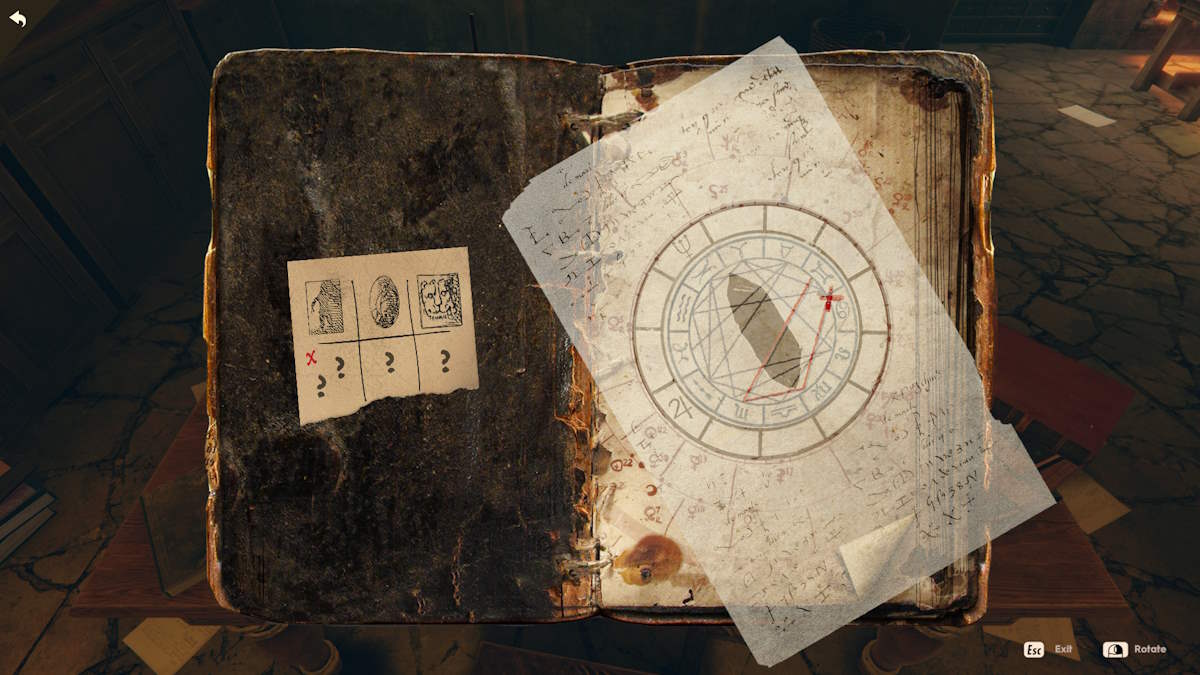
When you open it you’ll find the page on the left isn’t attached. Move it over the righthand page and it will attach itself to it. Now click this loose page to rotate it until it slots into the correct position above (you’ll know when it can no longer be moved). Working from the X on the loose piece of paper, you can see it marks four symbols from the X to three more points along the red line.
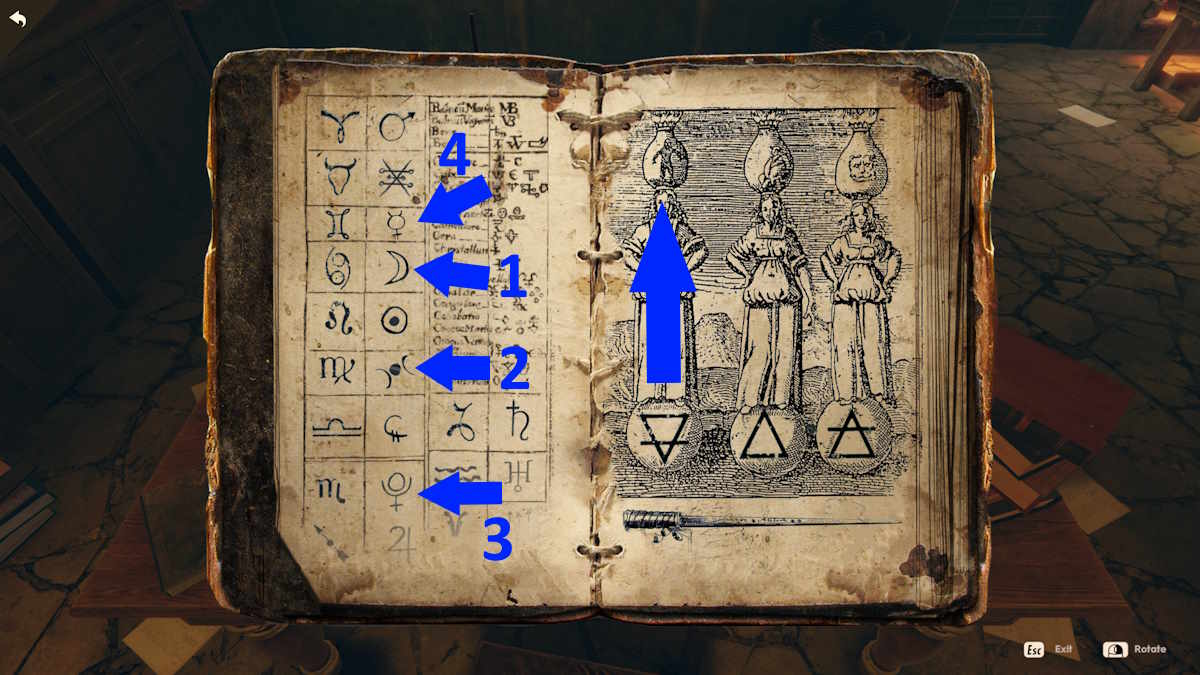
Flip the book page to the right, find the four symbols on the left column of the diagram, and note the symbols (and order) they equate to in the right column (see above). Also, note that each symbol on the pots on the right half of this page has a corresponding triangle pattern at the bottom. If you now flip the book back to the first page and look at the left side of it, you’ll see you now have a triangle pattern to match each top row symbol and a symbol to match each question mark on the bottom row.
Performing alchemy
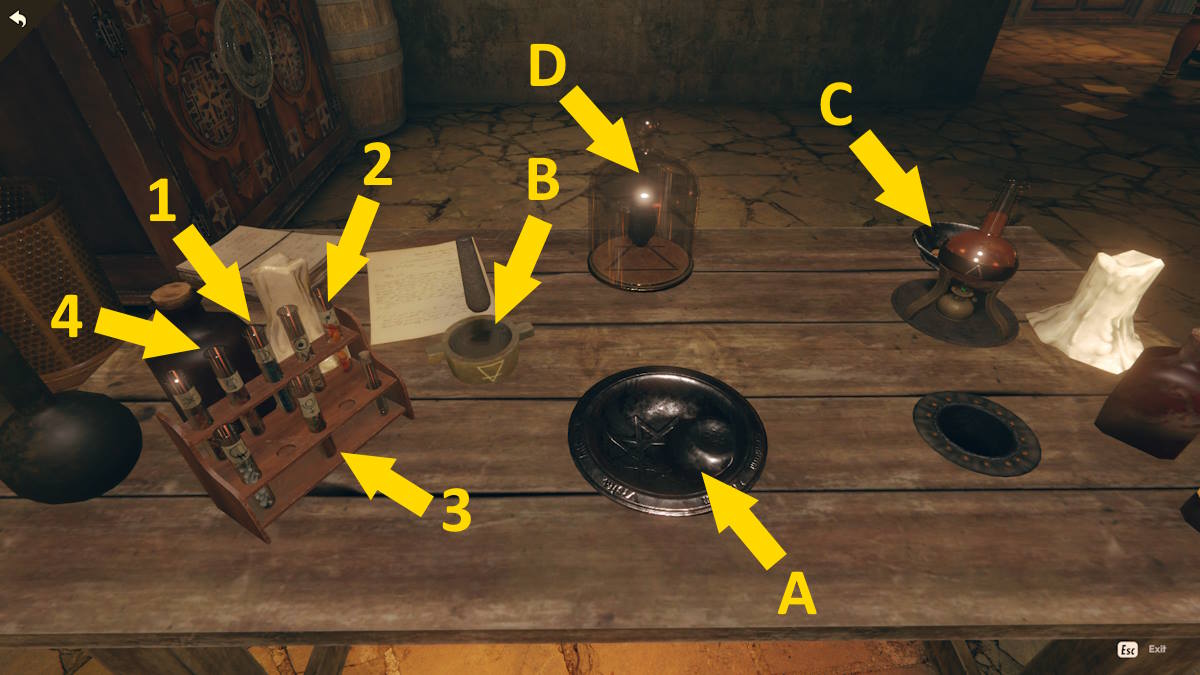
Now move over to the alchemy table itself (on the other side of the room, pictured above). Examine the table to get a close-up and do the following:
- Drag test tube 1 onto A
- Drag test tube 2 onto A
- Drag A into B and use the mortar and pestle on the ingredients until they become a white powder
- Move this new white powder from B back to A
- Drag test tube 3 onto A
- Drag A to C, which will liquify it before it returns itself to A
- Drag test tube 4 onto A
- Drag A to D
Opening the alchemy cabinet
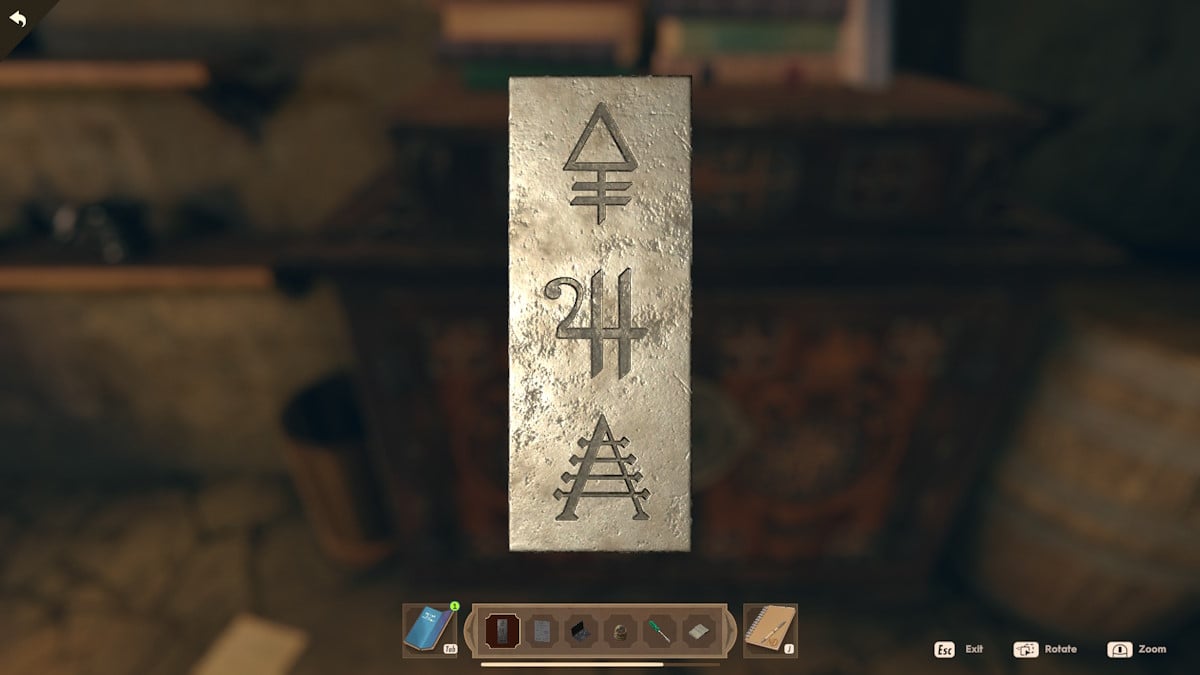
You can now take the Lock Combination from D. Note the three symbols marked on it (above), turn to the cabinet next to the alchemy table, and examine it. Align these three symbols on the front of the cabinet and it will open. You need to do this in a specific order (otherwise the lock will reset).
- Inner ring: Two clicks clockwise
- Middle ring: One click anticlockwise
- Outer ring: Four clicks clockwise
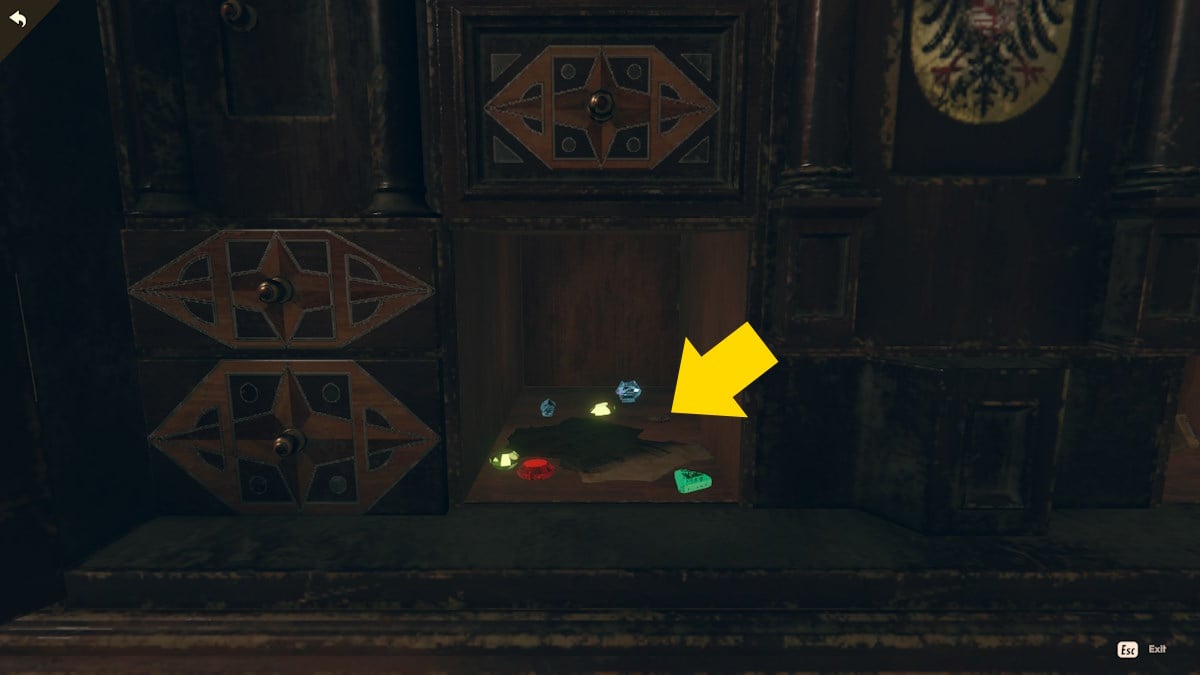
Once the cabinet is open, examine the gems in the bottom-left corner for a close-up and move them until you reveal a Coin (marked on the image above). Take the Coin.
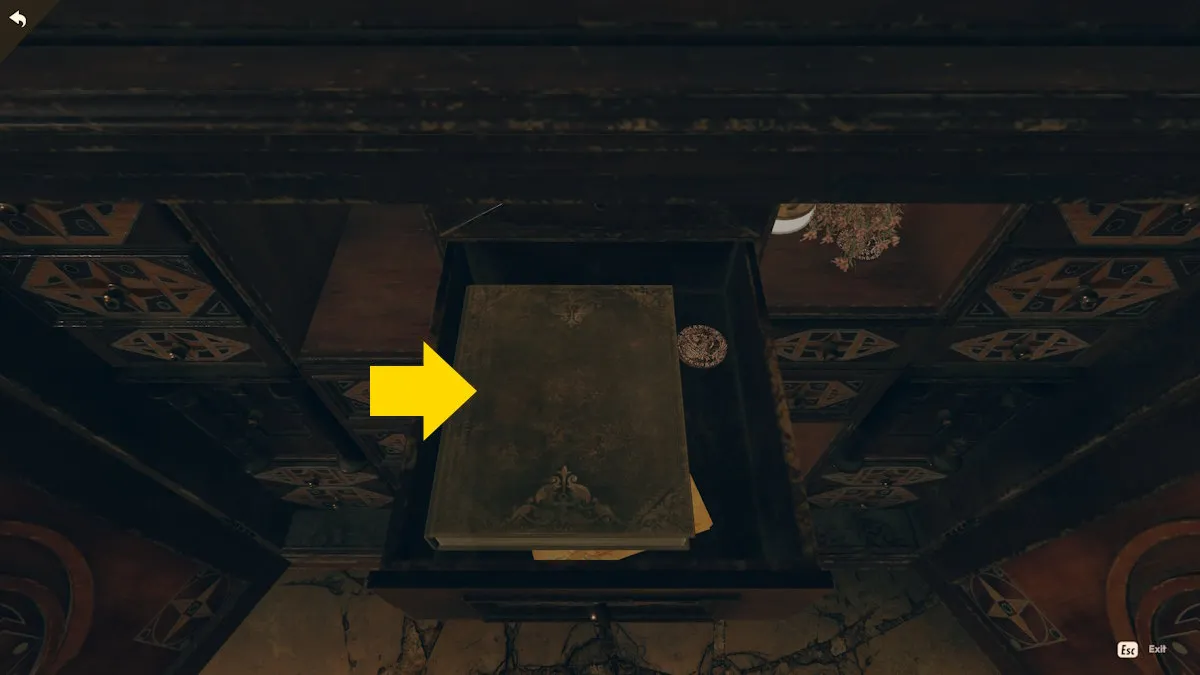
Now select the drawer in the middle of the top half of the cabinet and take the book from inside. You can look at the other artifacts in the cabinet, but can’t take them.
Leaving the tunnels
The way you came into the tunnels has been locked behind you so you can’t go that way. Turn left out of the door, turn left again, follow that corridor as it turns to the right, and then go left again to leave this section. You can however explore this section at your leisure if you want to.
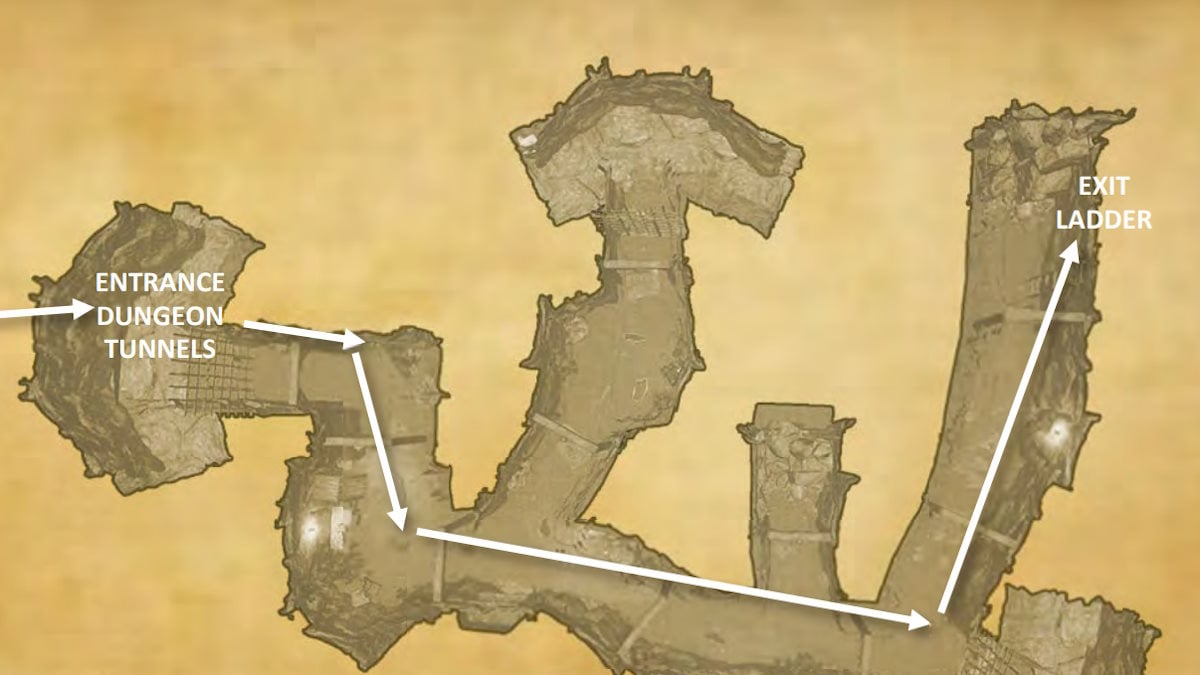
Once you go through the gate, it puts you in a new set of tunnels and It also seems that whatever was chasing you previously has returned. Follow the map above to get back outside as quickly as possible. Note the path you need looks like a dead end but there is a ladder on the right at the end of it you need to click.
Once outside again, you’ll get a call from Adela. Follow her instructions:
- Check the message from Adela and click Patricie’s phone number to add it to your address book.
- Go to the cafe and leave the book you found in the alchemy lab behind the counter (it will lean against the till monitor).
- Message Patricie to say you’ve left the book there.
You need to complete the Learn more about the Rezidente task before the day ends. Go to your phone and message Ned about it if you haven’t already. You also need to complete the Haunted Tour and get the journal update. After this, go and speak to Radek my the marionette carriage about the Rezidente.
For more on Nancy Drew, check out the Best Nancy Drew games of all time here at Pro Game Guides!


