
The New York Mysteries series of point-and-click puzzle adventures is a well-established favorite. If you’re working through the third installment, The Lantern of Souls, read on for a full walkthrough covering all the hidden objects and puzzles.
New York Mysteries 3 The Lantern of Souls Full Walkthrough
You play Laura James, a professional journalist who investigates supernatural mysteries as part of the White Stone Order. A rich lawyer, Thomas Martell, has died. His widow then died in a brutal murder the day after, prompting you to be dispatched to investigate.
If you’re new to the series, you can click the map at the bottom right of the screen to show a list of all the game’s locations (see above). This is super useful as it works as a fast travel mechanism, allowing you to click a location and instantly move there.
In addition, you’ll find your diary at the bottom left of the screen. This is useful for checking all the information you’ve learned about the case. This can be good for hints on what to do next and images that potentially help solve puzzles.
Chapter 1: The Martell’s Mansion
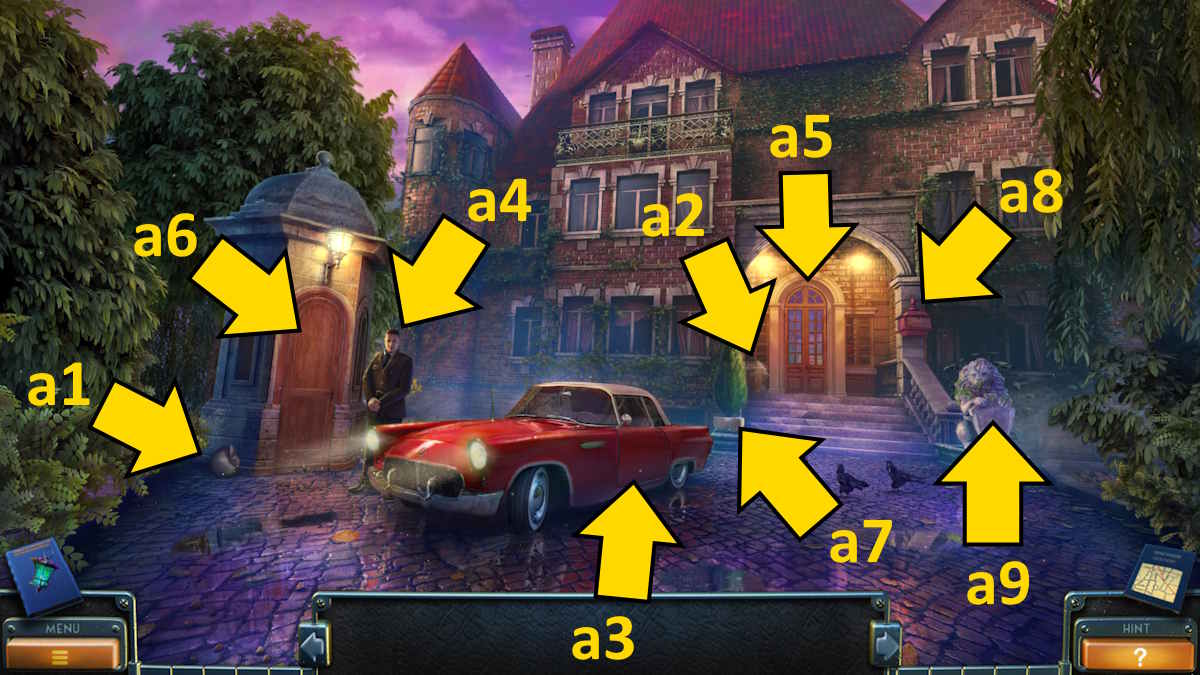
After the tutorial, you’ll find yourself at the Mansion Entrance. Take the Collectible from next to the guard tower (a1) and the Morphing Object next to the front door (a2). Click the car door (a3) to open it and again for a close-up of the inside of the car.
Take the Newspaper and Bag from the seat, and then open the bag in your inventory. Take out the Powder and Press Pass, show the pass to the guard (a4), and he’ll give you the Mansion Key. Get a close-up of the front door (a5), use the key on the lock, then click the door handle to head inside.
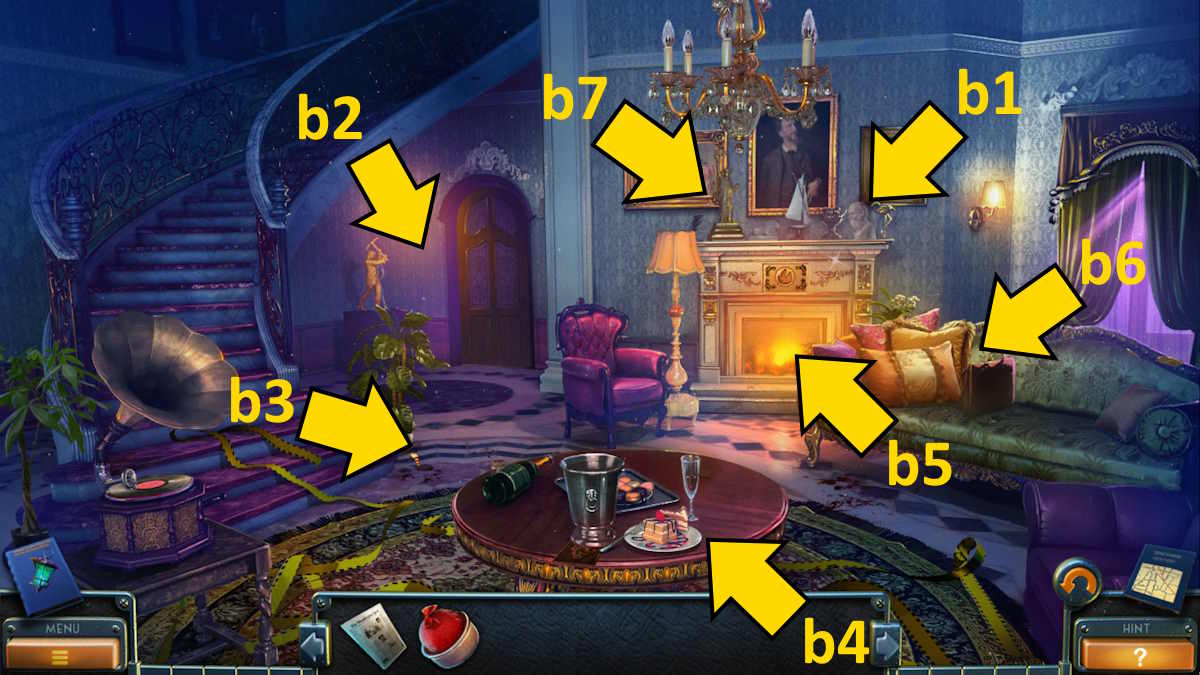
The Morphing Object is on the mantelpiece (b1) and the Collectible is on the table in the background (b2). Examine the plant at the bottom of the stairs (b3) to find a Tie Pin, and straighten it out in your inventory. Select the table (b4) and take the Bucket of Ice and a Fork, noting a key is needed to open a secret cache you find under the bucket.
Use the bucket of ice to put out the fire (b5) and take the Medallion. Move the cushions on the couch (b6) to take a Needle and a Card from the knitting. Slide the newspaper under the door (at b2), use the needle on its handle to push the key through, then click the newspaper once more to retrieve the Key. Now you can use the key in the door to move through to the Study.
The study
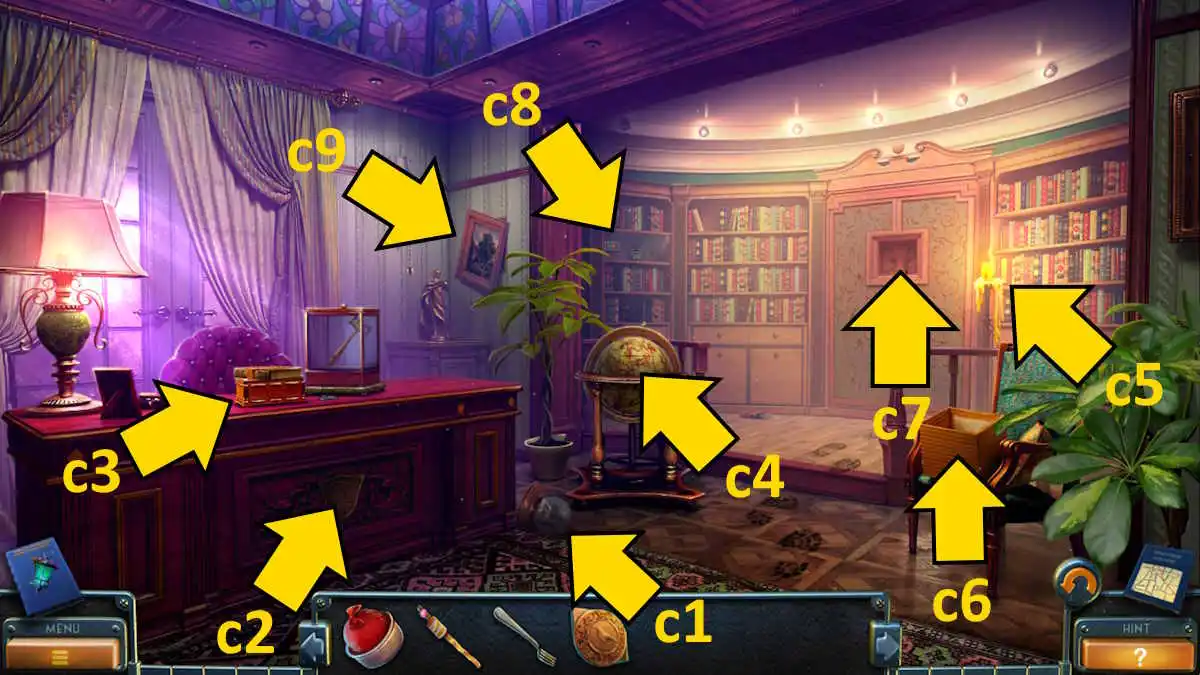
Take the Morphing Object from the floor by the desk (c1), the Collectible from the side of the desk (c2), then take the Zipper, Thomas’s Diary, and the Gavel from the top of the desk (c3). Add the medallion to the diary in your inventory to open it, and click the page that opens to remove the Hint.
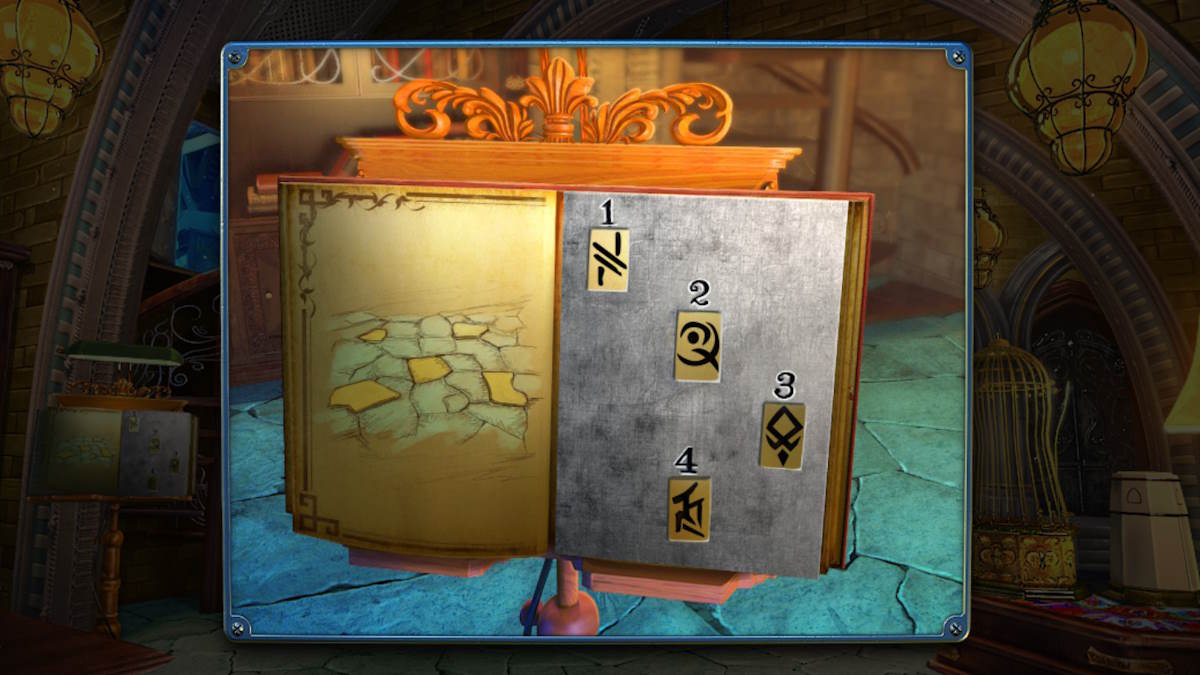
Select the globe (c4) for a close-up, click it to reveal a compartment, and press that to begin a puzzle. Add the hint you got from the diary, then click the numbered buttons (marked below) so that you turn the hand to mark the symbols in the correct sequence. Click the numbers in the following order:
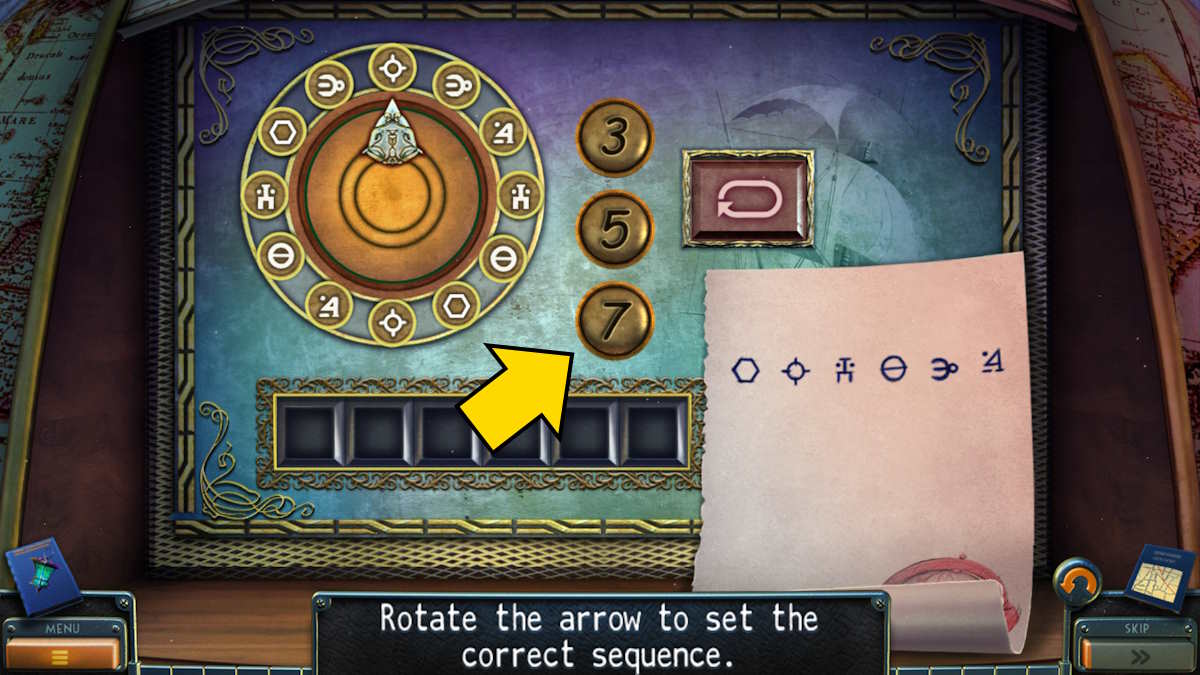
The globe will open, allowing you to take the Bottle. Use the gavel on the bottle in your inventory to smash it to get a Sheet of Paper with a candle on it. Use the piece of paper on the candle (c5) to reveal that there’s a secret cache outside in the garden. Also, take the Broken Stapler from the box on the chair (c6).
Move back to the living room and use the zipper on the bag on the couch (b6) to open it and take the Glue, an Umbrella (extend it in your inventory by clicking it), and a Key. Now go outside and use the key you just found to unlock the guard post (a6). Click the door again for a close-up and take the Shovel and Flashlight. Use the shovel on the plant by the front door (a7) and take the Fire Symbol.
The fire symbol puzzle
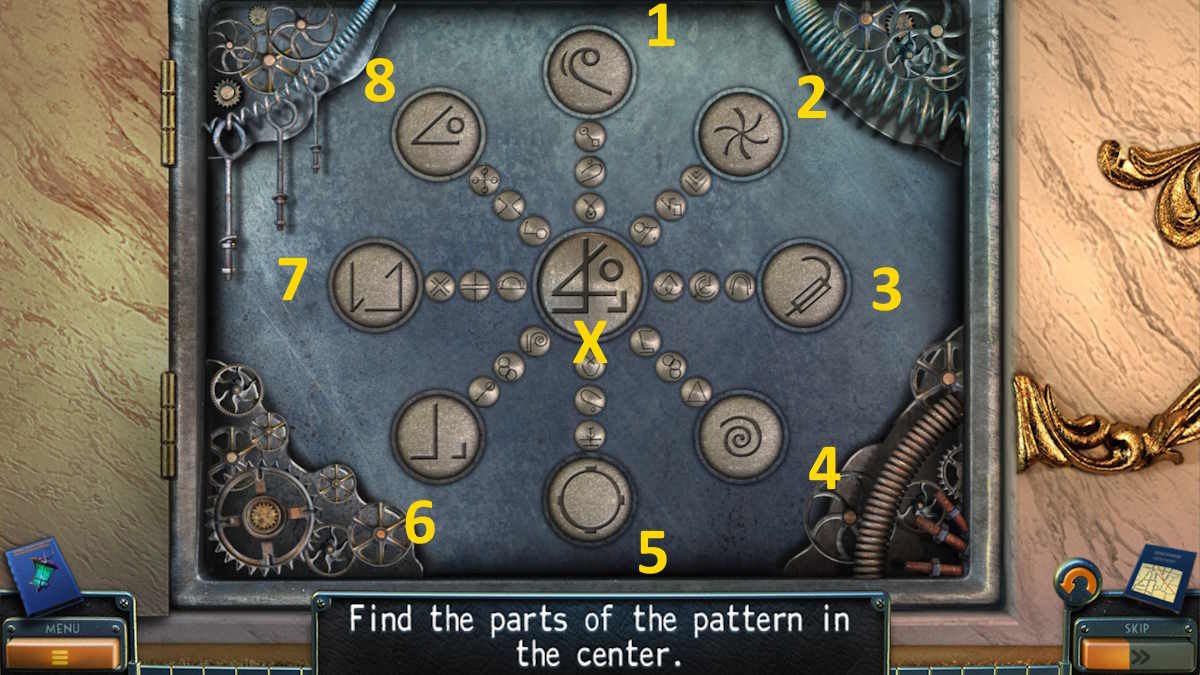
Return to the living room and use the fire symbol on the plaque above the fire (b5) to reveal a puzzle. You need to find the shapes that together make up the 16 images that appear in the middle of the screen (X, above). If you’re stuck on this one, the answers are:
- 6 and 8
- 4 and 7
- 2 and 5
- 1 and 3
- 7 and 8
- 1 and 6
- 3 and 5
- 2 and 4
- 7 and 8
- 1 and 5
- 4 and 6
- 2 and 3
- 1 and 7
- 3 and 5
- 2 and 8
- 4 and 6
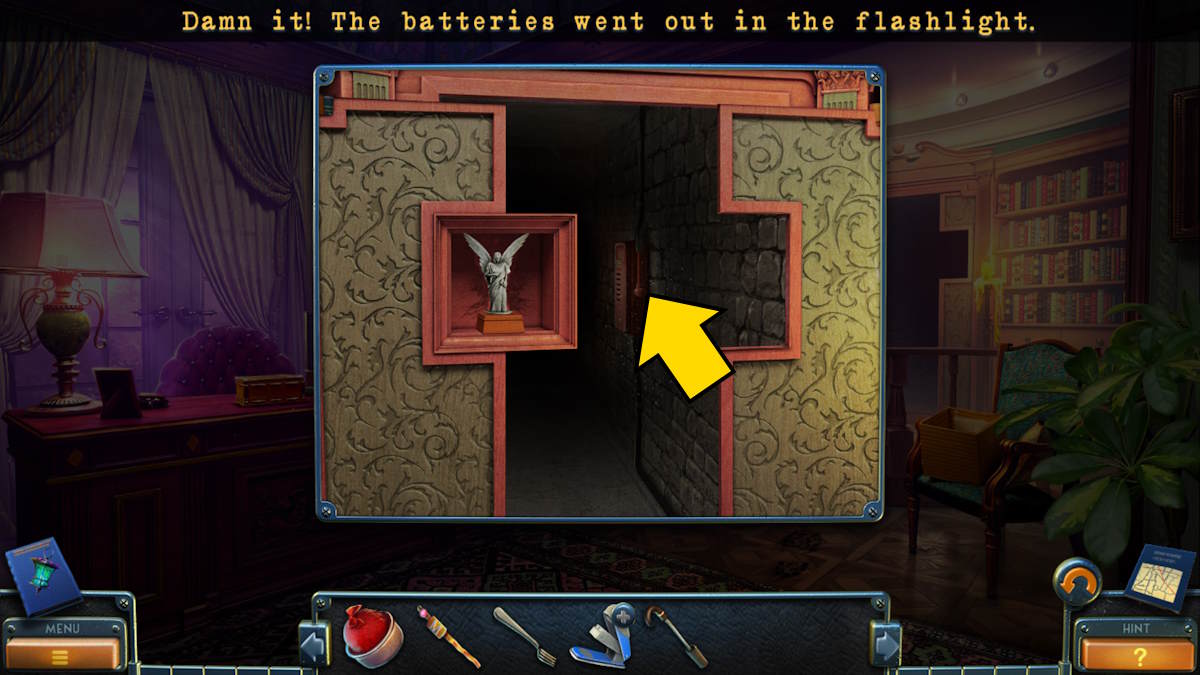
Once complete, take the Figurine Parts. Select the figurine parts in your inventory, add the glue, then piece the sections back together to get the Angel Statue. Move to the study and place the angel statue in its place on the back wall (c7), opening up a secret corridor. Use the flashlight to find the fusebox (above), and then click it to turn the lights on in the corridor. You now have access to the secret passage.
The secret passage
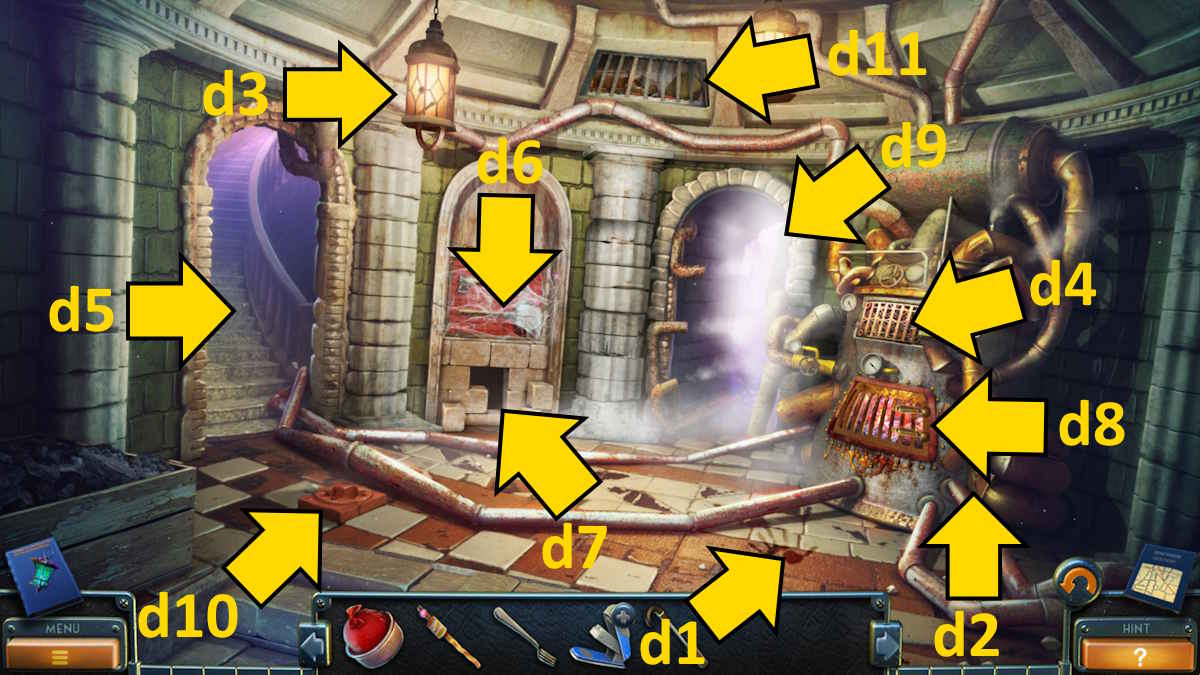
You’ll find the Morphing Object on the ground (d1) and the Collectible on the machine (d2). Use the umbrella to pull down the lamp (d3), use the tiepin to unlatch it, and take the Handle. Select the machine panel (d4) and use the fork to remove the screws.
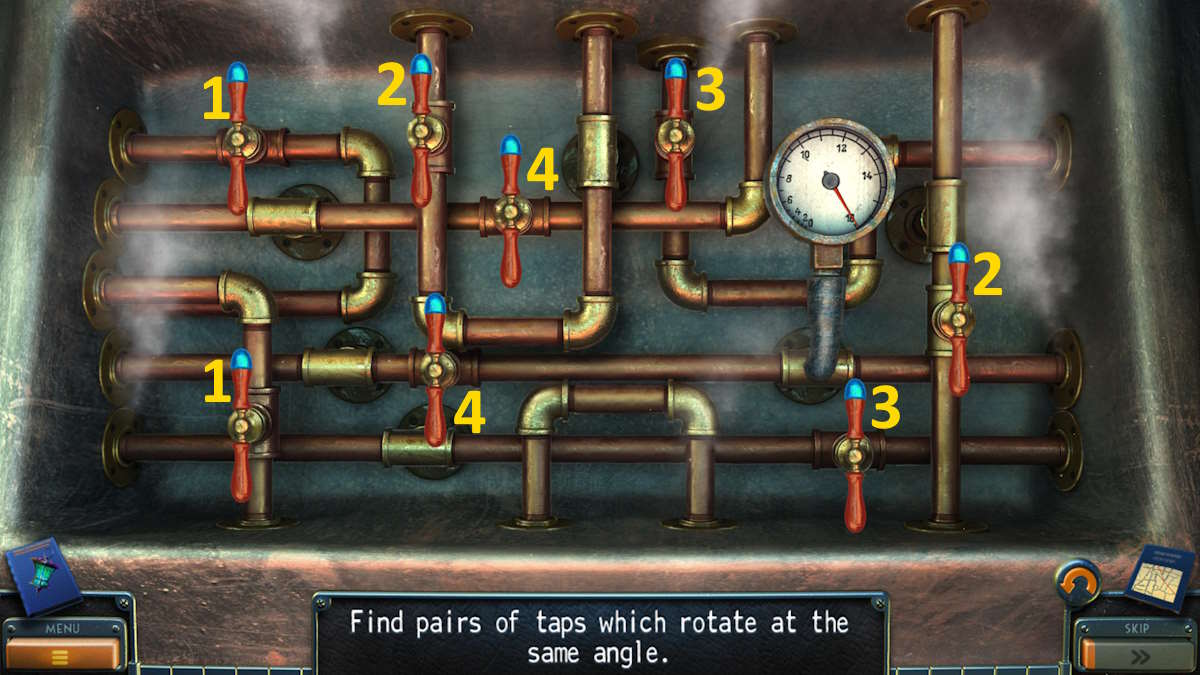
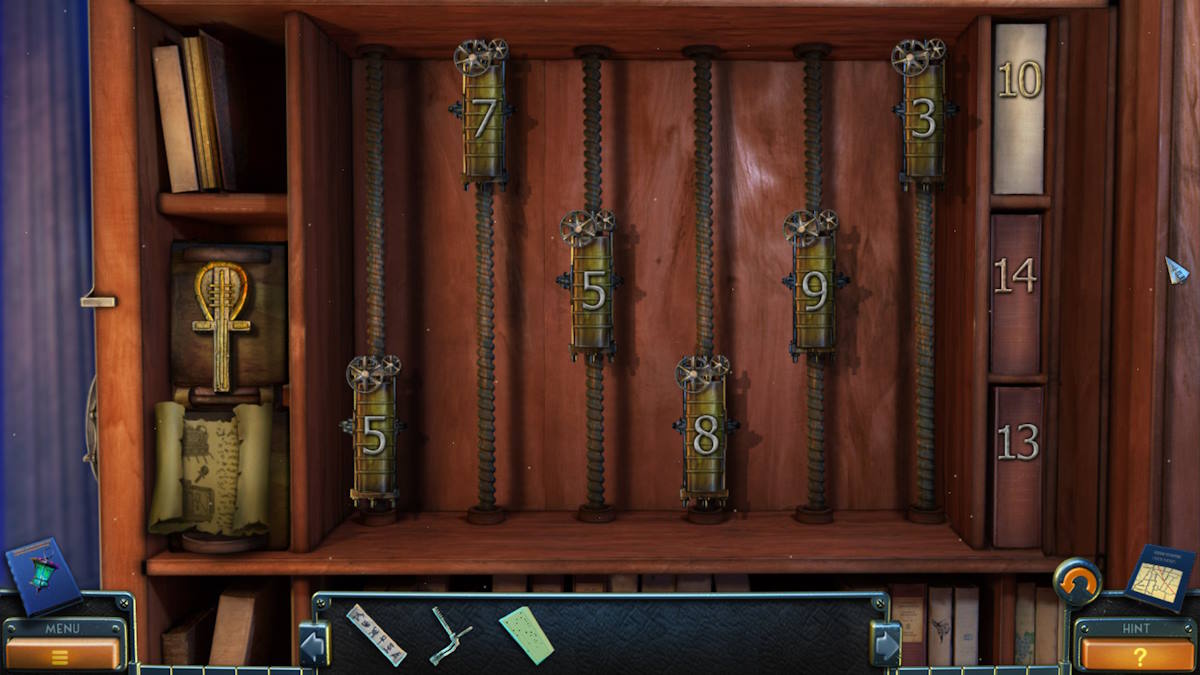
Click the panel again to remove the grate, take the Matches, and then add the handle to the mechanism behind to begin a puzzle. You need to find matching pairs of handles, which I’ve marked with matching numbers above. Now move up the stairs (d5) to the Rock Ledge.

The Collectible is next to the crate (e1), while the Morphing Object is on the machine (e2). Click the branch (e3) to snap it, then click again to take the Rope and a Twig. Select the chest (e4) for a close-up, take the Candle, and then return to the secret passageway. Use the twig to clear the cobwebs (d6) and take the Axe and Shovel. Place the candle below where you just took the shovel, use the matches to light it, and click the bear to move it out of its cubby hole (d7). Click the bear again to take the Scissors and a Scales Symbol.
Go back to the ledge and use the axe to break the crate (e5), taking the Hammer and Hook from inside. Combine the rope and hook in your inventory to get a Hook and Rope, which you can attach to the concrete slab (e6). Come out of that close-up, and click the end of the rope on the floor, which will attach it to the machine’s lid (e7). Use the shovel on the slab to knock it off the ledge, which removes the machine lid.
Back to the study
Return to the study and use the scissors on the note inside the box on the chair (c6) to find the Mailbox Key and a Hint (see above, you can’t pick it up). Use the scales symbol on the box on the desk (c3) and take the Stamp Ring and Jewelry Magnifier.
Head to the living room next, get a close-up of the Statue of Liberty on the mantlepiece (b7), and click the arm to open a secret compartment. Use the images on the hint you just saw (above) in the study to open it and take the Cog. Also, use the scissors on the sewing box (b6) and take the Mitten.
Now go outside to the mansion entrance and use the key to open the mailbox (a8), taking the Parcel from inside. Remove the paper from the parcel in your inventory, and then use the stamp ring to open the box. Take the Eagle Figurine from inside.
Go inside to the secret passageway and use the mitten to open the burner on the machine (d8). Use the shovel to remove some coals, further reducing the pressure in the machine, and the hot steam will stop flowing out of the damaged pipes. You can now go through the doorway (d9) for a cutscene.
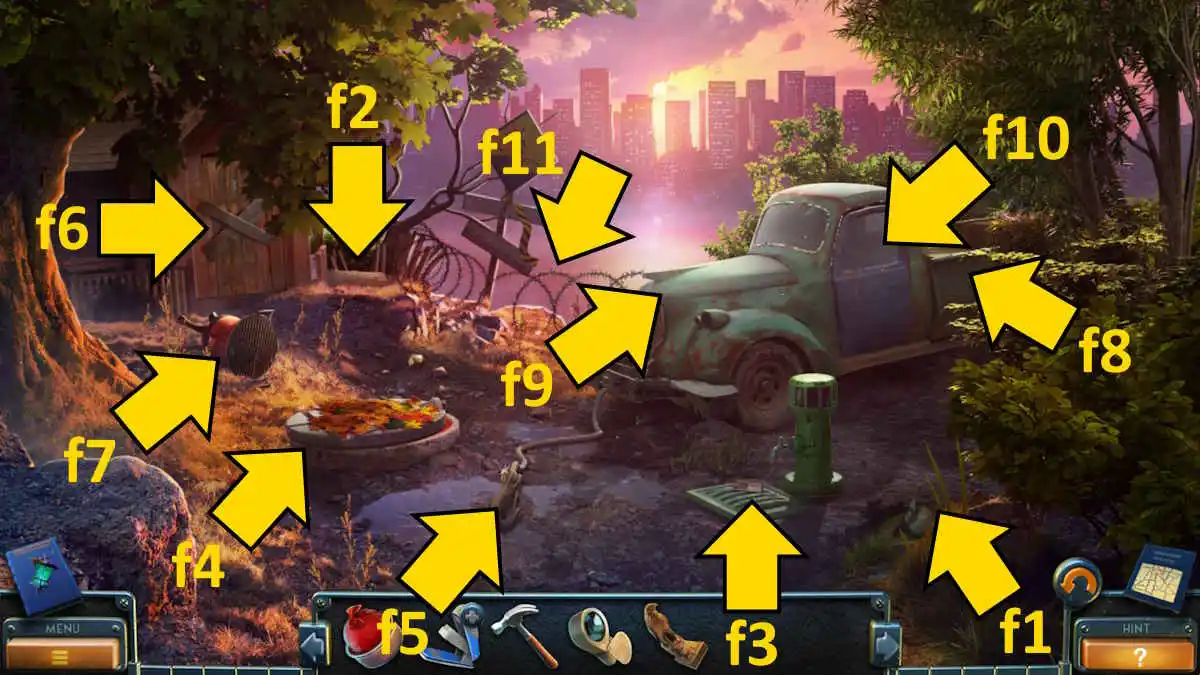
The Collectible is by the drain (f1) and the Morphing Object is by the shed door (f2). Take the Card from the drain (f3), clear the leaves (f4) to find a Stick and a Cog, and you can then click the rope (f5) to attach it to the manhole cover (f6). Use the hammer to remove the boards from the door (f6), but that’s all you can do here for now. It’s time to go back to your car (a3) and report your findings to the order by clicking the key in the ignition in the close-up.
Chapter 2: Order HQ
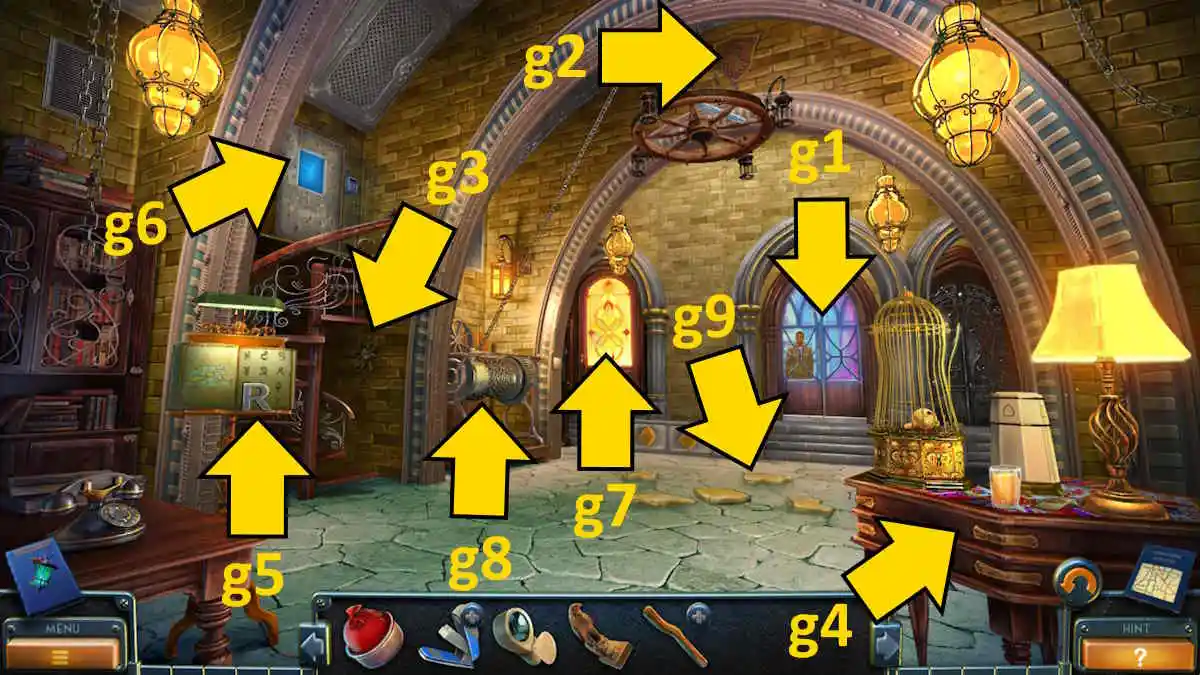
When you arrive in the hall, speak to Professor Bishop (g1) to find that he’s stuck in the Hall of Fame due to a rusty lock. He’ll give you a Code to help you get into the lab where you should be able to find some help to get him free.
The Collectible is high on the wall (g2) and the Morphing Object is on the left near the spiral stairs (g3). You can also take a Card, Gold Mouse, and Glass of Juice from the table (g4), and the Letter R from the lectern (g5). Now click the door at the top of the stairs (g6) for a close-up, add the code, and type 4513 (then hit enter) into the keypad to go inside to the lab.
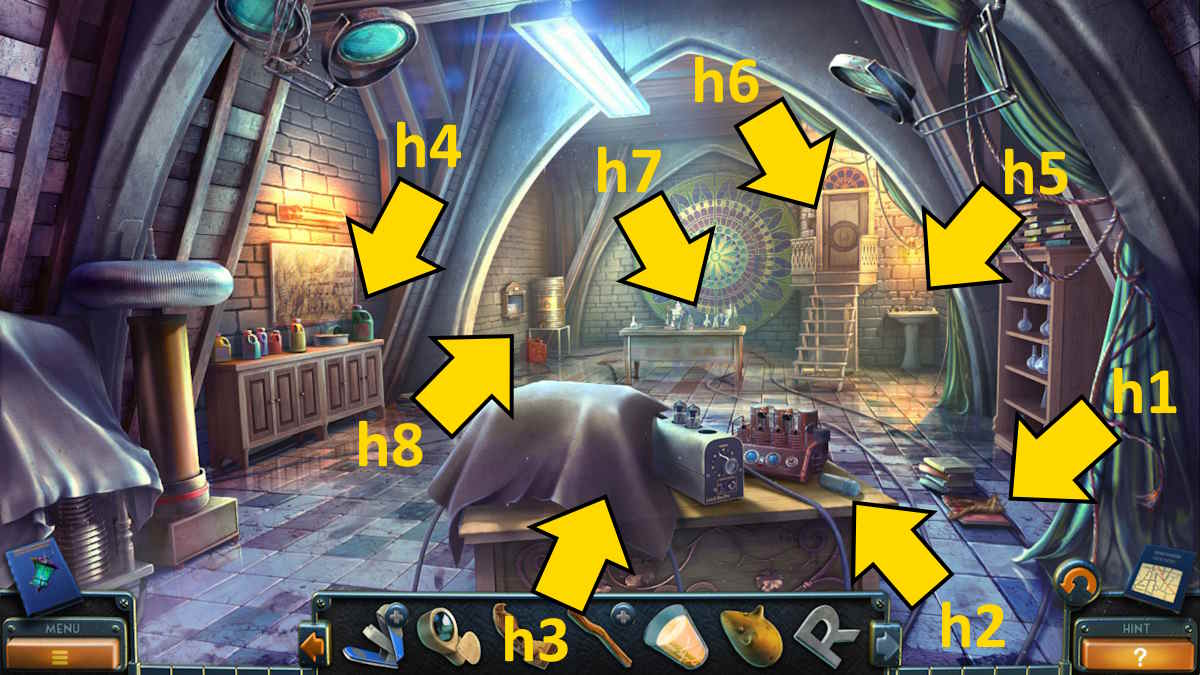
After speaking to Will, you’ll find the Collectible on the books (h1) and the Morphing Object is on the edge of the table (h2). Remove the cloth on the table (h3), click the cage, and add the gold mouse to the mechanism on its lid to begin a puzzle. The solution is below if you’re stuck. Once complete, take the Rat from the cage.
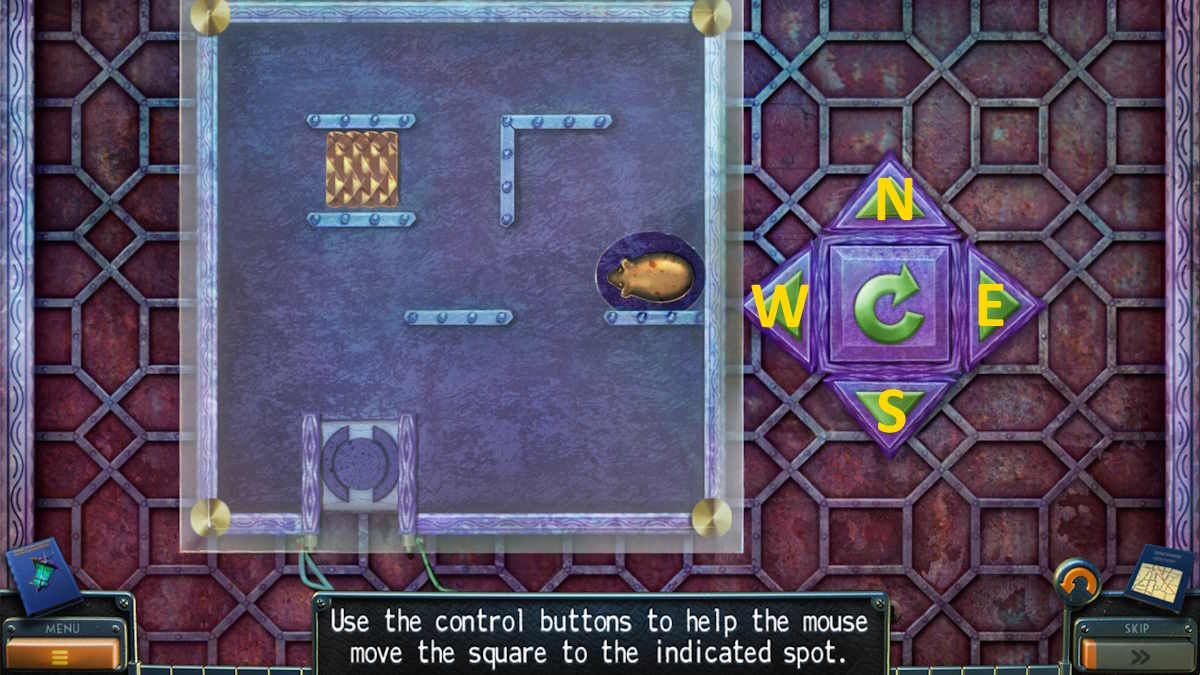
- Wx4, N, E, W, N, Ex2, S
- Wx2, S, Ex2, Nx2, Ex2, S
- W, S, Wx2, S, E, S, Ex2, N
- Wx2, E, N, Wx2, S
Take the Alkali from the cabinet (h4), and use the sink (h5) to empty the glass in your inventory. Afterward, use the tap with the glass to gain a Glass of Water. Select the door next (h6) and put the rat into the door mechanism to open it and start a missing objects mini-game. Once complete, take the Catalyst.
Click the workbench (h7) next, and add the alkali, glass of water, and catalyst to the table. To complete the anti-rust do the following:
- Unscrew the alkali cap and use the pipet to draw some out of the bottle
- Use the pipet on the glass of water, then pour the water into the tube
- Grind the sugar, then add it to the bowl along with the catalyst
- Place lids on the bowl and tube
- Use the matches to light the burner
- Add the spray cap to the bottle, then take the finished Rust Remover.
Helping Bishop

Return to the hall, use the rust remover on the door (g1), and head into the Hall of Fame. Talk to Bishop once more, then grab the Collectible from above the fireplace (i1) and the Morphing Object from the wall (i2). Select the fireplace (i3) and take the Fireplace Tongs and Rag, then stand up the chair (i4) and get the Letter J from the curtain rail (i5).
Select the painting (i6), add the letters J and R, and take the Bunch of Lockpicks from behind the painting. Select them in your inventory and click the metal ring to get a Lockpick and a Screwdriver Handle. You can now use the handle to get the Forked Screwdriver from the back of the fireplace (i3). You can also add the eagle figurine to the eagle statue (i7) before heading back into the lab.
Use the forked screwdriver on the wall cabinet (h8) to get the Engine Chart and a Vacuum Diode. Add the diode to the machine on the table next to the rat cage (h2), which opens, allowing you to take the Tap Handle. Now, use the fireplace tongs to pick up the Dirty Funnel from the bowl of alkali (h4), and wash it in the sink (h5) to receive a Funnel. Add the funnel to the red gas can (h8), add and use the tap on the barrel there, and take the Jerry-can.
Returning to the Mansion
Use the lockpick on the drawer in the guard’s hut (a6) to get the Remote Control. Move into the study and use the remote control to open the bookcase (c8), taking the Card and Shape Key from inside. Return to the rock ledge and use the rag on the oil drum (e4) to get an Oily Rag, before moving on to the cliff. Use the oily rag on the barbecue (f7) and open it up to get some Wooden Tongs.
Go to the rock ledge again and use the tongs to get the last cog you need (it’s stuck in the wall, pictured above, by the toolbox (e8). Add the two cogs on the floor to the box, plus the ones in your inventory. The box will open and you can take the Key and a Card.
Back at the cliff, use the key to gain entry to the shed (f6) and start another missing object mini-game. Once complete, you’ll receive the Valve. Add the valve to the tap (f3) and run the water, which allows you to take the Car Key from the grate here.
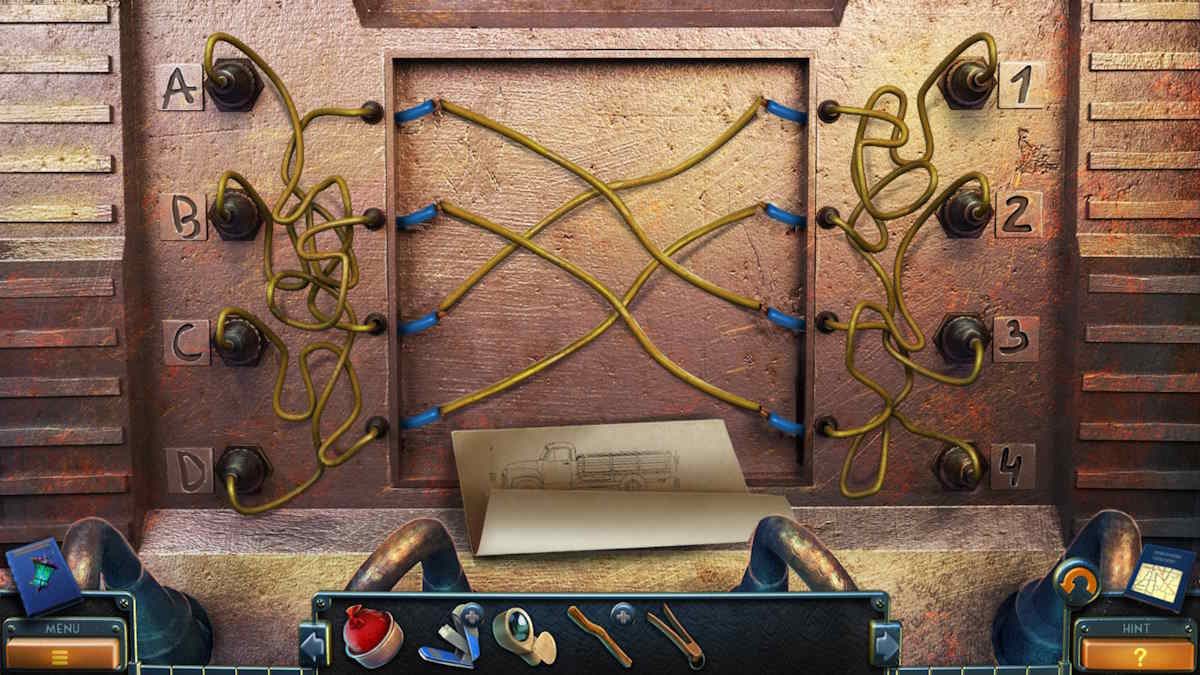
Click the back of the truck (f8) and open the valve to pour in the gas from the jerry can, then click the hood (f9) and then the engine inside. Now you can add the engine chart to start a connections puzzle. I’ve shown the connections required above.
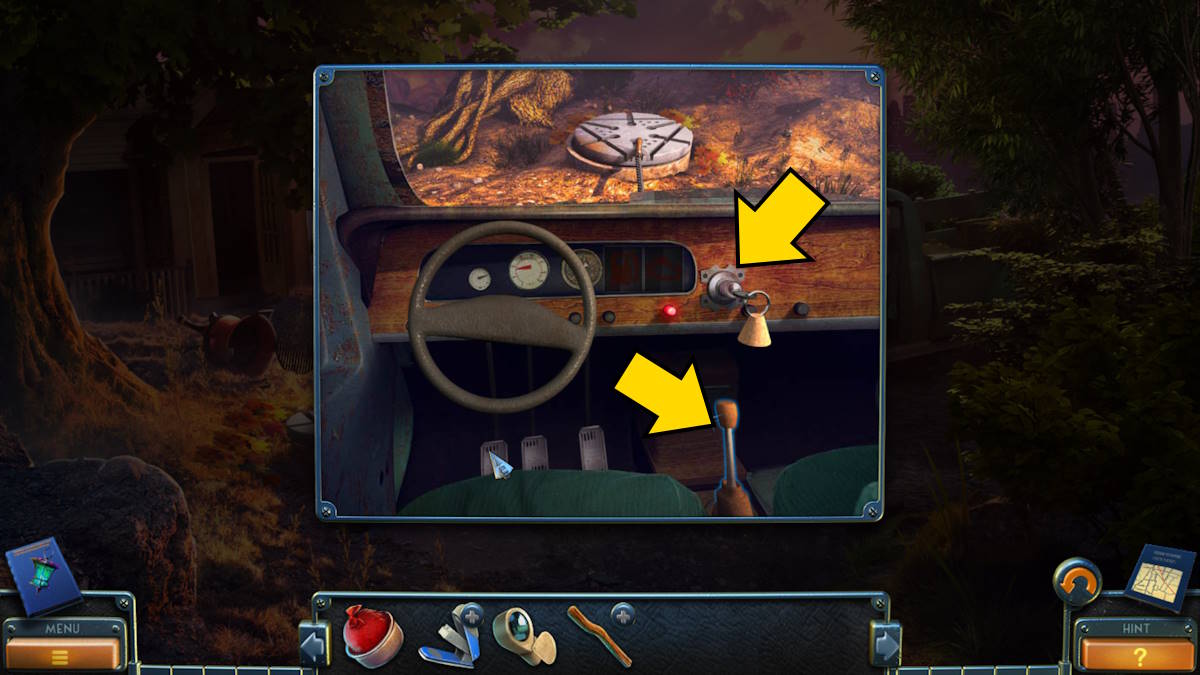
Select the truck’s door (f10) for a close-up of the inside and use the car key (see above) to start it up. Press the indicated pedal (it will glow blue), then the hand break (marked above), and then the other indicated pedals until the truck reverses. Click the now-open manhole (f4) for a cutscene, and you will head into the Bunker Entrance.
Chapter 3: The Mayor’s Bunker
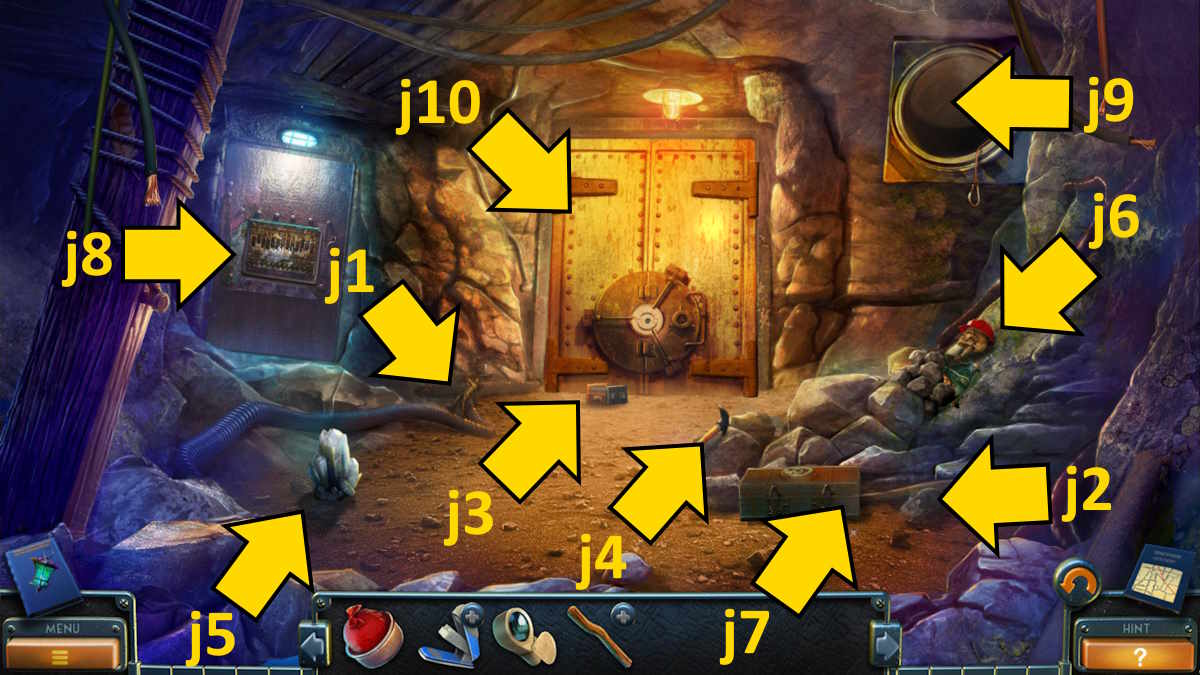
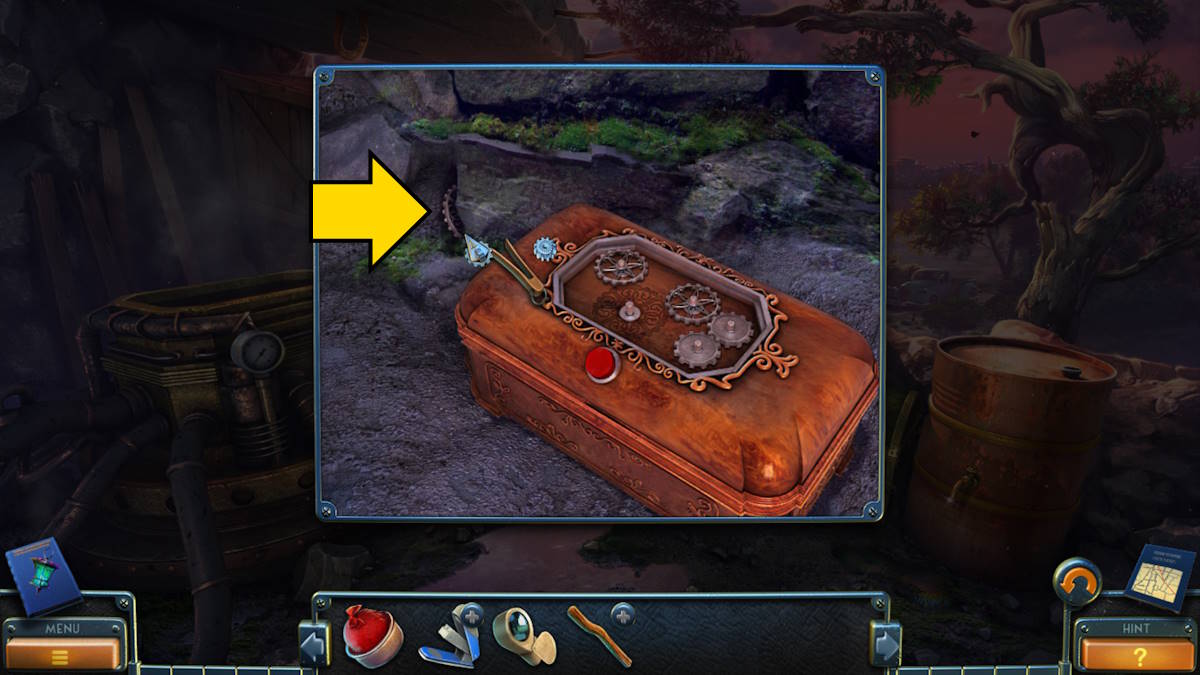
Take the Collectible from the pipe (j1), the Morphing Object near the box (j2), and the Lamp (j3). Grab the Pickaxe (j4) and use it to collect a piece of Blue Mineral (j5). Remove the rocks from the skeleton (j6) to take the Fancy Disc and the Speleologist’s Diary. Open the diary in your inventory to read it, taking the Chart from inside.
Place the fancy disc on the box (j7) to open it, grabbing the Stone Detail, Cutters, and Battery Pack from inside. Add the battery pack to the lamp and click it again to get a UV Lamp. Head back to the cliff and use the cutters to get some Barbed Wire (f11), then add the wire to the stick in your inventory to get a Homemade Brush. Return to the bunker and use the brush on the box on the wall (j8), then click the box again to begin a puzzle.
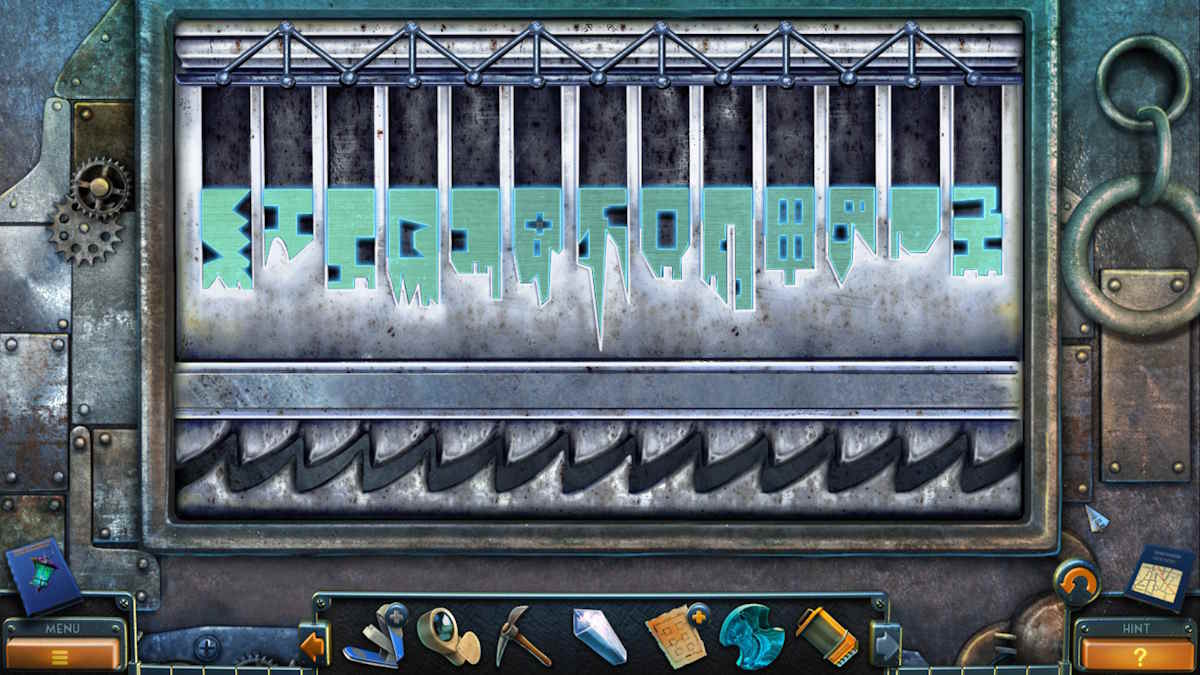
All you need to do is swap the pieces so that the details match the shapes behind them. I’ve put the completed puzzle above for reference. When done, you’ll gain access to a missing objects mini-game. Once that’s complete, take the Ladder.
Now you can use the ladder on the access pipe (j9) to enter some ventilation ducts. Once you’ve climbed up, open the chart and use the UV lamp on it (you’ll have to switch the lamp on). This gives you the Vent System Chart, allowing you to follow this path through the maze of tunnels:
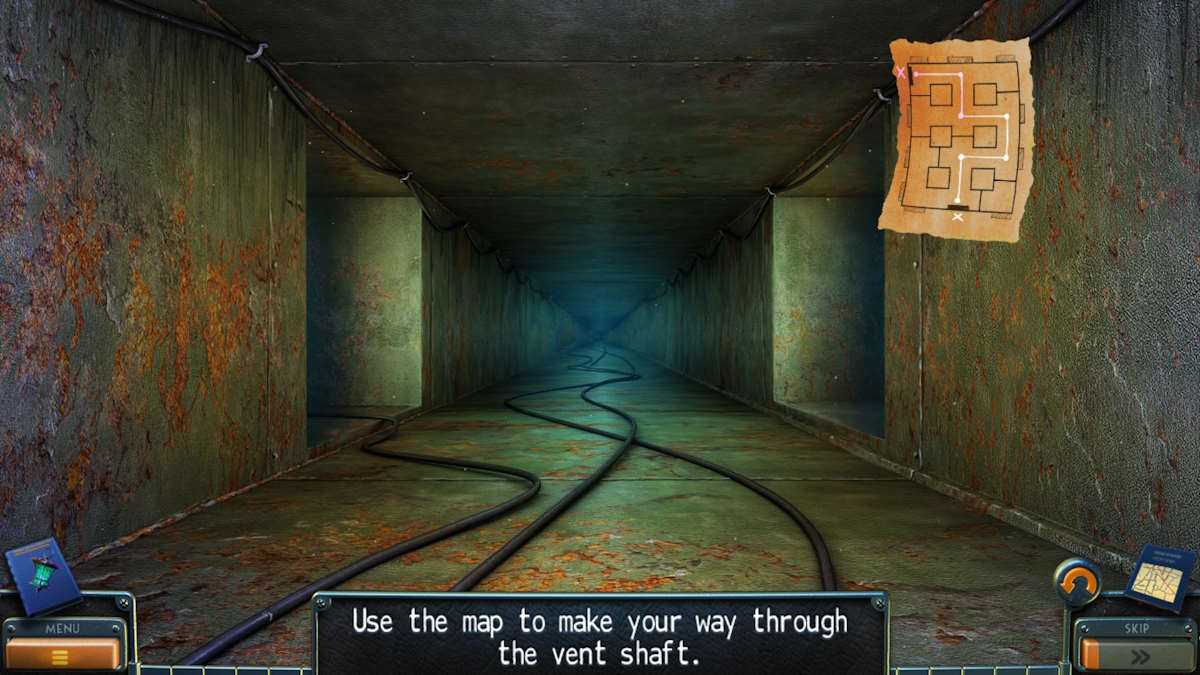
- Forward, right, left, left, right, left
The central dungeon
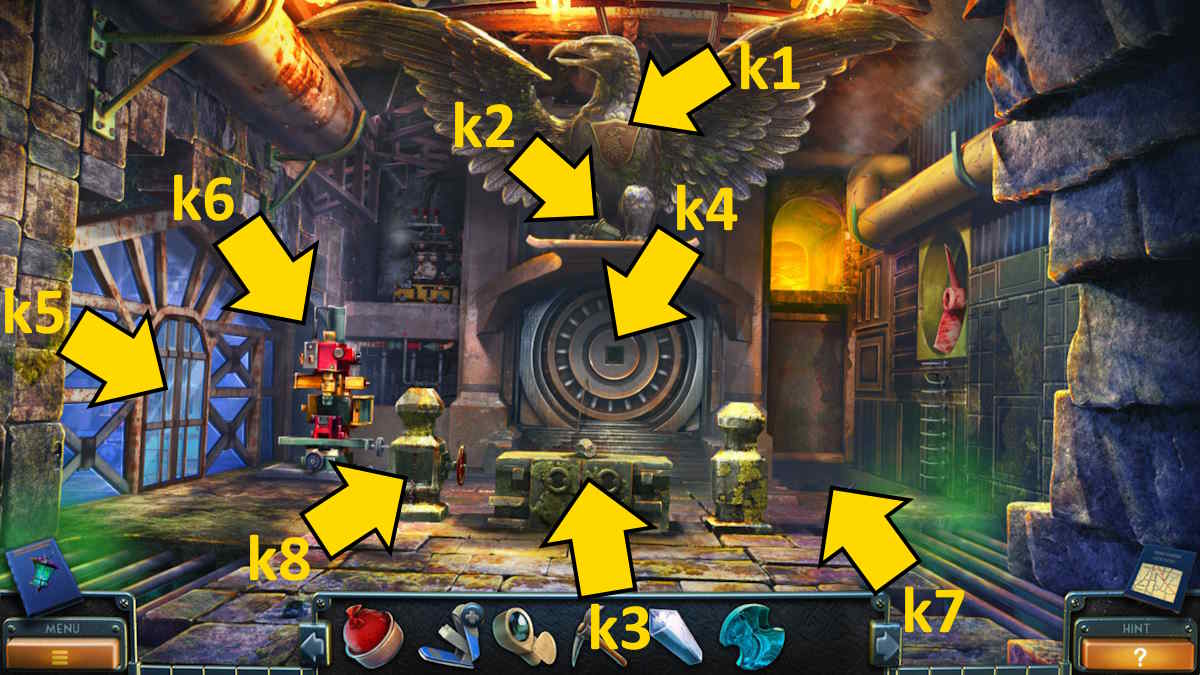
After a cut scene you’ll arrive in the central dungeon. Take the Collectible from the eagle (k1) and the Morphing Object (k2) from just below it, by the eagle’s feet. Grab the Stone from the altar (k3), and add your stone detail in the same close-up (although you’re still missing one piece). Select the circular door (k4) and take the Rebar you find in the close-up. Use the stone on the window of the door (k5) to break it, open the door, and move into the greenhouse.
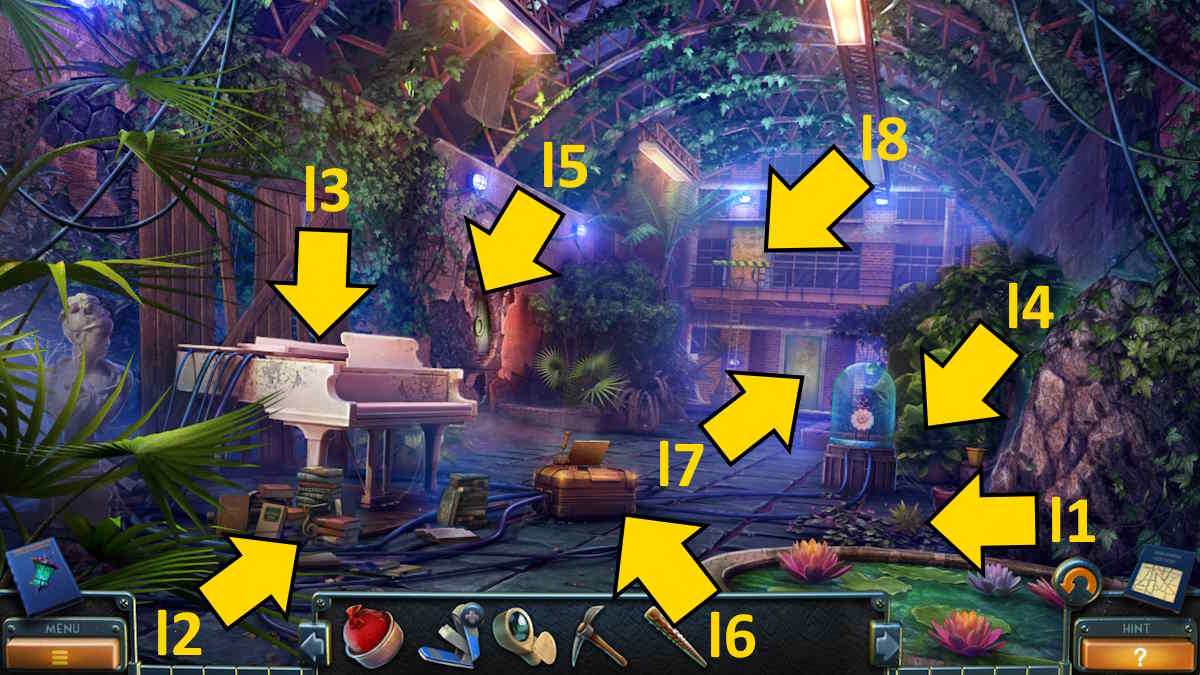
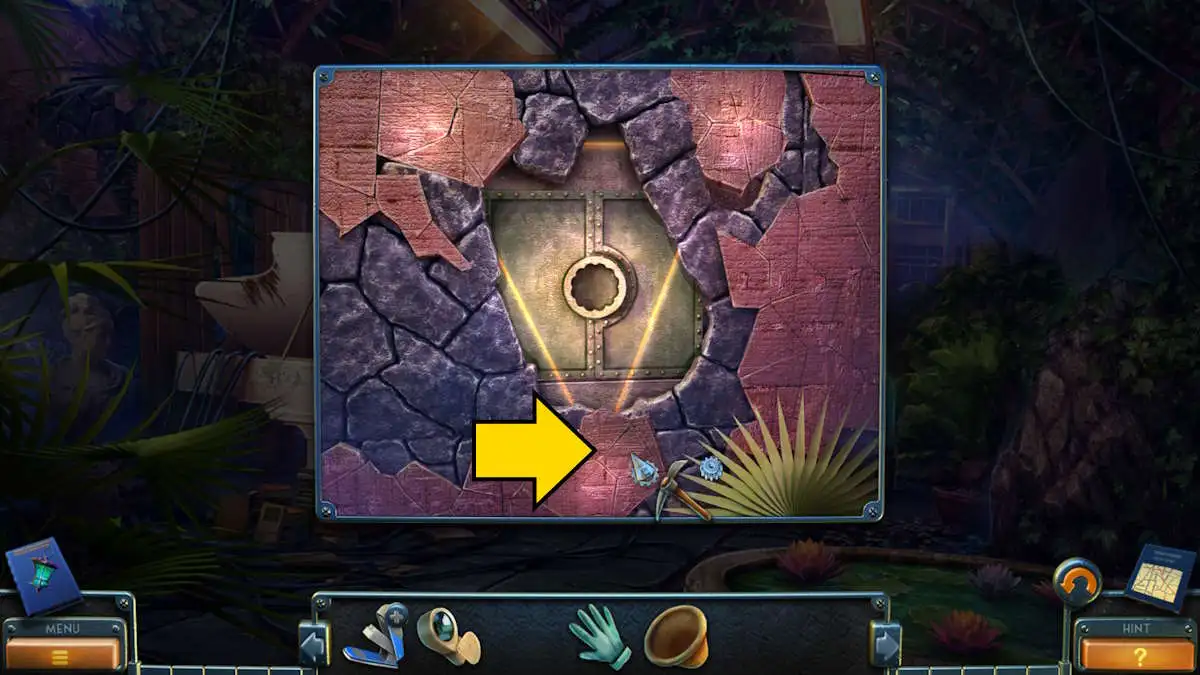
The Morphing Object is near the pool (l1) and the Collectible is by the books (l2). Use the rebar to prop open the grand piano (l3), then take the Rubber Glove from inside it. Click the glass dome (l4) for a close-up and take the Pot, then look at the green pattern behind the wall (l5) to get a warning about rays protecting it. Use the pickaxe on a highlighted area (see below) and then take the three Yellow Crystals.
Return to the central dungeon and place the blue mineral on the machine (k6). Also, add the plant pot, then use the rubber glove so that you can press the red button in the close-up safely. Click the powder afterward and you’ll scoop it into the pot, adding Blue Powder to your inventory.
Go back into the greenhouse and add the blue powder to the generator (l6). Click its lid to close it, then pull the switch to power it up and get a cutscene; during which Will is trapped. The glass dome was smashed in the accident, so take a Piece of Armored Glass and the Stone Flower from the wreckage (l4). Now, use the flower on the green wall (l5) and take the Stone Detail.
You can now return to the central dungeon, add the second detail to the altar (k3), and take the Pyramid that appears from inside. Add the pyramid to the round door (k4) for another cut scene, during which you are captured and imprisoned. Things could be going better!
Trapped in the control center
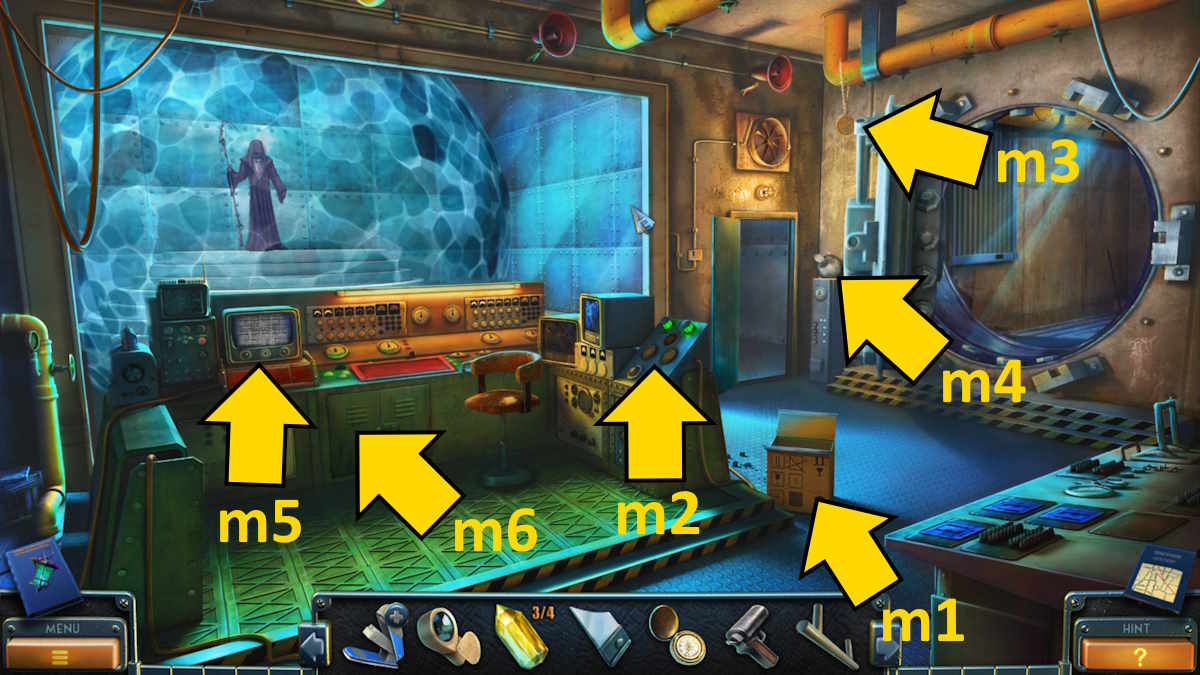
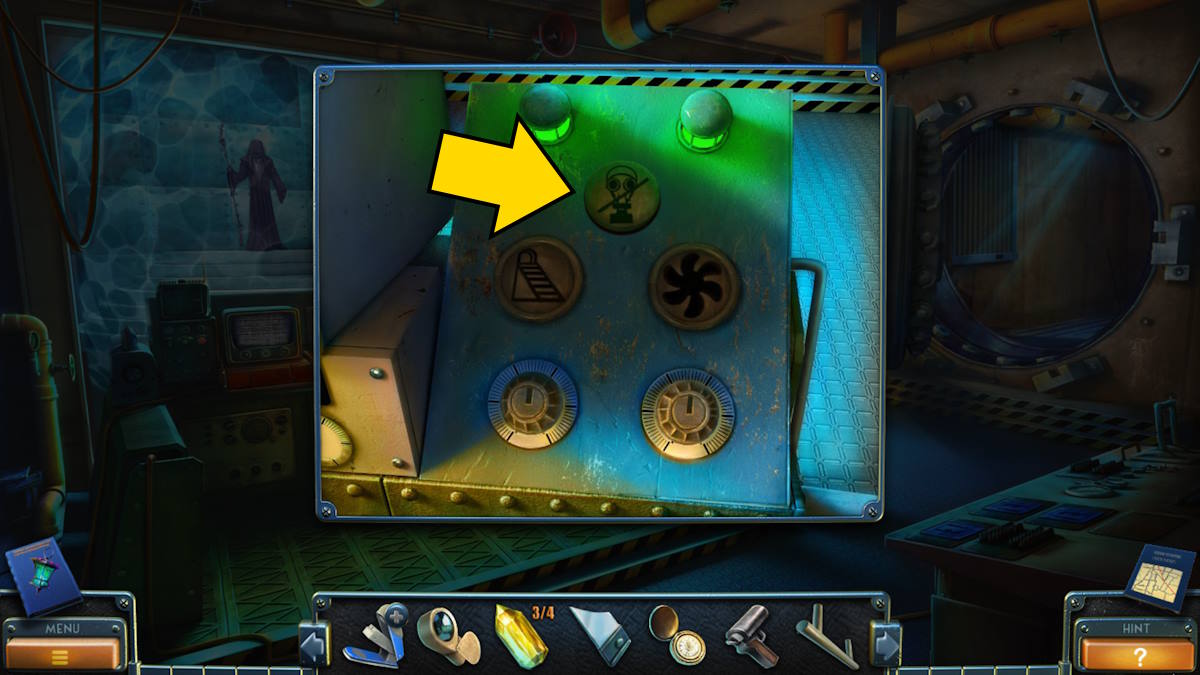
As you’re being captured, you manage to grab a Pocket Watch. Once you can move, use the glass to open the box (m1) and take the Gas Mask. Also take the Flare Gun from the box, before taking the Door Handle from the control panel (m2). In the same panel close-up, click the button with the gas mask to turn off the gas (see below).
After a cutscene in which you’ll meet the Reaper, grab the Collectible from the corner (m3), and the Morphing Object (m4) from above it on the pipe. Move back to the greenhouse, use the door handle on the door at the back of the room (l7), and move through to the Infirmary.
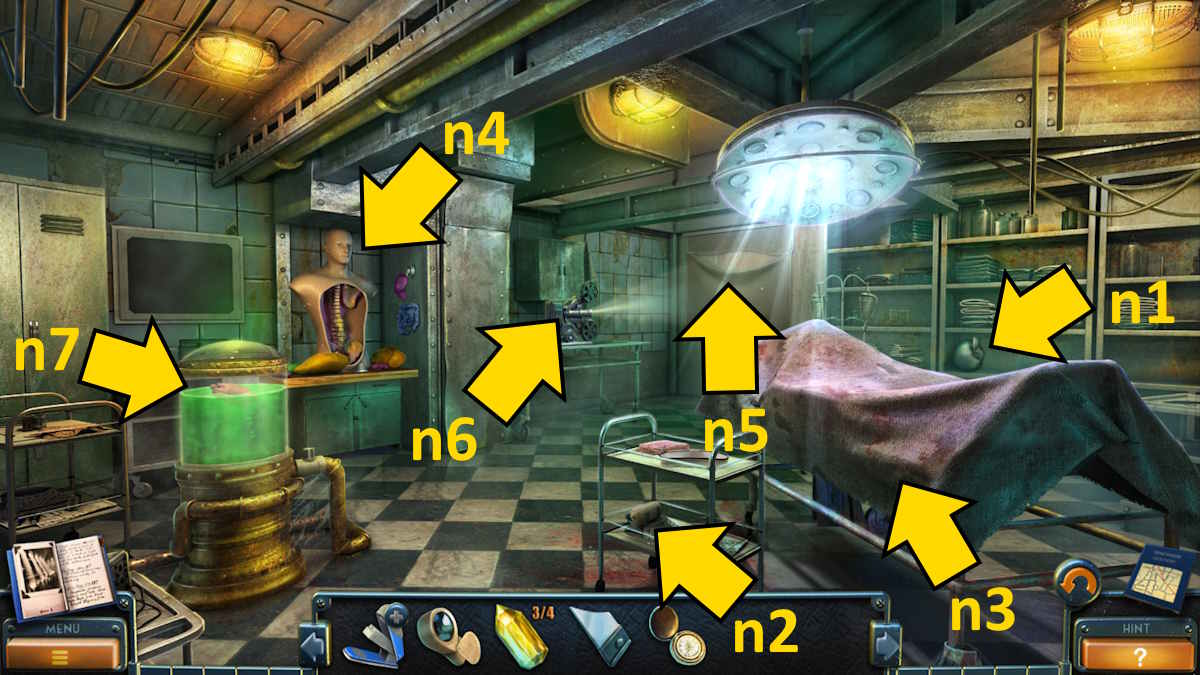
The Collectible is on the shelves (n1) and the Morphing Object is on the trolley (n2). Remove the cloth from the gurney (n3), take the Stethoscope Part, and then use the glass to cut the knot on the notes and take the Folder. Open the folder in your inventory, click through and read it, and take the Surgical Clamp you find at the back of the folder.
Select the medical training dummy next (n4), take the Knob, and then return to the greenhouse. Use the surgical clamp to get the Token from behind the piano wires (l3), and then use the token to open the barrier at the top of the ladder (l8). This gives you access to a missing objects mini-game, which rewards you with a Key. If you’re struggling to open the green box, leave the first latch as it is, push the second down once, and the last (on the right) fully down (hit it twice).
Finding Will
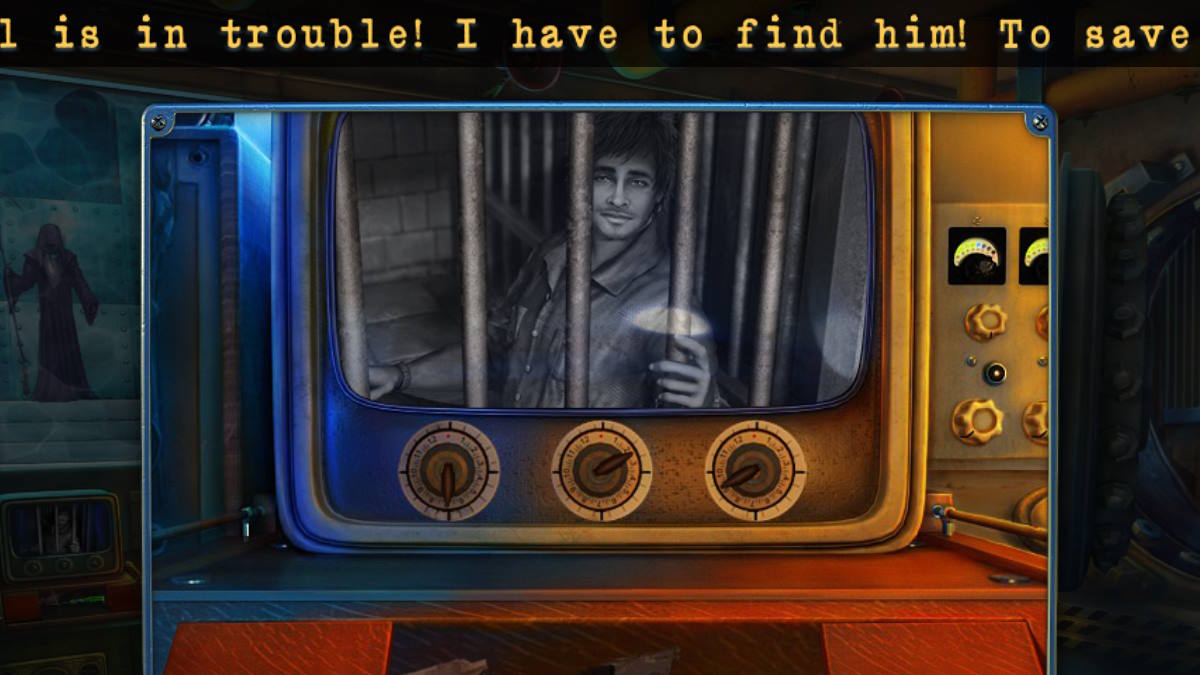
Back in the control center, add the knob to the TV screen (m5) and then click each of the three knobs until they’re in the positions shown above. It seems Will has been captured! Take the Screwdriver, and then use the key to open the green cupboard next to the TV (m6), taking the Rope and Hook from inside. Head back to the central dungeon once more.
Shoot the flare gun into the pit (k7), then use the rope and hook to fish up the suit and take the Key from the pocket. Go to the control center next, and use the key on the console where you turned off the gas (m2). You now have access to the office.
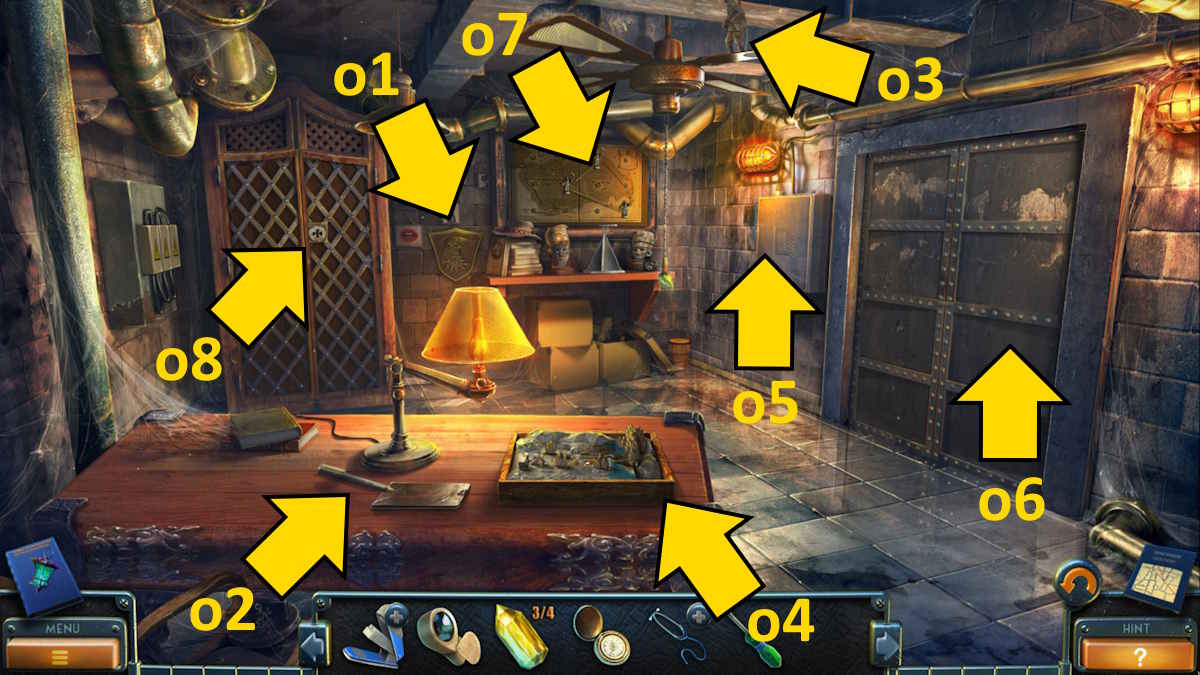
Take the Collectible from the back wall (o1), and the Morphing Object from the table (o2), then turn the fan on by pulling the cord and collect the Soldier Figurine (o3) from the floor when it drops. Open the wallet on the table (o2), take the ID Card from inside, and then add the soldier figurine to the diorama on the desk (o4) to start a puzzle. Move the soldier as indicated in the image below. When you get to the end, take the Spring and the Key.

Open the fusebox on the wall next (o5), throw the switch on the left, and use the screwdriver on the red wire to get the Screws. Combine the spring with your broken stapler to fix it, earning you the Stapler, and then go back to the infirmary and fix the screen (n5). This will start a cutscene showing the Reaper being captured. Afterward, the camera (n6) breaks, allowing you to use the screwdriver to get a Terminal Connector.
Return to the office, add the terminal connector to the fusebox, put the screws back in with the screwdriver, and throw the switch back up. The doors (o6) will now open, giving you access to the prison cell. Head inside and talk to Will.
Escaping the bunker
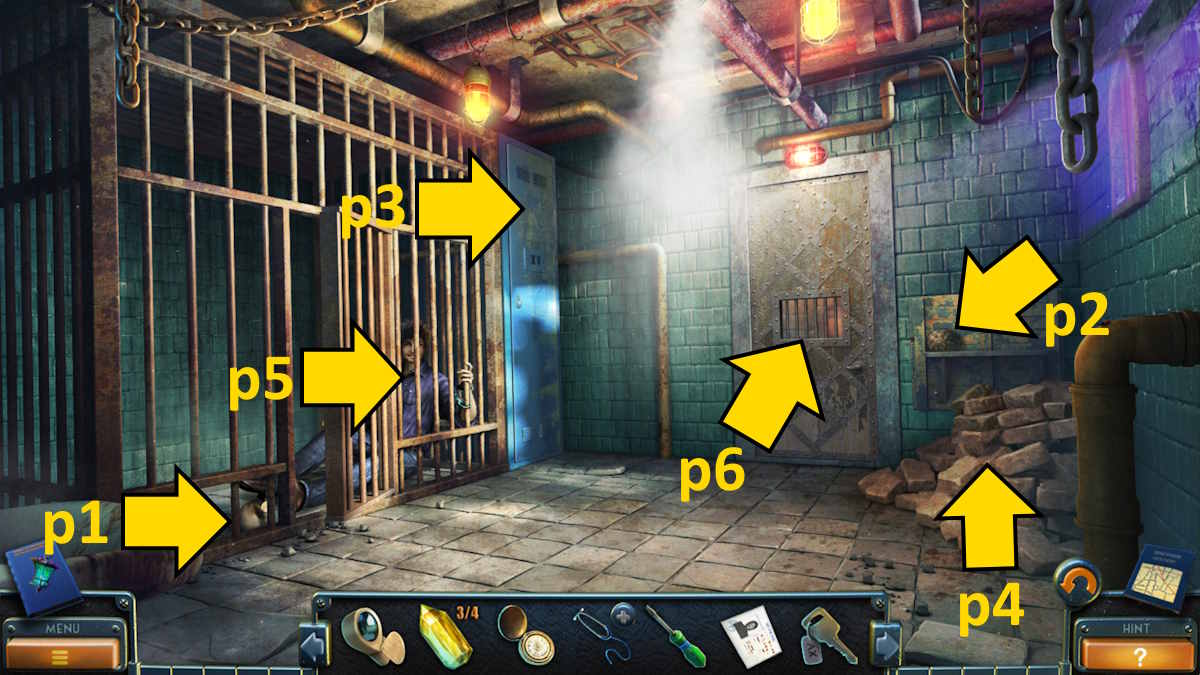
You can now take the Collectible (p1) and the Morphing Object (p2), then use the key to open the locker (p3) to find some Handcuffs. Move the rocks (p4) to find some Coins, then head back to the central dungeon. Use the handcuffs to repair the chain (k8), turn the red handle, and take the Oil Can. Use the can on Will’s handcuffs in the prison cell (p5) to free him. He’ll give you a Mechanical Arm.
Go back to the infirmary and use the arm to get the Faucet Handle from the scorpion cage on the gurney (n3). Use this handle on the liquid container (n7), click it again to drain it, open it by pressing the lid, and take the Plastic Heart. Adding the plastic heart to the training dummy (n4) begins a puzzle in which you must put all the body parts in the correct places.
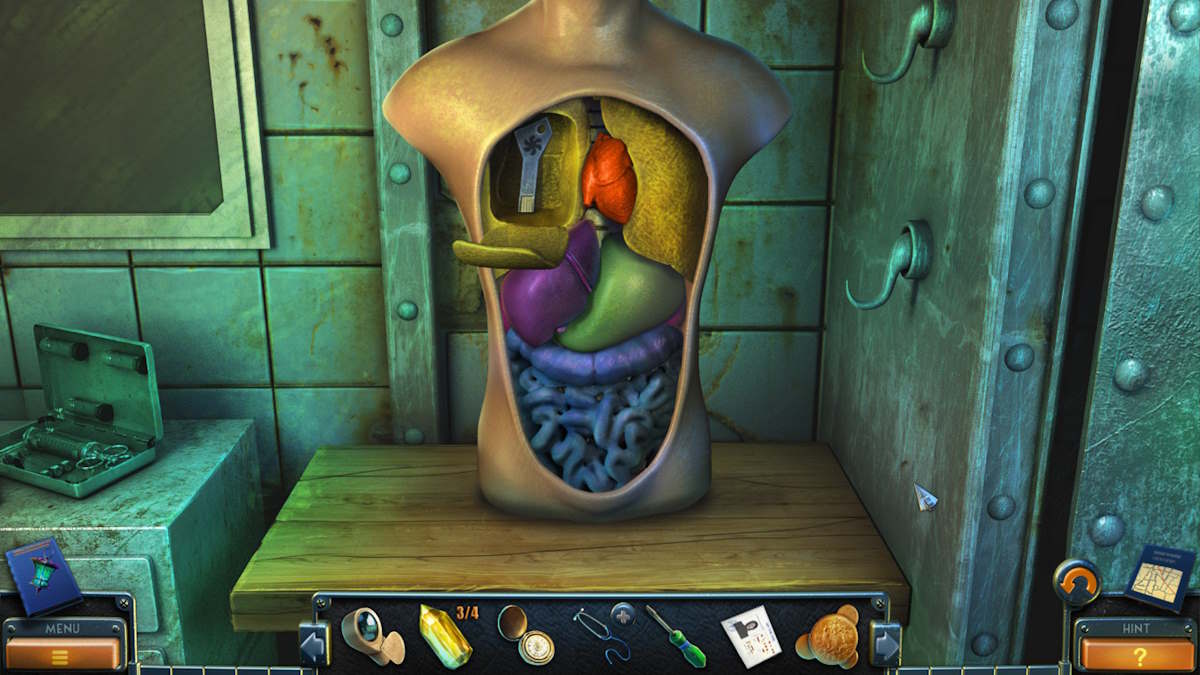
You can see the solution above. Once done, take the Key. Move to the control center next and use the key in the last slot on the console (m2), which turns off the fans and allows you to escape the bunker.
Chapter 4: Repairs at HQ

Return to the hall in HQ and give the ID card to Bishop, who will hand you a Key to his study. Head to the Hall of Fame, use the screwdriver to fix the curtain pole (i5), then click the curtains (i4) to open them and reveal a portrait gallery. To complete this puzzle you need to place each picture in its correct frame (the solution is above). Once complete, you can take the Winch Handle and Lever from behind one of the portraits.
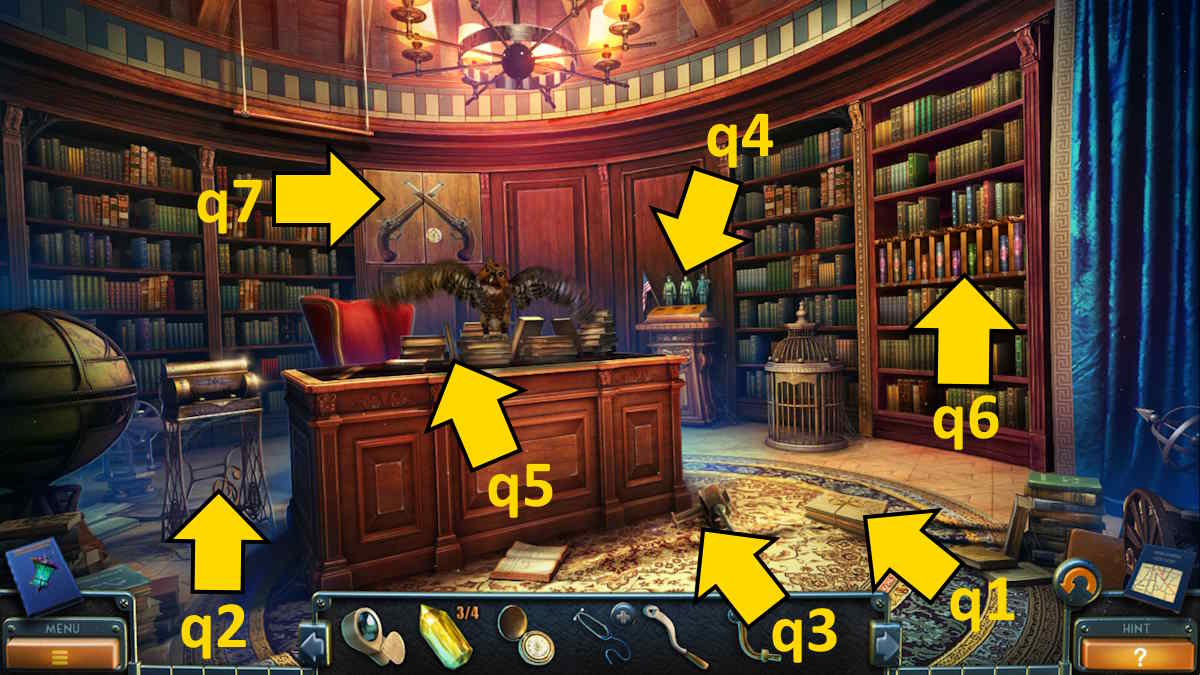
Return to the hall and use the winch handle on the winch (g8) to lower the chandelier and take the Handle. Use Bishop’s key to enter his study (g7), and take the Morphing Object (q1), the Collectible (q2), and a Jack (q3). Add the lever to the machine you took the collectible from (q2), use the lever, and then open the released envelope to gain a Punchcard giving you access to the opera house. You can also select the medal display next (q4) and take the Handle.
Returning to the mansion
Now go to the secret passage in Martell’s mansion and use the shape key on the floor pattern (d10), turning it to create some steps up to the ceiling vent (d11). Use the jack to pry open the bars of the vent and take the Saw plus a Card.
Move to the mansion entrance and use the saw to cut the vines covering the lion statue (a9), allowing you to recover some Metal Grapes. Now move into the living room and use the grapes to open the compartment on the table (b4), allowing you to recover a second Stethoscope Part and more Coins. Combine the stethoscope parts in your inventory to gain a Stethoscope, and head to the study.
Click the picture on the wall (c9) to gain access to the safe and then use the stethoscope on the safe to begin a puzzle. Turn the dial to the following numbers to crack it open and take the Eagle Figurine. If you get a number wrong and go back a space, you’ll need to repeat the previous number in the sequence to get back to where you were.
Repairing the underground railway
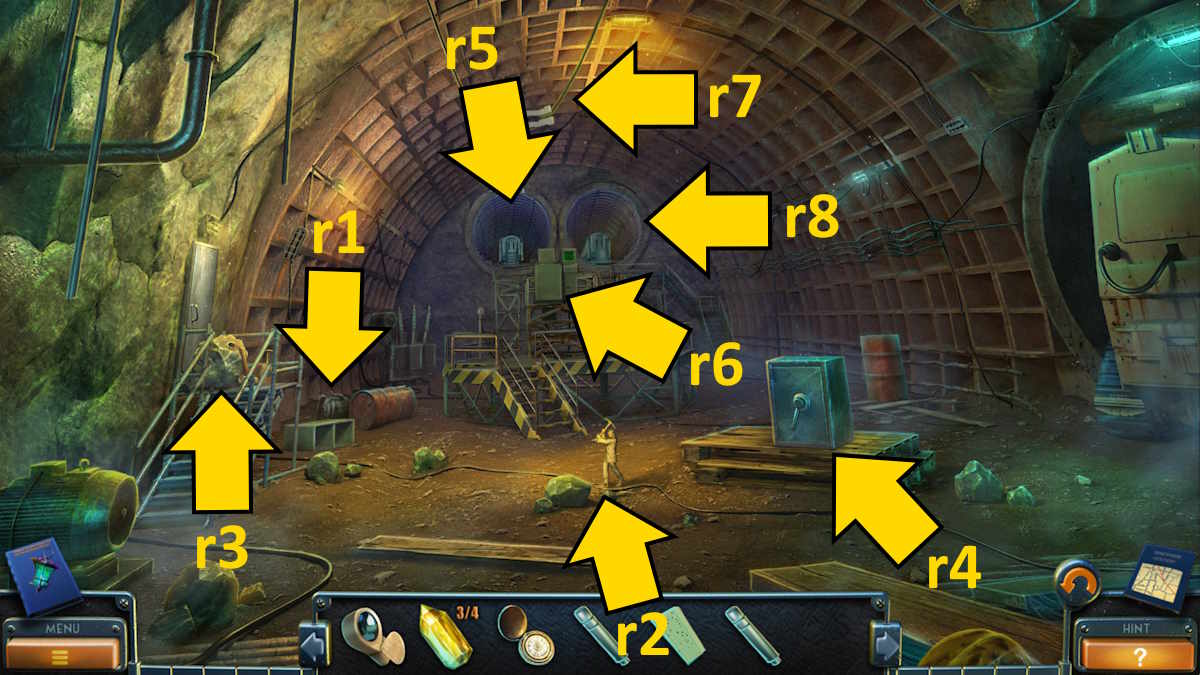
Go to the bunker entrance next and add the remaining coins to the green box (j7), taking another Eagle Figurine from inside. Now you can return to the Hall of Fame at HQ and add the remaining eagle figurines to the eagle statue (i7), giving you access to the subway tunnel. Head down and collect the Morphing Object (r1), plus the Collectible (r2).
Grab the Sledgehammer by the door (r3), then add the two handles you still have to the safe (r4) to open it and get a Welding Lamp, plus a Card. Return to the rock ledge at Martell’s mansion next, and use the welding lamp and sledgehammer to break the chains on the green chest (e4). Open it up and take the Chain.
Add the chain to the operating mechanism in the subway (r5), close its lid, add the punchcard, then click the left-side subway train (r6) to move on to the opera house.
Chapter 5: The Opera House
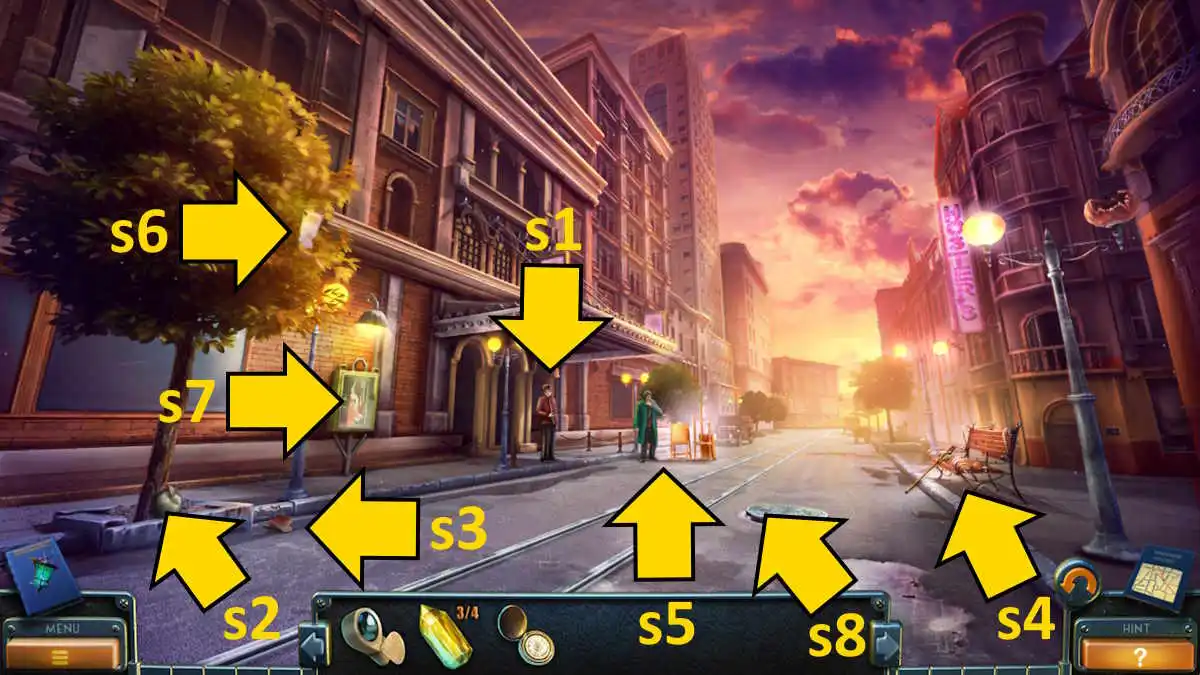
After speaking to the opera house worker (s1), you’ll find both the Collectible (s2) and the Morphing Object (s3) by the tree. Grab the Cane from the bench (s4), then speak to Henri (s5). Use the cane to get the Ticket out of the tree (s6), give the ticket to the employee (s1), and then head inside to the opera hall.
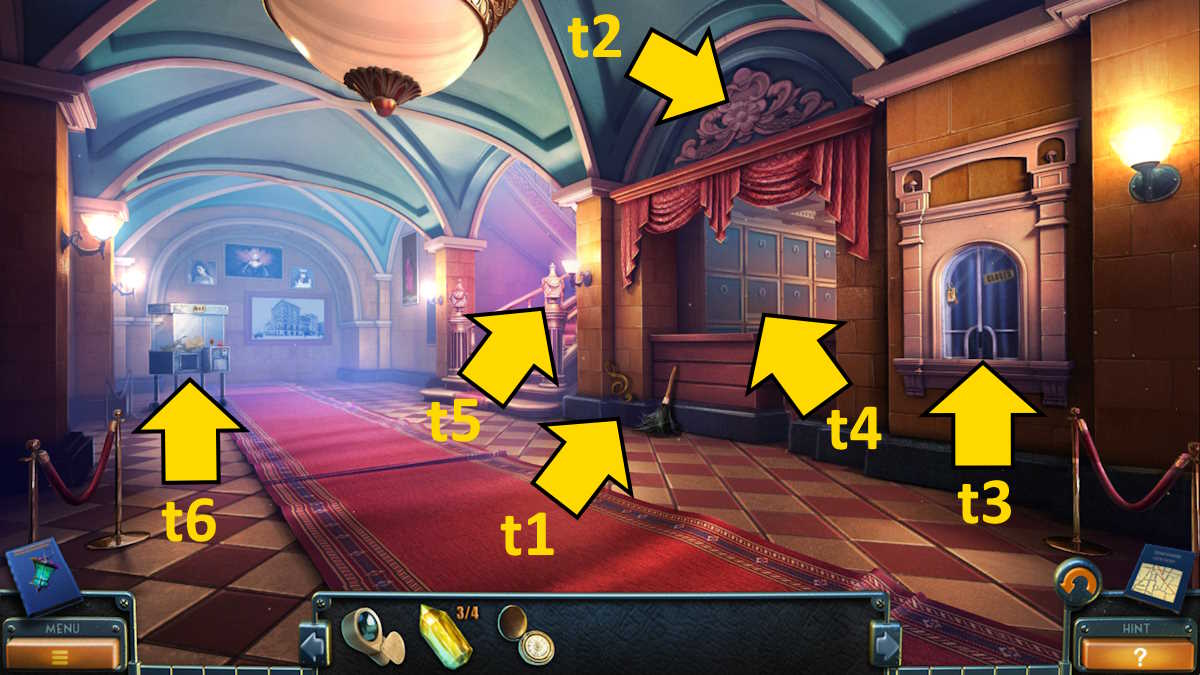
Take the Collectible (t1) and the Dust Brush next to it, along with the Morphing Object from the wall above them (t2). Pop back outside and use the brush to remove the insects from the bench (s4), allowing you to take the Thin Wire. Click the wire in your inventory to turn it into a Hook, and use the hook to get the Key from the ticket booth (t3).
Get a close-up of the locker area (t4), click box 7, and use your key to open it and take the Code. Now click the clothes and you’ll put on an opera staff member’s uniform, allowing you to access otherwise restricted areas of the opera house. Click the stairs (t5) to head up to the buffet.
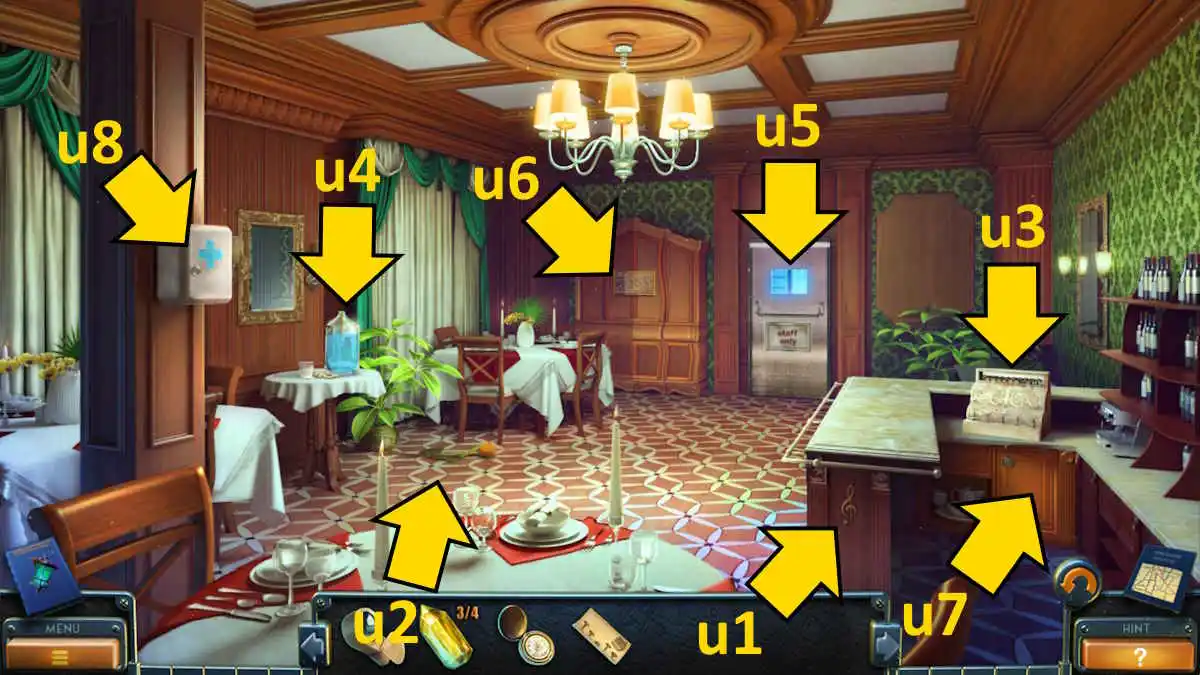
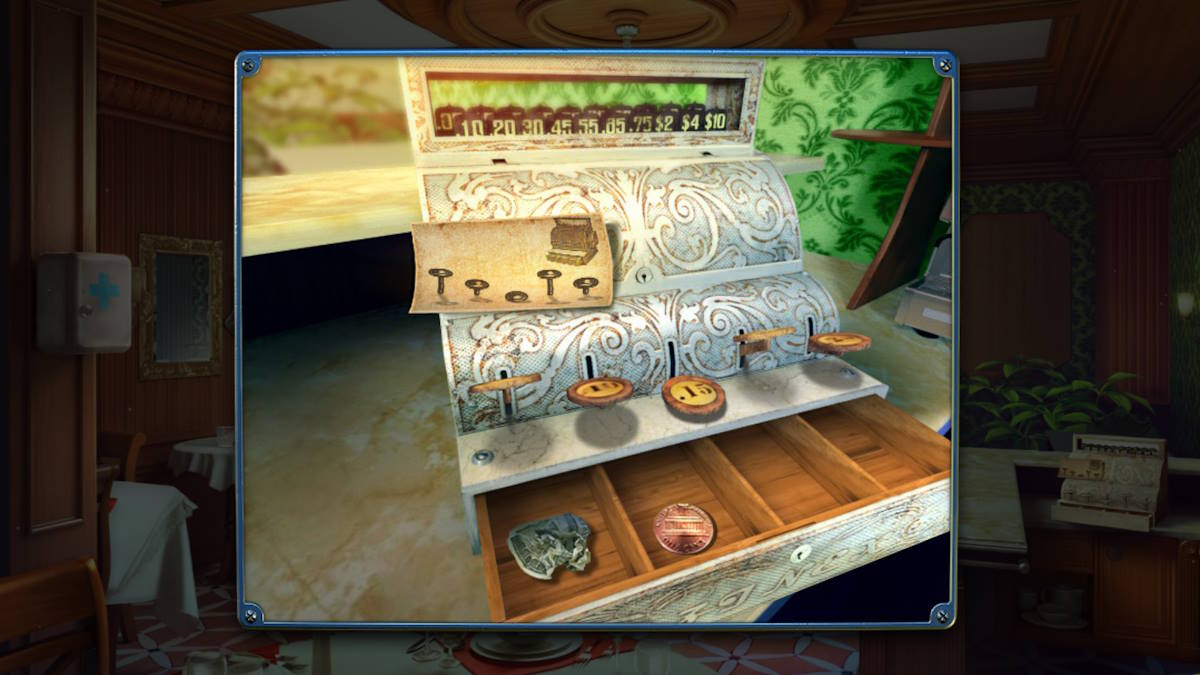
The Collectible is on the side of the counter (u1), while the Morphing Object is on the floor (u2). Add the code to the cash register (u3), copy the sequence to open it, and take the Penny. See the open register with the correct buttons pushed below.
The buffet area
Take the Mask from the table (u4), then click the staff-only door (u5) to start a missing objects mini-game. Once complete, take the Pattern and add it to the back wall of the buffet area (u6) to start a puzzle.
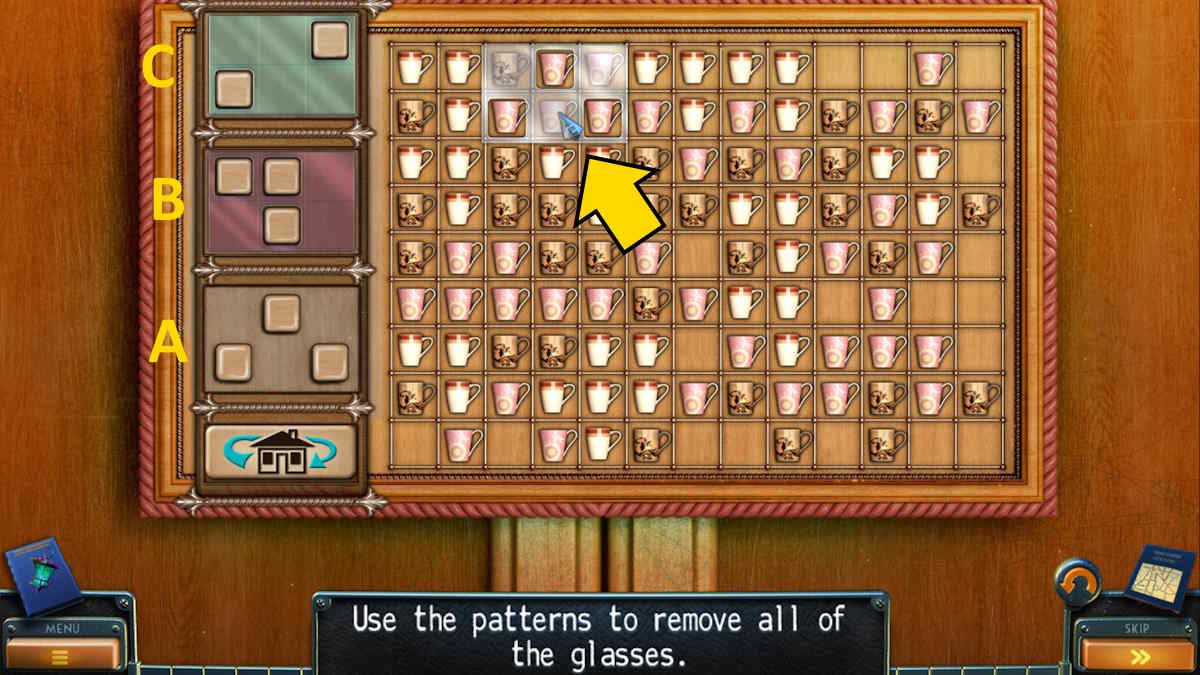
You need to remove all the glasses from the right side by using the patterns on the left. This is simpler than it may first appear. Use the bottom of the three patterns (A) first and remove all of the pink glasses with it. It will only remove items in the holes, so make sure to match each set exactly so that you can always remove complete sets of three. So in the example above, once I remove those three pink cups, I can move the pattern one space to the right and remove the next three pink cups.
Once that is done, use B to remove all of the white cups in the same way, and finally use C to remove all of the brown cups. Once done, click the now-open sideboard (u6) and click the cups on its top row to reveal and then take the Bell. Return to the hall, get a close-up of the locker area, and fix the bell there. Ring it for a cutscene, after which the staff door will be left open, allowing you backstage.
Helping Elisabeth Morgan backstage

The Collectible is on the floor below the fire cage (v1) and the Morphing Object is the image on the plant pot (v2). Knock on the door (v3) to find out that the lady on the other side has a headache; she will only answer your questions if you find her some painkillers.
Click the fire cage (v4) for a close-up and take the Handle that’s on top of it. Click the door on the left (v5), remove the Suction Cup Hook, and then head back outside to the entrance. Use the handle to open the poster box (s7) and take the Solvent you find inside. Return to the backstage area and use the solvent on the spilled paint on the floor (v6) to be able to pick up the Key and a Card.
Go back into the buffet and use the suction cup hook on the cupboard behind the counter (u7), allowing you to open it and take the Siphon and a Flour Sack. Use the key to open the first aid box (u8), taking the Painkillers and a Knife from inside. Add the siphon to the water flask on the table (u4), then use the cup that’s already on the table on the siphon to pour a glass of water. Add the painkillers, and pick up the Painkillers in the glass of water. Go backstage, use the painkillers on the central door (v3), and Elisabeth will let you in.
The make-up room
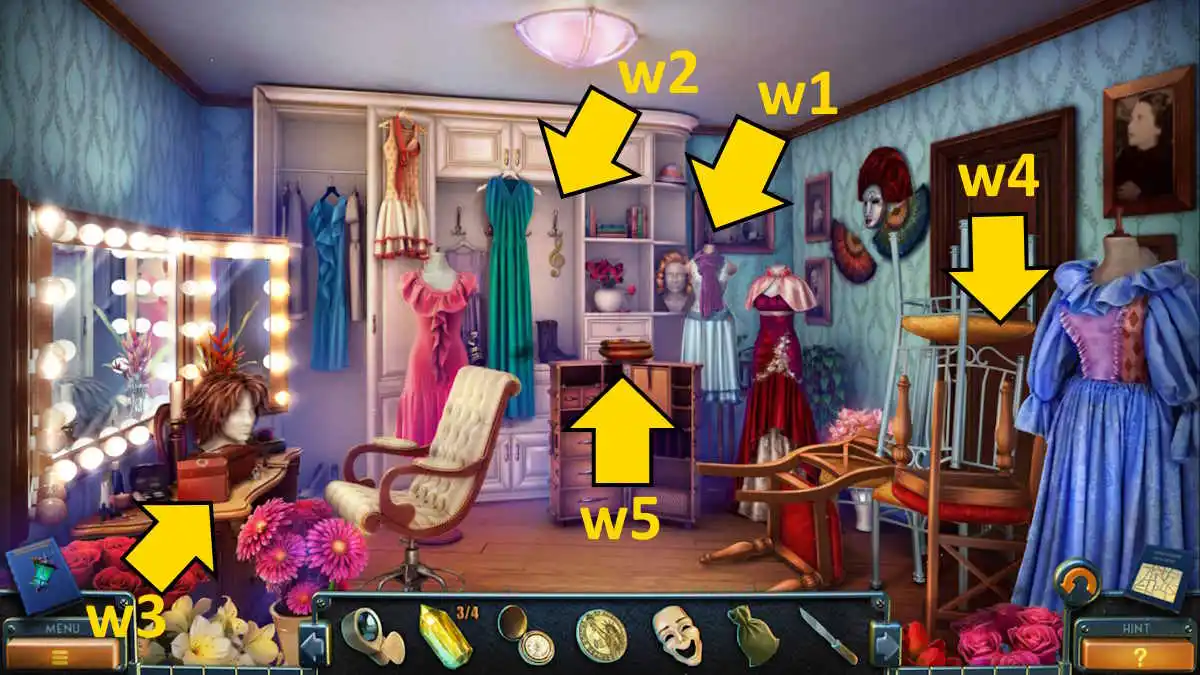
You’ll find the Morphing Object on a mannequin (w1) and the Collectible hanging on a peg (w2). Grab the Card from the table (w3), then move the chairs away from the door (w4) to open it and start a missing objects mini-game. Once complete you’ll receive the Dress. Head out to the hall where Elisabeth is waiting. Give her the dress, and she’ll give you a piece of Jewelry.
Go back into the make-up room and use the jewelry to open the box on the table (w3), taking the Air Horn and Wire Cutters from inside. Move backstage and use the wire cutters to open the fire cabinet (v4), taking the Adapter and Gaff. Now you can use the gaff outside the entrance to open the manhole (s8) and get the Wrench.
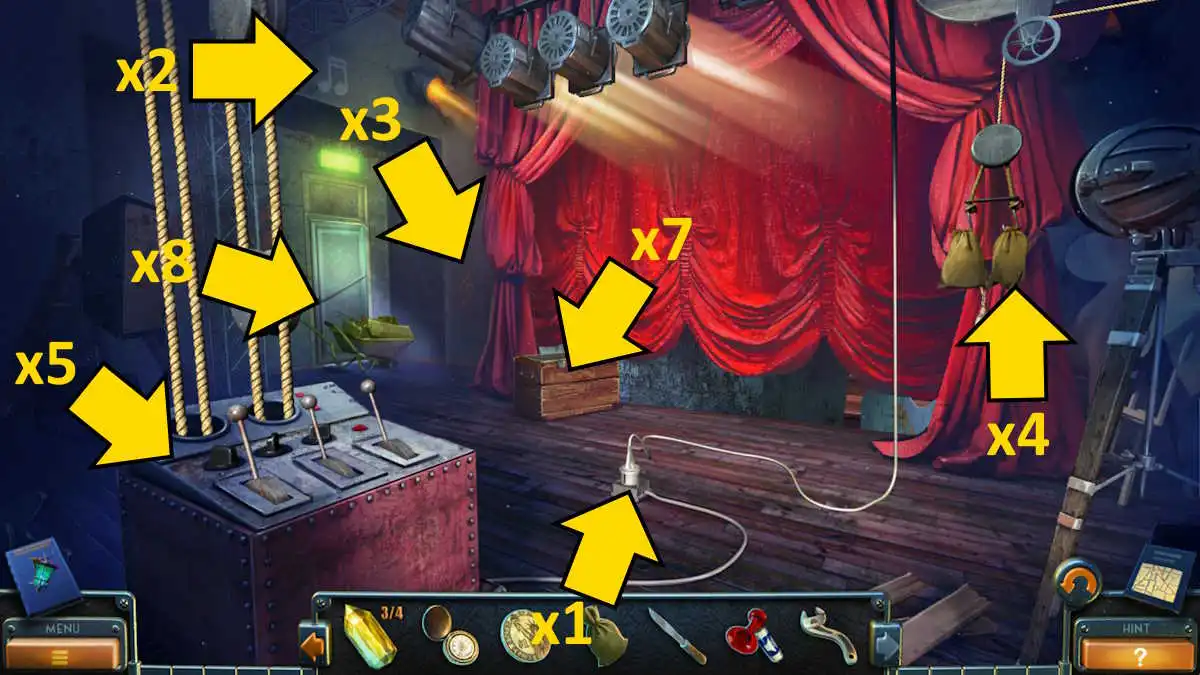
Now go backstage once more and use the righthand door (v7) to enter the props room. It’s dark, so click the plug on the floor (x1), add the adapter, and then plug it in to put the lights on. You’ll find the Morphing Object (x2) and the Collectible (x3) on the walls.
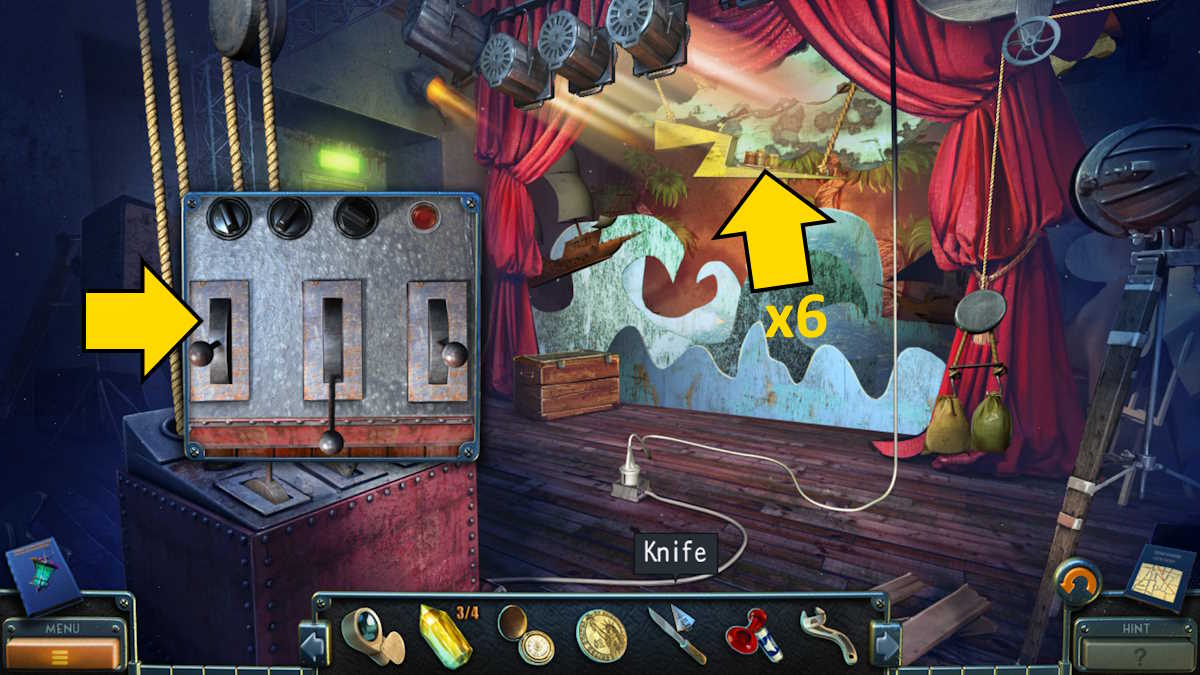
Remove the empty bag from the curtain (x4) and replace it with your flour bag, opening the stage curtains. Now click the lighting controls (x5) for a close-up to begin a puzzle. You need to lower the paints by setting the levels as pictured above. Once you have, collect the Painter’s Set (x6 in the image above).
Entering the tuner’s room
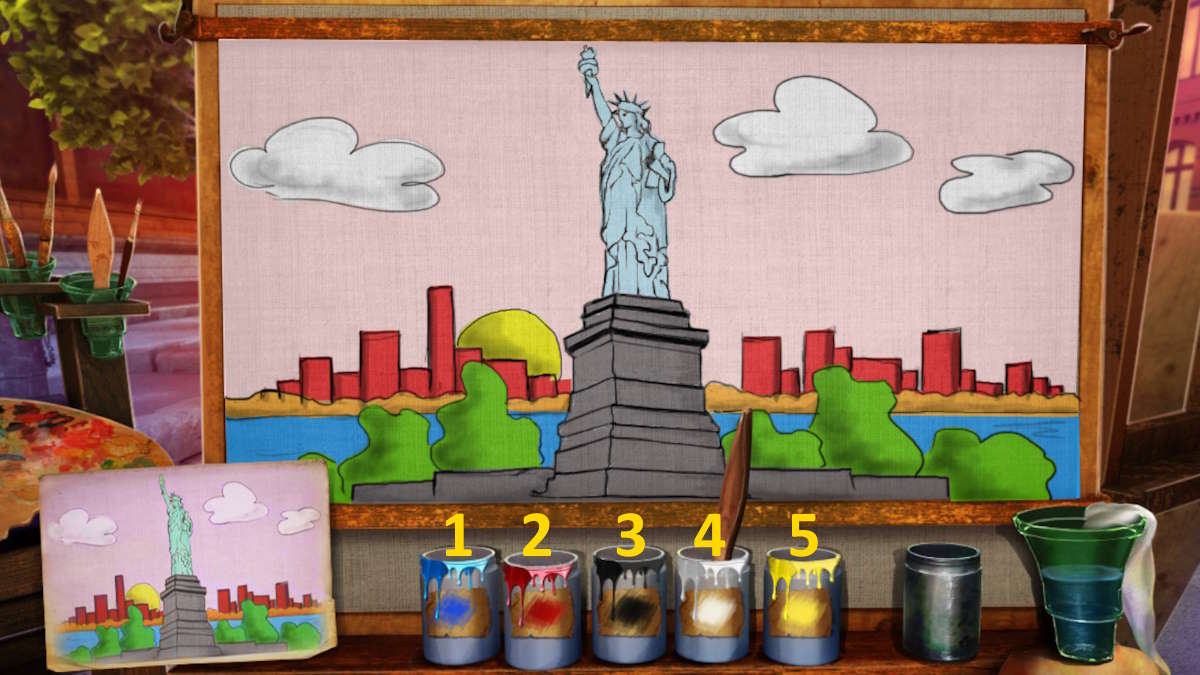
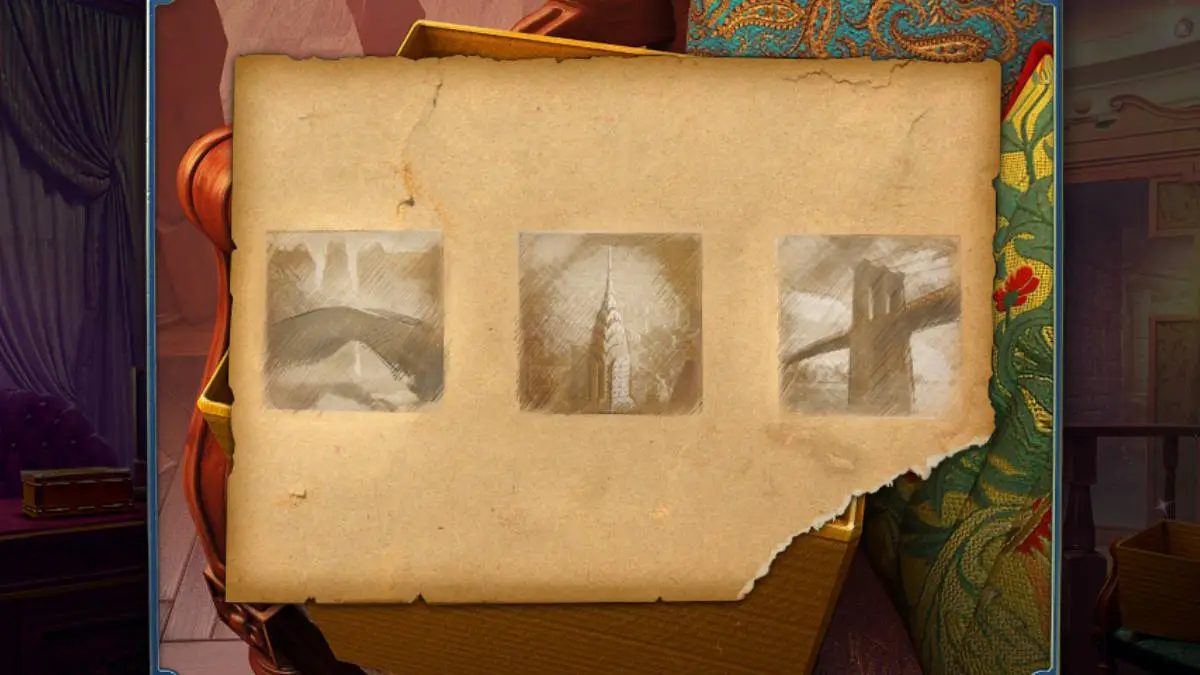
Go outside and give the paints to Henri (s5) to start a painting mini-game. You just need to copy the painting in the image to succeed. Aside from the basic colors, you’ll need to use white and then black (3 and 4) in the foreground to make grey; blue and yellow (1 and 5) on the trees to make green; red and yellow (2 and 5) on the seashore to make orange; blue and white (1 and 4) on the Statue of Liberty; and red and white (2 and 4) on the sky. The completed image is above. Once done, Henri gives you a Mask.
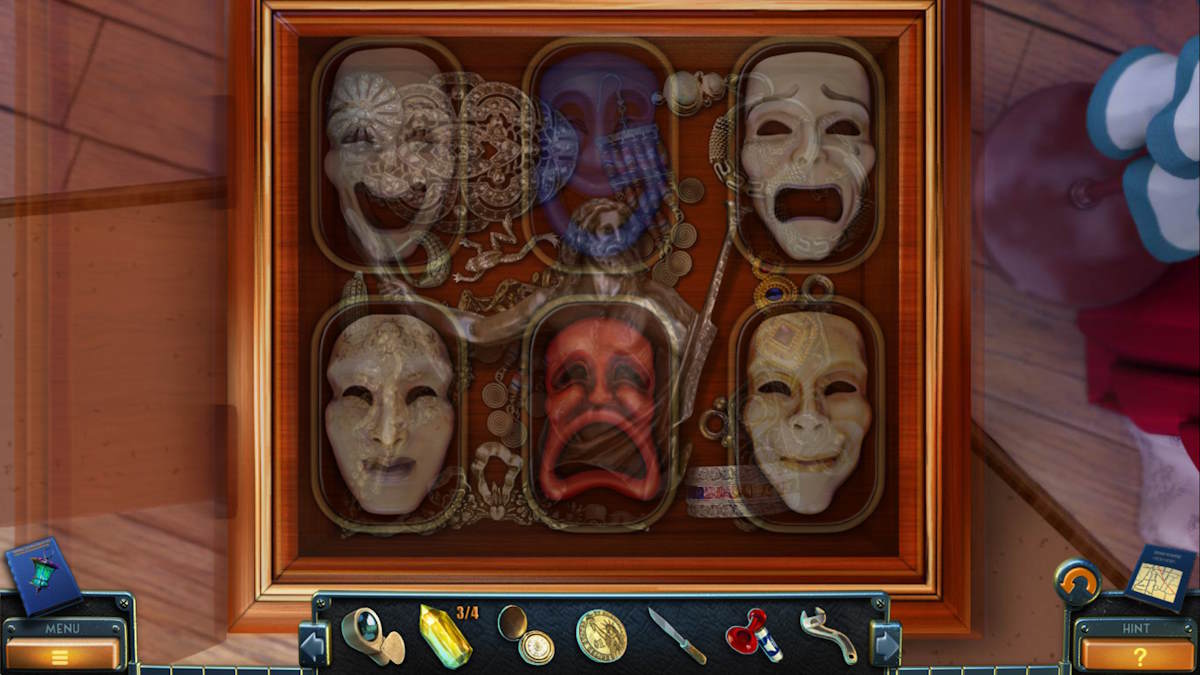
Return to the make-up room and add the two masks to the box (w5) to start a puzzle. You need the masks to be in the correct places, which I’ve shown above. Once complete you’ll be able to take a Piece of Pattern. Go back to the props storage and add the piece of pattern to the props box (x7), taking the Wooden Sword from inside. You can now move to the backstage area and use the wooden sword to open the door on the left (v5) to enter the tuner’s room.

The Morphing Object is on the side of the cabinet (y1) and the Collectible is on the stool (y2). Use the knife to cut open the chair fabric (y3) and find a Music Box Drum, get a close-up of the guitar case (y4) to take the File, and then move back to the make-up room and add the drum to the music box on the table (w3) to find a Fragment and Two Cents.
Use the two cents in the vending machine in the opera hall (t6), then press its green button and collect a Souvenir. Move back to the tuner’s room, add the fragment to the guitar case (y4) to open it, and take the Wheel. Now you can go back to prop storage, add the wheel to the barrow (x8), and move it to gain access to the back courtyard via the door behind it.
Finding the secret room
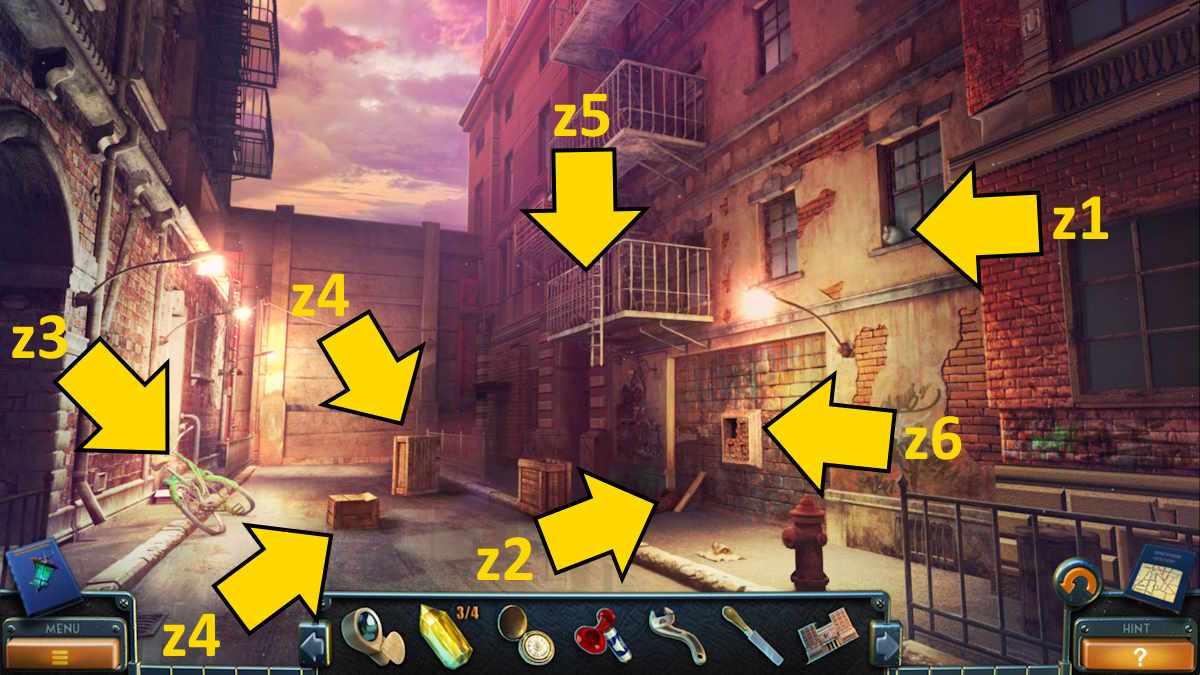
You’ll find the Collectible on a windowsill (z1) and the Morphing Object by the drainpipe (z2). Use the wrench on the bike (z3) to remove the pedal, and then take the Chain. Stack the boxes (z4) to be able to reach the balcony (z5), and grab the Glass Cutter and a Brick from it.
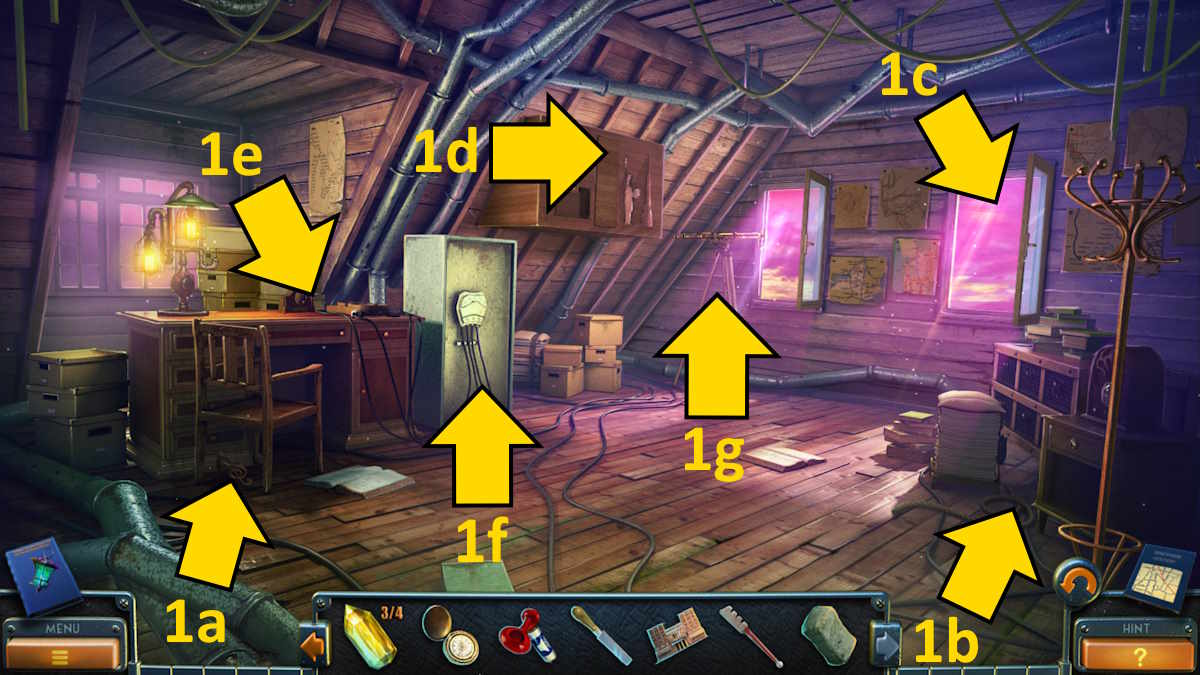
Return to the tuner’s room, add the chain to the door (y5), and then turn it to gain access to a lift that will take you to a secret room. Once inside, you can take the Collectible from under the chair (1a) and the Morphing Object from the floor on the right of the room (1b). Drop the brick out of the window (1c) to get the Decorative Tile to bounce up to you, then add the souvenir to the box (1d) and, when the secret compartment opens, take the Key from behind the Empire State Building.
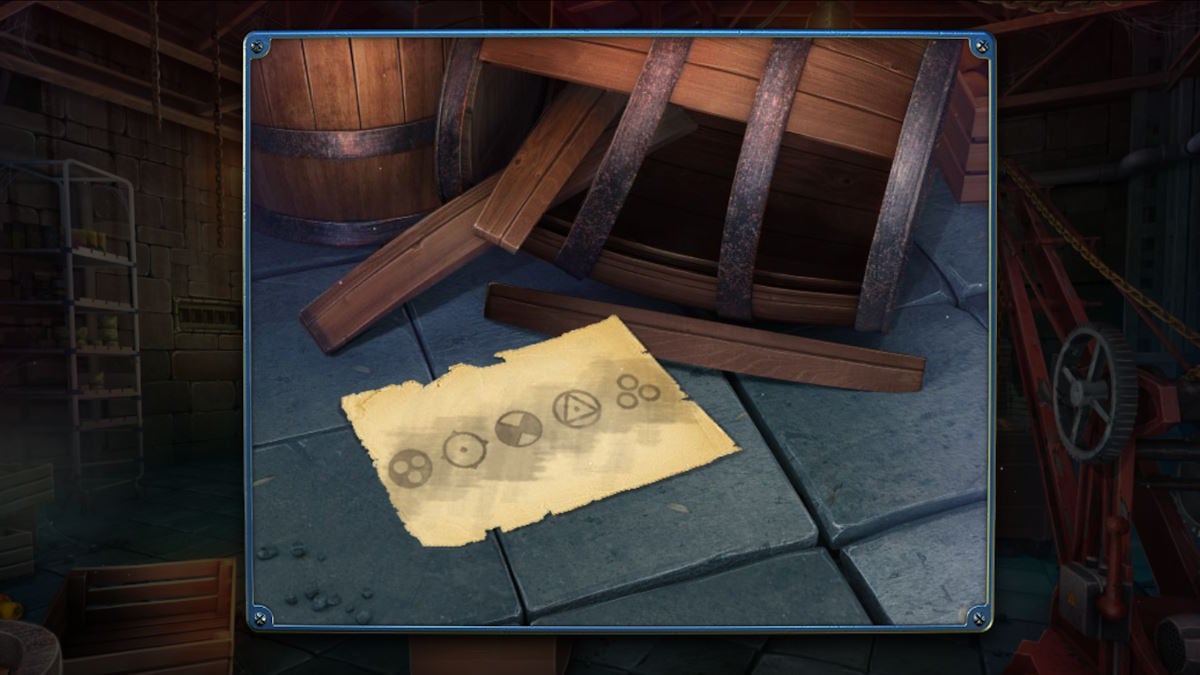
Select the desk (1e) to find a Card and add the pocket watch to the clock to find a clue with Symbols on it. Go down to the courtyard, add the decorative tile to the wall (z6), and then click it once more to reveal a Reaper Figurine. Return to the tuner’s room once more, use the key to open the other door (y6), and complete another missing object mini-game to get the Violin. Go to the secret room, place the violin in the machine on the table (1e), and the safe (1f) will open. Take a second Reaper Figurine from inside.
Chapter 6: Making the weapon
Go across to the cell in the bunker and use the file to saw through the bars (p6) to unlock the door and start a missing object mini-game (I’ve included the code you need for the brick sequence above). Once complete, take the Safe Handle. Take it to the bunker entrance and use it to open the safe (j10), and then click the open safe for a cut scene.
Click the door again afterward for a close-up and read the note on the wall. Take the Tank of B12, and then the final Reaper Figurine you find behind it. Move to the office and add the three reaper figurines to the chart on the wall (o7) to begin a movement puzzle. The trick here is to keep the strings in triangles while moving all the figurines to the lefthand side of the chart (see the image above). Take the Telescope Lens and read the lunatic’s diary!
Back at the opera house, you can return to the secret room, add the lens to the telescope (1g), and look through it to see that the device is being set up on the Empire State Building. It’s time to return to order HQ with your latest findings.
Back at Order HQ

Go down to the subway tunnel at HQ and speak to Will, who’ll give you a Key. Move to the Hall of Fame next, use the glass cutter to open the purple cylinder (i8), and take the Helmet from inside. Now go to Bishop’s office and use the air horn to scare away the owl, giving you access to the desk (q5). Take a Card and a Ruler from the desk.
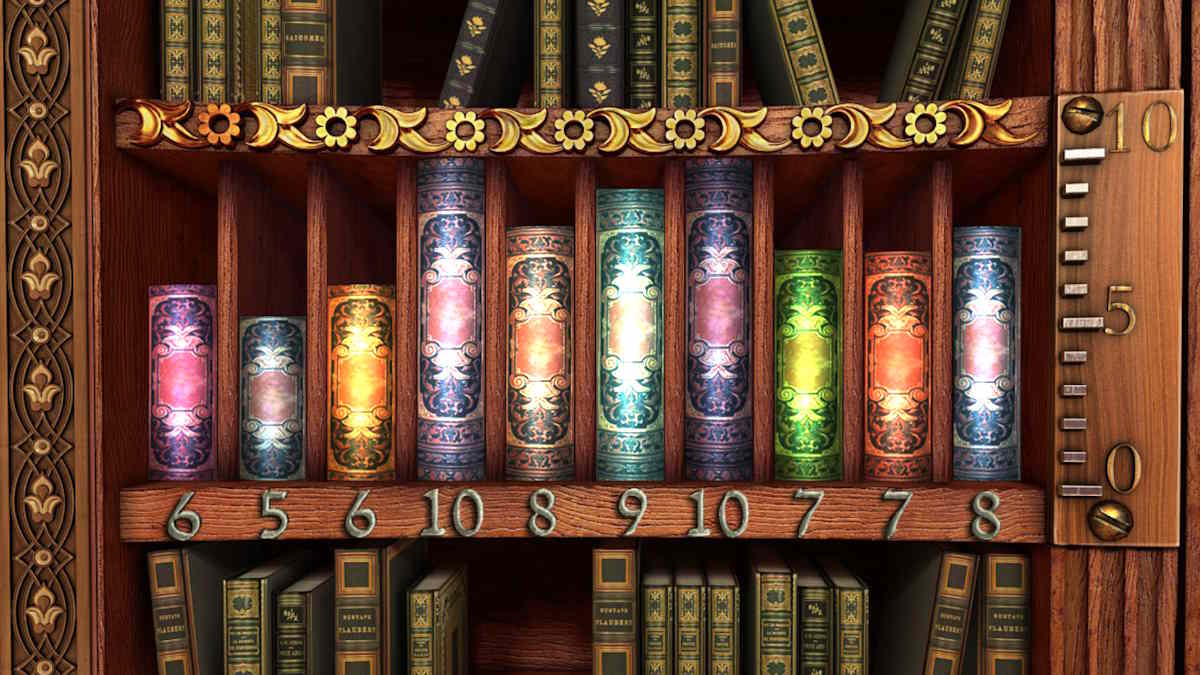
Select the bookshelf next (q6), add the ruler, and rearrange the books in the order pictured above (by height, according to the scale to the shelf’s right and the numbers under the books). This gives you access to the Archives, so head on through the secret door behind the bookshelf to check it out.
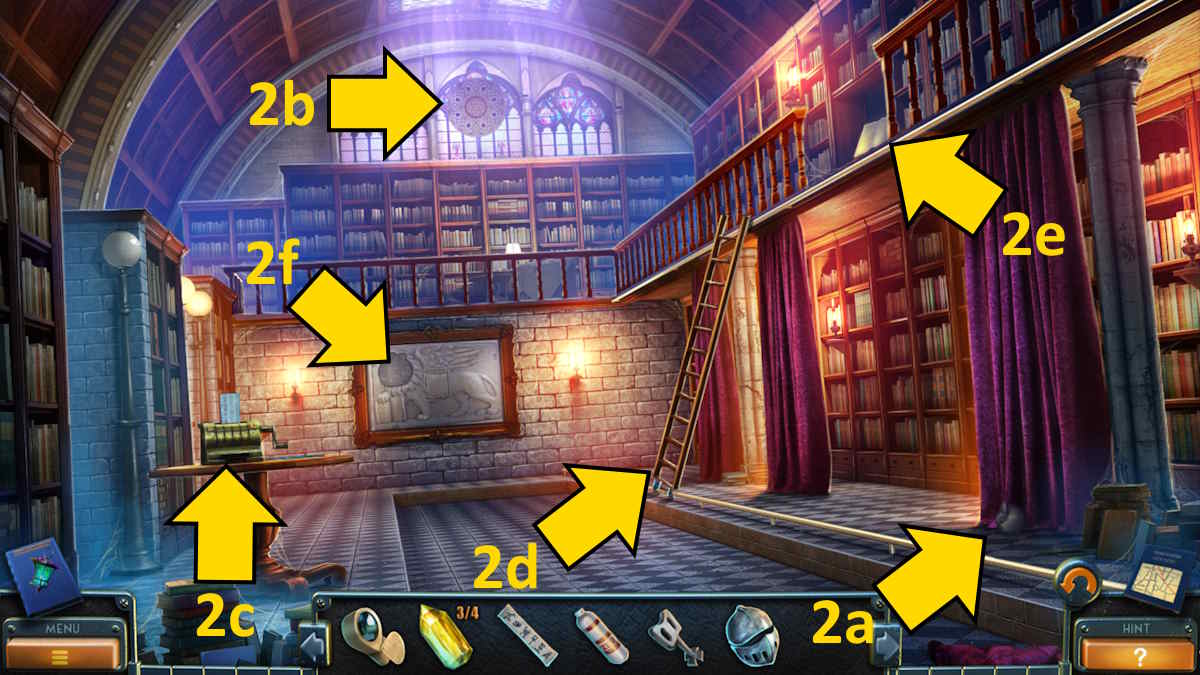
Take the Collectible (that’s one set down!) from the foot of the curtain (2a) and the Morphing Object from the central window (2b). Select the table (2c), take the Pattern, and then move to the hall. Put the pattern on the right side of the book on the lectern (g5) to highlight four symbols, but you can’t do anything more here for now.
Move to the office in the mayor’s bunker next and use the key to open the tall cupboard (o8), then take the Medal from the uniform inside. Go back to Bishop’s office at HQ, add the medal to the display (q4), and take the Key from inside the box. Use this key to open the wall cabinet (q7), take the Powder Sack from inside, and then go down to the subway tunnel.
The arsenal
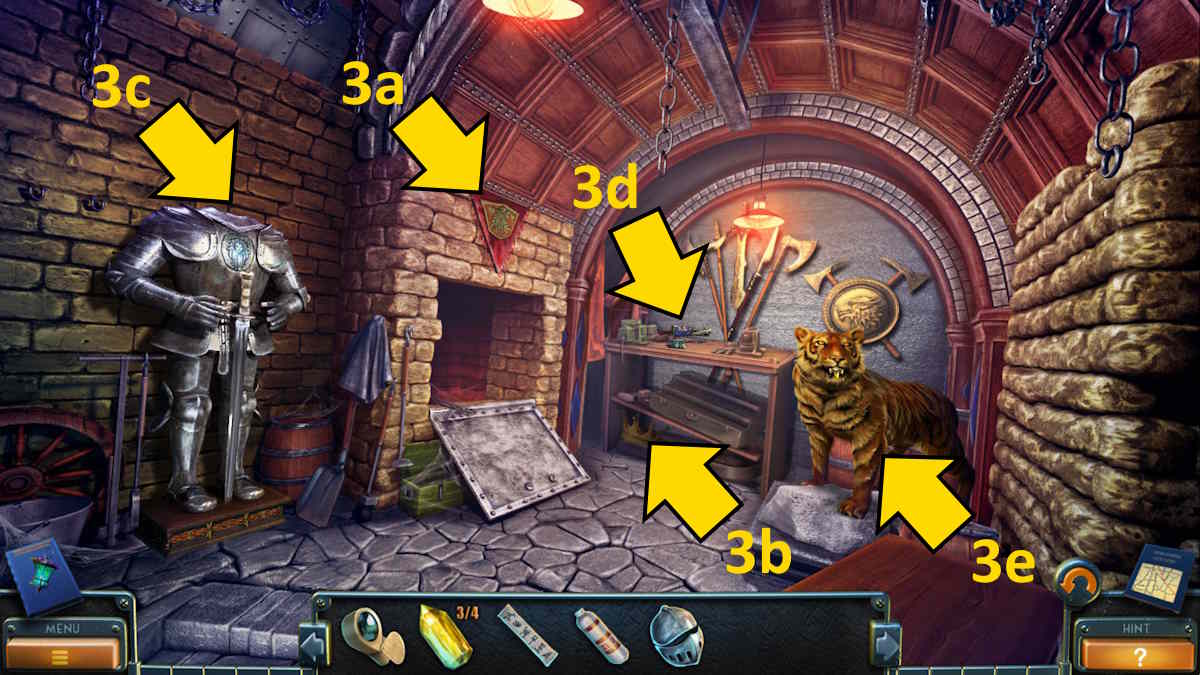
Add the powder to the large rock blocking the door (r3), then click the detonator in the same close-up to blow it up. Move through the now open door and into the arsenal. Take the Collectible from the wall (3a), the Morphing Object from the bottom of the bench (3b), and add the helmet to the suit of armor (3c) to open up the chest plate and take a Boomerang.
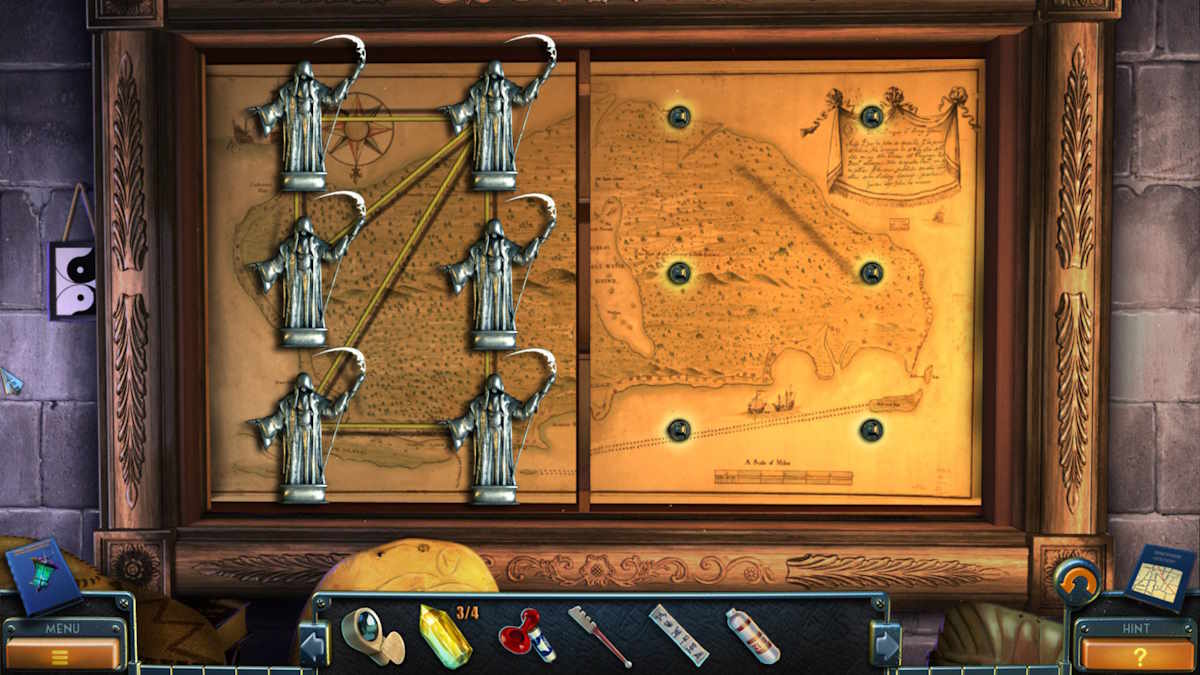
Select the bench (3d) for a close-up, take a Lambda Symbol, a Wheel, and a Card, and then add the tank of B12 to the crossbow here. Go to the subway and use the boomerang to knock down and collect the Expander (r7). Go to the archives and fix the ladder (2d) with the wheel, click the ladder to move it toward you, and then use the magnifier to read the book at the top of the shelves (2e). This gives you the code 9872 for the Empire State Building. Enter this code into the machine on the table (2c), click the handle, and take the Punchcard.
Now move to the Hall of Fame and use the lambda symbol on its corresponding door (i9). When the shelf opens, click it to start a series of six very simple jigsaw puzzles. Once complete, you’ll be able to take your fourth Yellow Crystal.
Completing the weapon
Move to the hall and add the crystals to the chandelier (g2), which will now light the stones below (g9). Use the crank (g8) to put the chandelier back up to the ceiling, press the stones in the order from the clue you got earlier (see above), and then take the Omega Symbol.
Back in the Hall of Fame, use the omega symbol to open the next bookcase (i9) and begin a numbers puzzle. The numbers at each level need to equal the numbers on the right (see the solution below). Once complete, take the Activation Key. Return to the arsenal and use the expander to open the tiger’s mouth (3e) and take the Tower.
Back in the hall, add the tower to the model on the table (g4) and take the Stone Lion Head. Use the lion head in the archives to complete the mural (2f), taking the Medallion from inside. Use the medallion to open the nook in the Hall of Fame fireplace (i3) to get the Tank. Add this to the crossbow on the bench in the arsenal (3d), and take the Weapon.
Now you’re set to tackle Hardstein! Move to the subway tunnel, use the punchcard (r6) to fire up the second subway car (r8), and select it to head toward the Empire State Building.
Chapter 7: The final showdown
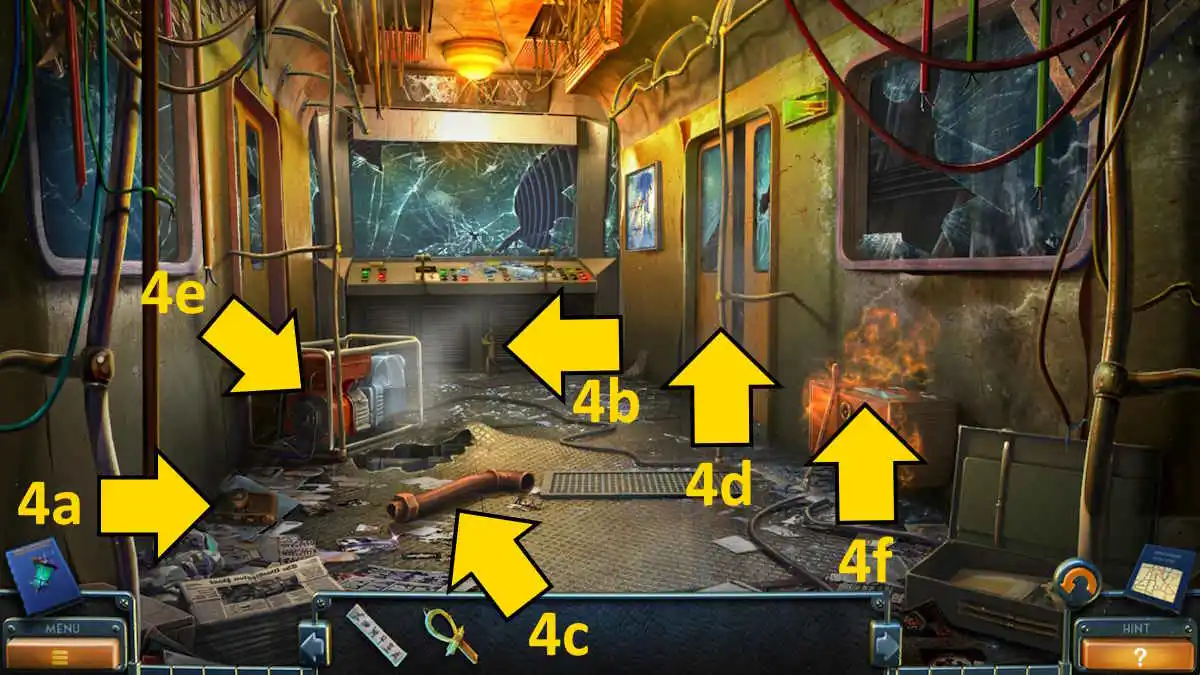
When the subway train crashes, take the Morphing Object from the pile of papers (4a) and the Collectible from below the train control panel (4b). Pick up the Pipe (4c) and place it between the doors (4d) to wedge them open, allowing you to move out onto the subway station.
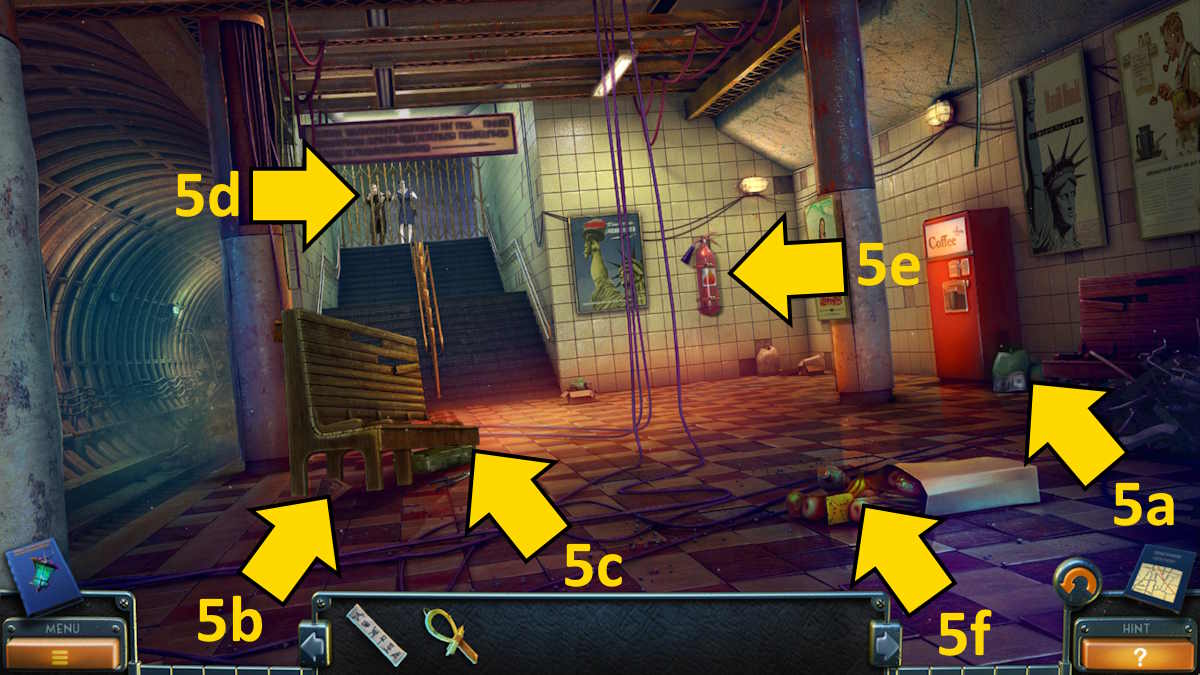
You’ll find the Morphing Object by the coffee machine (5a) and the Collectible under the bench (5b). Grab the Bolt Cutters and Pliers from the bench (5c), then go back into the wagon. Use the pliers on the generator (4e) to power it down, allowing you to reclaim the Weapon in the same close-up. Use the weapon on the zombies at the top of the stairs (5d) in the station, use the bolt cutters to unlock the gate, and move outside.

The Morphing Object is on a post to the right (6a), while the Collectible is near the tree to the left (6b). Take a Wrench from the back of the police car (6c) and then head back into the station. Use the wrench to unhook and take the Fire Extinguisher (5e), use it to put out the fire in the wagon (4f), and take the Crowbar.
Now go back out front and use the crowbar to get into the trunk of the police car (6c) to collect a Pattern and a Card, and pop the old batteries out of the police radio. Select the front of the building (6d) for a close-up, click what looks like a bomb, and add the pattern to start a connections puzzle. Connect the wires as shown above to gain access to the Empire State Building.
Inside the Empire State Building
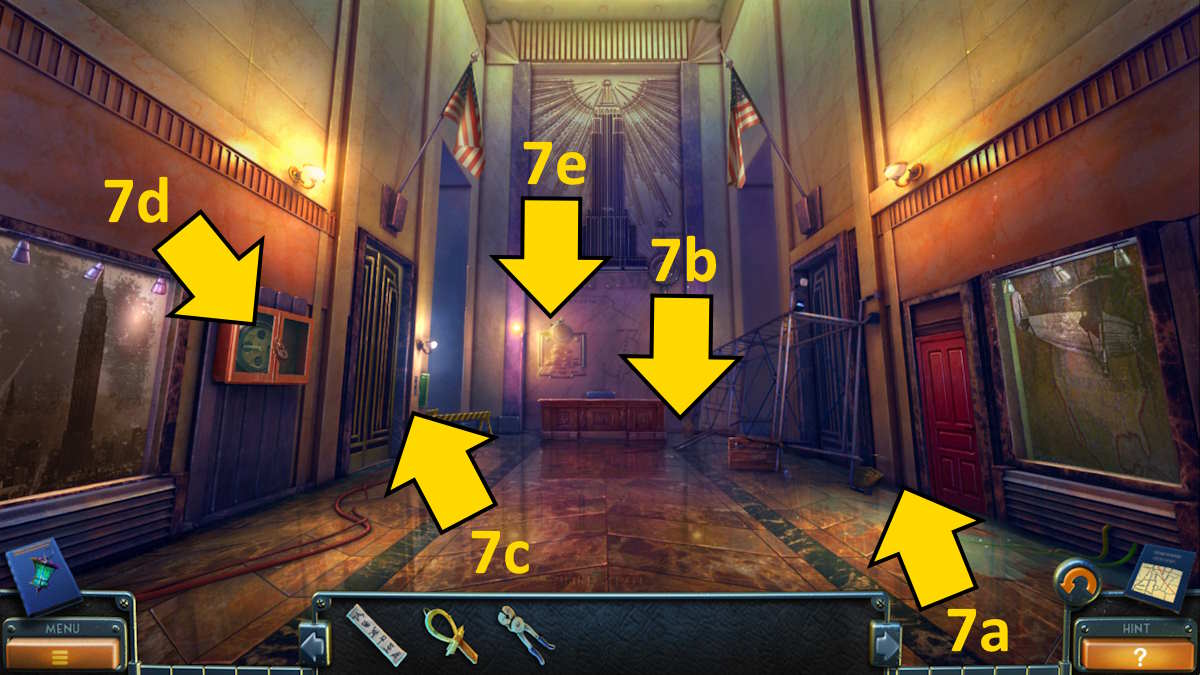
Complete another collection with the Collectible by the red door (7a), and grab the Morphing Object from next to the desk (7b). Take the Piercing Tool from the elevator control panel (7c) before moving back to the station.
Use the piercing tool to remove the Cork from the bottle in the rubbish (5f), then use the cork to open the red box in the wagon (4f) to find some Rubber Boots and a Belt. Use the rubber boots to get past the water in front of the red door (7a) and move through to the security room.
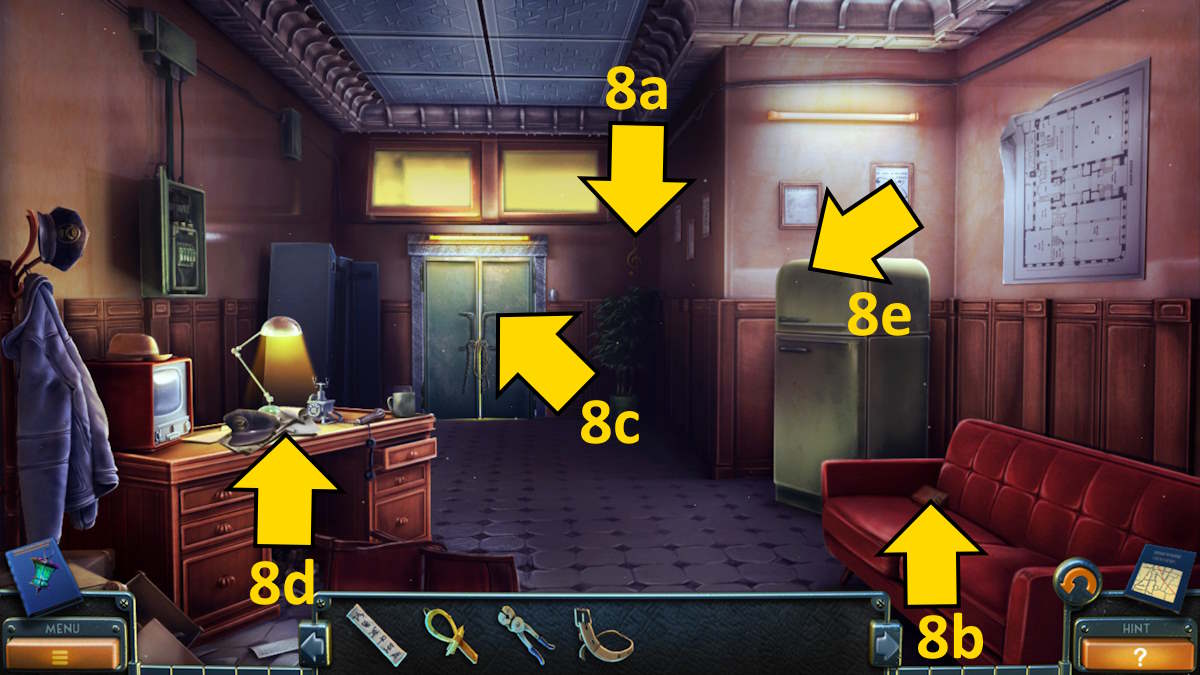
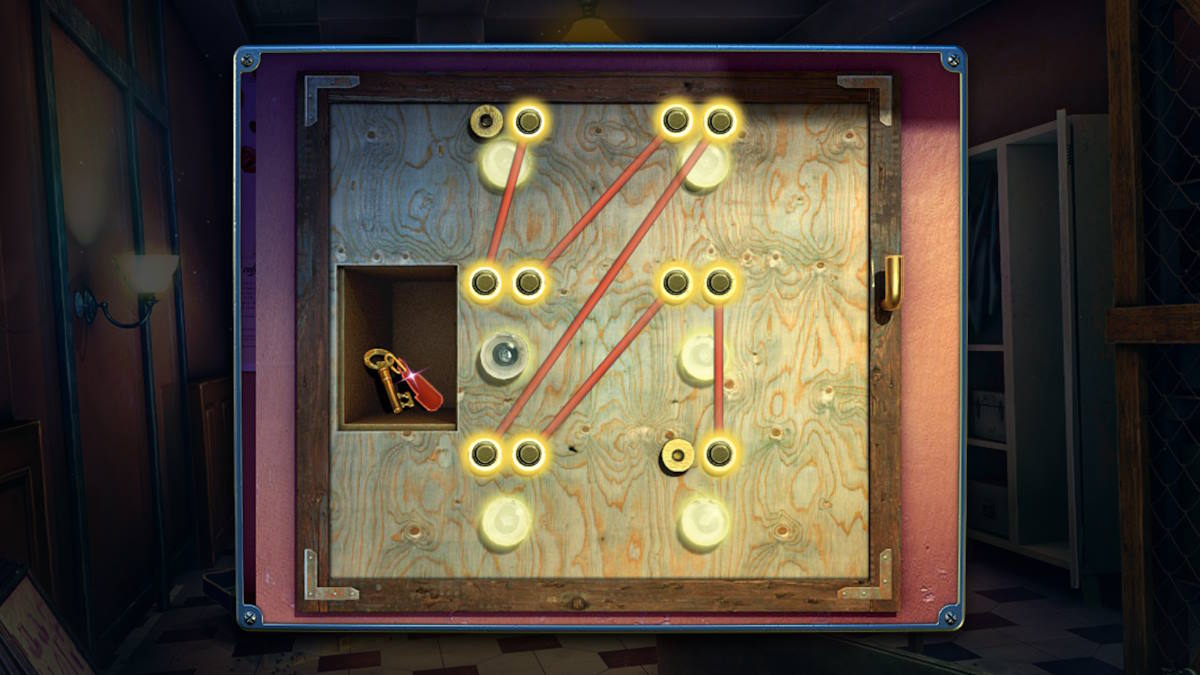
Finish another collection with the Collectible on the wall (8a), and grab the Morphing Object from the couch (8b). Take the Lasso from the door (8c) and use the wirecutters here to break the chain and reveal a missing object mini-game (I’ve shown the wire puzzle section below). Once complete, take the Key. Select the desk next (8d) and click the papers until you find the Electric Prod and a Card.
Return to the hall, use the key to open the fire cupboard (7d), and take the Fire Hose. Go outside, remove the cap from the fire hydrant (6e), and then attach the hose. Remove the batteries from the prod in your inventory, add them to the police radio in the police car trunk (6c), and use the code that the radio gives you (653) to open the box in the trunk and take the Jack.
Go down to the station, use the jack to prop up the bench (5c), and take the Coffee Machine Handle from inside the case there, along with your final Card. Add the handle to the coffee machine (5a), use it, and pour a coffee. Take the Hot Coffee.
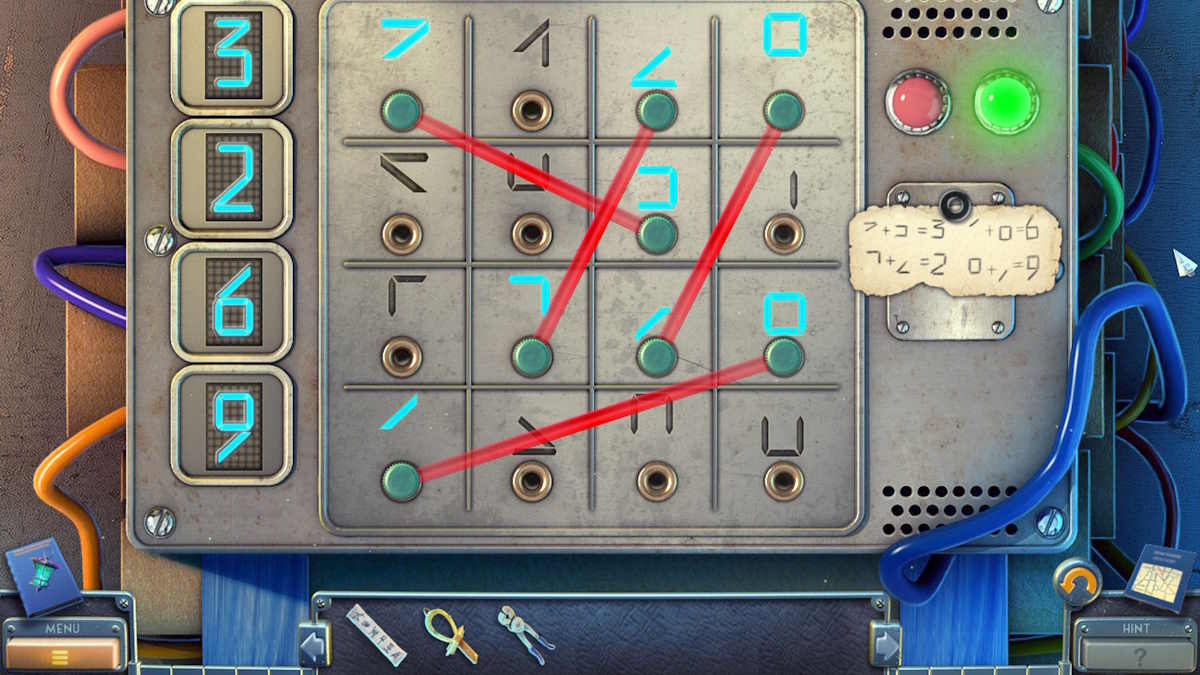
Head back to the security room, open the freezer (8e), and use the coffee to melt the ice and get the Magnet. Add the magnet to the prod in your inventory, and fasten it in place with the belt to get a Magnet on a Stick. Use the stick to get the Fuse from the back wall in the hall (7e), and then add it to the elevator control (7c) to start a puzzle. Put the fuses in the following order:
- 15 sideways at the top
- Upright, from left to right, 10, 25, 5, 30, 20
Once done, click the five switches in the top-right of the close-up and the puzzle is complete. Press the up button on the elevator to open it, go inside, and head up to the observation deck.
The observation deck
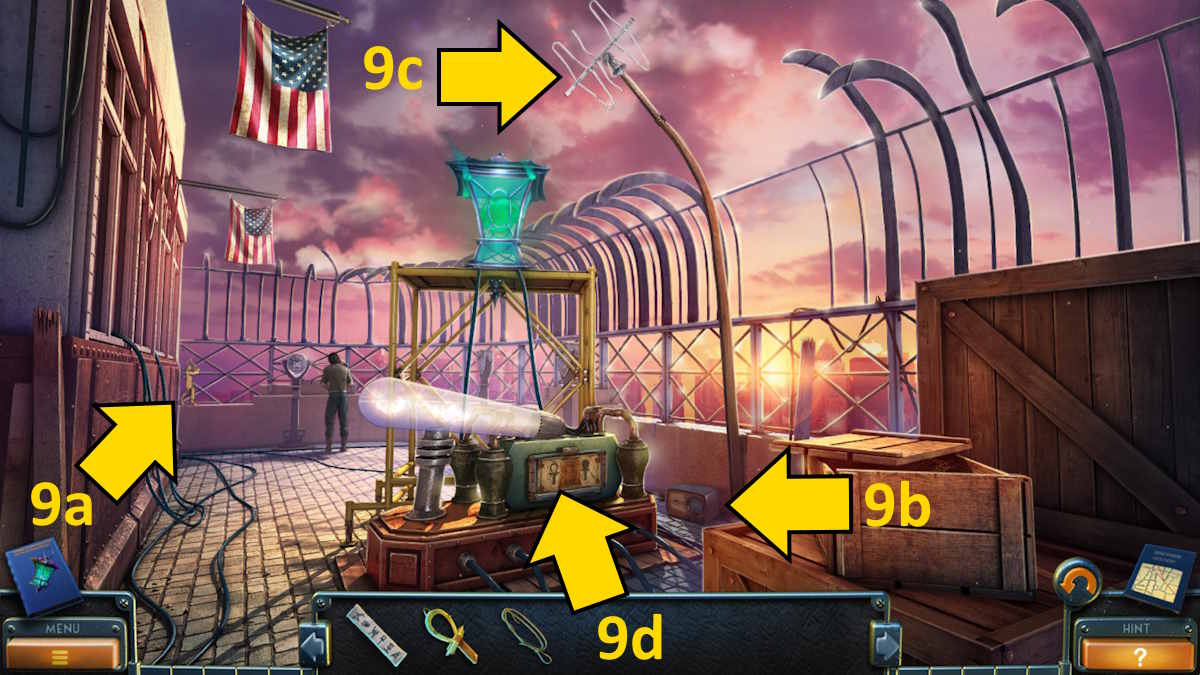
You’ll find the last Collectible on the railing (9a), and the final Morphing Object next to the amplifier (9b). Use the lasso to pull the aerial down (9c) and electrocute Hardstein in the process. He’ll drop the missing key off the side of the building, so head back to the entrance to collect it by using the hose (6a) to wash it down from the signpost (6f). Take the Activation Key.
Go back up to the observation deck, add the two keys to the amplifier (9d), add the symbols diagram, and then rotate the discs to match the symbols. Use the following order to match them all up:

- 4, 3, 2, 1, 4, 3, 2, 5, 4, 5
The lamp will grow dim and the Reaper will be released. Congratulations! You’ve completed New York Mysteries 3 – The Lantern of Souls!
For more tips and puzzle solutions here at Pro Game Guides, check out my New York Mysteries 5 Walkthrough!


